Geo-tagging is the writing of geographical information in image files. BreezeBrowser Pro can automatically geo-tag JPEG and raw files by storing positional information in the form of latitude and longitude read from track log data from a GPS device. This information is written to the standard EXIF GPS shooting data stored in JPEG files and in the XMP sidecar file for other image types.
Many handheld GPS devices can store a track log which can be downloaded to a PC. The track log contains both positional data in the form of latitude and longitude and the time in UTC (aka GMT). BreezeBrowser Pro is able to read the track log data and the time each picture was taken and use this to calculate where the picture was taken. It is important that the camera's clock is set accurately in order for this to work.
Some GPS devices such as the Sony GPS-CS1 GPS Tracker are designed specifically for photography and are very convenient to use with BreezeBrowser Pro. The Sony device is simply turned on before you start taking pictures and automatically logs your position every 15 seconds. BreezeBrowser Pro can read the GPS track logs and store the latitude and longitude in your files by comparing the timestamps of the GPS fixes with the timestamps stored in the shooting data of the images. It can also optionally create a track log file which can be viewed in Google Earth or Google Maps.
With other GPS devices it may be necessary to download the track logs to your PC before geo-tagging your images. BreezeBrowser Pro is able to read track log files in NMEA format with a .log or .nmea file extension. Please consult the manual for your GPS device for information on how to download the track log to your PC.
Adding GPS data to images from GPS track log files
In BreezeBrowser Pro's thumbnail views first select the images to be geo-tagged and the select "Geo-Tag Images using GPS data..." from the Tools menu and the dialog below will be displayed. You can also select this option from BreezeBrowser Pro's main window and the "Tag Selected Images" button will be replaced with "Tag All Images".

Time Settings
It is important that BreezeBrowser Pro is told what time the camera's clock is set to so that it can use the timestamps of the images to read the location data from the GPS track log. Normally both the camera and the computer are both set to local time and you only need to select "Camera is set to local time". If your camera is set to a different time zone from local time "Camera is set to local time" should be unchecked and the time zone offset wrt to GMT should be entered e.g. New York in the summer time (during DST) is four hours behind GMT and so a value of -4 for should be entered for the offset from GMT.
If your camera clock is out by a few minutes you can compensate for this by entering a value in the "Camera clock error" field.
If you are unsure that the time settings have been set correctly you can check them by comparing the "Camera time" display with the current time displayed in the setup menus on your camera.
The "GPS fix window" setting specifies how close the time of a GPS fix in the track log needs to be to the time the picture was taken for it to be accepted. Setting a large value will increase the chances that a GPS fix will be found in the track log but it may not be very accurate if the GPS track log has gaps in its data e.g. if you turn the GPS on, take some pictures in one location for a while then turn the GPS off, drive to a new location and forget to turn the GPS on again before taking more pictures BreezeBrowser Pro will record the first location for the second set of pictures if the "GPS fix window" is set to a large value. If the "GPS fix window" is set to a small value (smaller than the time to drive from the first location to the second location) it won't find a suitable GPS fix in the track log.
Please note: Setting a large value for the "GPS fix window" only affects the accuracy of the GPS data stored in the image if there are gaps in the GPS track log. If the GPS track log contains a fix within a few seconds of when the picture was taken an accurate position will be stored in the shooting data of the image even if the "GPS fix window" is set to a large value.
Track Log Settings
BreezeBrowser Pro also needs to know where to find the GPS track log files and this is specified in the "Track log settings" section.
Some GPS devices such as the Sony GPS-CS1 simply need to be connected to the PC using a USB cable and they will appear as a removable drive. With these types of devices BreezeBrowser Pro will be able to find the track log files when the "Search removable drives" option is selected.
GPS receivers such as the Garmin etrex Venture CX can also be used in this way provided the track logs are stored on a data card and the USB Mass Storage interface option is selected (please see the GPS receiver's manual for details).
Many other GPS devices can't be connected directly to a PC as a removable drive and it is necessary to download the track log files to the PC. With this type of device you need to download the track log files to your PC and enter the location of the track log folder in the GPS settings dialog before geo-tagging your photos.
A summary of the track log files showing the number of GPS fixes they contain and their start and end times can be displayed by pressing the "Check..." button.
BreezeBrowser Pro reads standard NMEA track log files with a .log or .nmea file extension and GPX or Garmin ForeTrex XML files with a .gpx or .xml file extension.
BreezeBrowser Pro can generate a track log file that can be viewed using Google Earth or online using Google Maps. To do this simply select the type of track log files you require and specify an output folder where BreezeBrowser Pro should write the files. Google Earth track log files have a .kml file extension and can be viewed by double clicking on the file in Windows Explorer. Google Maps track log files are web pages and have a .htm file extension. They can be viewed in a web browser by double clicking on the file in Windows Explorer.
Please note: Google Earth needs to be installed on your computer in order to view Google Earth track log files. A free download is available on the Google Earth web site. If you wish to display Google Maps on your website you will need to obtain a Google Maps API key from http://www.google.com/apis/maps/ (this is free for consumer use) and enter this in the "Google Maps Key" field in the GPS Settings dialog.
GPS Accuracy
GPS devices are typically accurate to around 10 or 20 meters and usually write track log data at regular intervals e.g. every 15 secs. Some GPS devices also store altitude data in the track log file but this tends to be less accurate the the positional data (latitude and longitude). BreezeBrowser Pro reads the time the picture was taken using the shooting data stored in the image and uses this to interpolate the position using the location data stored in the track log file.
Please note: Track log data usually isn't written if there is no GPS signal which can happen in built up areas with tall buildings, in tunnels or inside buildings. When this happens BreezeBrowser Pro will interpolate between the nearest GPS location data from when a picture was taken and this may result in an inaccurate position.
Manually adding GPS data using Google Earth
Please note: Google Earth no longer supports the API used by BreezeBrowser Pro and so this feature has been removed in BreezeBrowser Pro v1.9.10 onwards.
BreezeBrowser Pro can also read latitude and longitude data from Google Earth and store this in the shooting data of the files. To do this simply select the "Geo-Tag Images using Google Earth" from the Tools menu and the main BreezeBrowser Pro window will be replaced by the Geo-Tagging window below and Google Earth will be started if it is not running already.
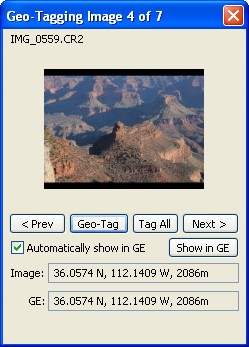
The geo-tagging window will stay on top of other windows to make it easier to use in conjunction with Google Earth.
Use the "< Prev" and "Next >" buttons to step through the images to be geo-tagged. Then move the cursor in the Google Earth window over the position where the photo was taken and press the "Geo-Tag" button in the geo-tagging window. The latitude, longitude and altitude data read from the Google Earth window will be written to image and the next image will be automatically displayed. Press the "Tag All" button to add the current GPS data to all images (overwriting any GPS data which may already be stored in the images).
The latitude, longitude and altitude of the view currently displayed in the Google Earth window is displayed at the bottom of the geo-tagging window (labeled "GE:"). If the image already contains GPS data this will be displayed in the "Image:" line and the "Show in GE" button will be enabled. Clicking on the "Show in GE" button will update Google Earth to display the position to show the image's latitude and longitude. If the "Automatically show in GE" check box is selected the Google Earth window will be automatically updated to show the image latitude and longitude when the "< Prev" and "Next >" buttons are pressed.
A larger image can be displayed by clicking on the thumbnail image in the geo-tagging window.
Press the escape key or click on the red close box to exit the geo-tagging window and display the main BreezeBrowser Pro window again.
Please note:
| 1. | Google Earth needs to be installed on your computer and it must have an internet connection in order to geo-tag images. Google Earth can be downloaded free from http://earth.google.com |
| 2. | Altitude data may not be available for all locations and is only displayed when the "Terrain" layer is selected in Google Earth (the Geo-Tagging dialog will select the "Terrain" layer automatically when it starts up). |