This example shows how BreezeBrowser Pro's kiosk mode can be used together with our Hotfolder Prints and photobooth software to allow users to select photos for reprinting or emailing.
In this example let's assume that the photobooth software is setup to save the photos in the folder C:\Photos\2011-05-17. The output mode in the photobooth software should be set to "Print and save JPEG copy" or "JPEG copy only" so that a JPEG copy of the printed layout is saved. The JPEG copy of the printed layout will be saved in a subfolder named "Prints" i.e. the folder C:\Photos\2011-05-17\Prints. The filename of the JPEG copy of the printed layout is the date and time that the first photo in the sequence was taken e.g. 20110517-195032.JPG.
The photobooth software should be setup so that the JPEG copy of the printed output is formatted correctly for printing (this will normally be the case if the photobooth software's output option is set to "Print and save JPEG copy"). BreezeBrowser Pro should be setup to display images in this folder, C:\Photos\2011-05-17\Prints, so that when the print menu option is selected the JPEG copy of the printed output is sent to the printer.
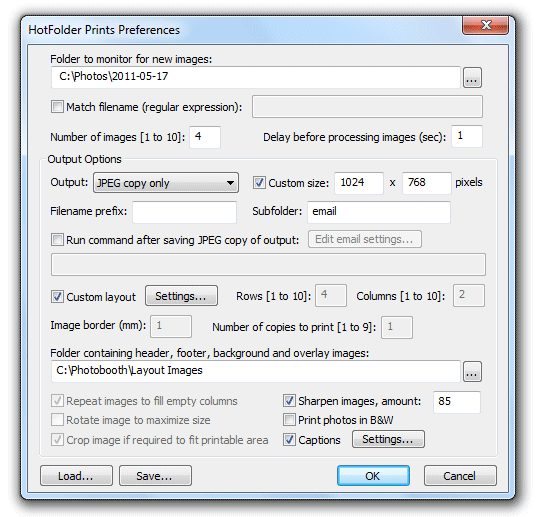
The JPEG copy of the printed output isn't really suitable for emailing to users. The files tend to be very large and formatted for printing (e.g. a traditional vertical strip of four photos) rather than screen display. Our Hotfolder Prints software will monitor the folder where the photos are downloaded and saved from the camera and save them in a layout suitable for emailing to users e.g. a 2 x 2 grid of photos at a typical screen resolution of 1024x768 pixels together with your company logo and contact details. To set this up the output mode in Hotfolder Prints should be set to "JPEG copy only" so that a JPEG copy of the print layout is saved. The filename of the JPEG copy uses the same method as our photobooth software and is generated using the date and time of the first photo in the sequence. The filename prefix should be left blank and the subfolder should be set to "email". The Hotfolder Prints preference will look something like:

This will make sure that the photobooth software creates a JPEG copy of the printed output in the "Prints" subfolder and Hotfolder Prints creates a JPEG of the same name suitable for emailing in the "email" subfolder.
Summary of the different folders being used:
C:\Photos\2011-05-17 |
folder where individual photos from the photobooth are saved e.g IMG_0001.JPG, IMG_0002.JPG, IMG_0003.JPG and IMG_0004.JPG |
C:\Photos\2011-05-17\Prints |
folder where a copy of the printed layout is saved by the photobooth software e.g. 20110517-195032.JPG |
C:\Photos\2011-05-17\email |
folder where a copy photos formatted for emailing is saved by Hotfolder Prints e.g. 20110517-195032.JPG |
|
|
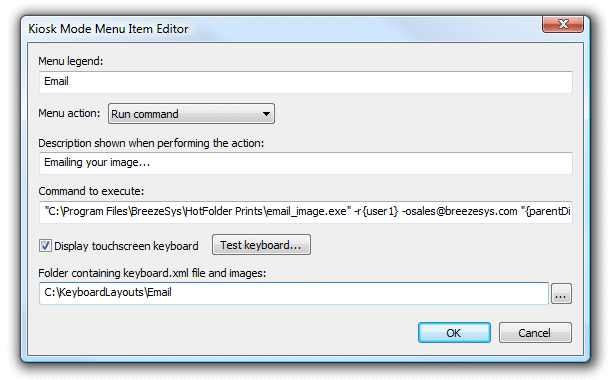
BreezeBrowser Pro should set to monitor the "Prints" folder and a kiosk mode menu entry created to print the photos. A second kiosk mode menu entry can then be created to email the images stored in the "email" subfolder. The Kiosk menu menu item editor dialog should look something like this:

The command to execute should call the Hotfolder Prints email_image.exe command and pass it the JPEG image that has been formatted for emailing (which is in the "email" subfolder. To do this the image pathname is defined as {parentDir}\email\{file}. This is because BreezeBrowser Pro is viewing images in the "Prints" folder: C:\Photos\2011-05-17\Prints and we need to email the image in the "email" folder C:\Photos\2011-05-17\email. The token {parentDir} returns the path C:\Photos\2011-05-17 and so {parentDir}\email gives the correct folder: C:\Photos\2011-05-17\email and we just need to add the filename using the token {file}. The command will look something like this:
"C:\Program Files\BreezeSys\HotFolder Prints\email_image.exe" -r{user1} -osales@breezesys.com -s"Photos from John's Birthday" "{parentDir}\email\{file}"
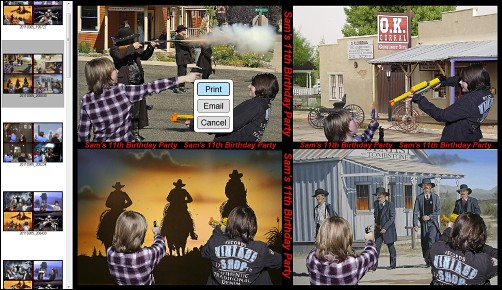
When kiosk mode is selected the user will see a screen similar to the one below. As more photo booth images are taken during the course of the event they are added to the list of thumbnails down the left hand side. The user can print an image by touching the main image and selecting "Print" from the menu.

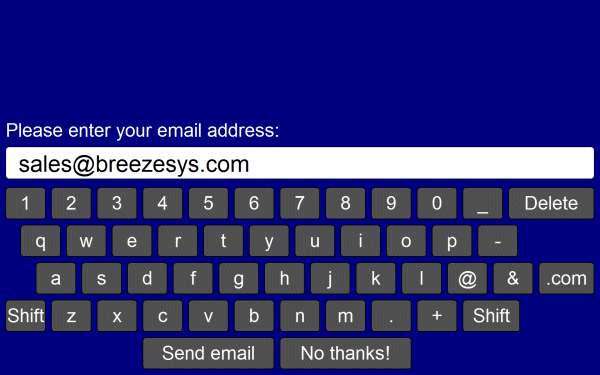
The user can email an image by touching the image and selecting "Email" from the menu. When the user selects "Email" the touchscreen keyboard is displayed so that they can enter their email address. The screenshot below shows the default keyboard layout which can be customized if required (please see the section on the touchscreen keyboard for details).

If the user enters their email address and then the "Send email" key the touchscreen keyboard is dismissed and the email address can be passed to the command using the {user1} token:
"C:\Program Files\BreezeSys\HotFolder Prints\email_image.exe" -r{user1} -osales@breezesys.com -s"Photos from John's Birthday" "{parentDir}\email\{file}"