Hotfolder Prints monitors a folder for new JPEG or PNG image files and automatically formats them into a page and prints them. The images can be formatted using the automatic layout or custom layout options. The automatic layout option is suitable for simple layouts where the images are arranged in a grid. The custom layout option offers precise control over the size, position and rotation of each image and is suitable for more complicated layouts.
To setup Hotfolder Prints click on the "File" menu and select "Preferences..." and the dialog below will be displayed:
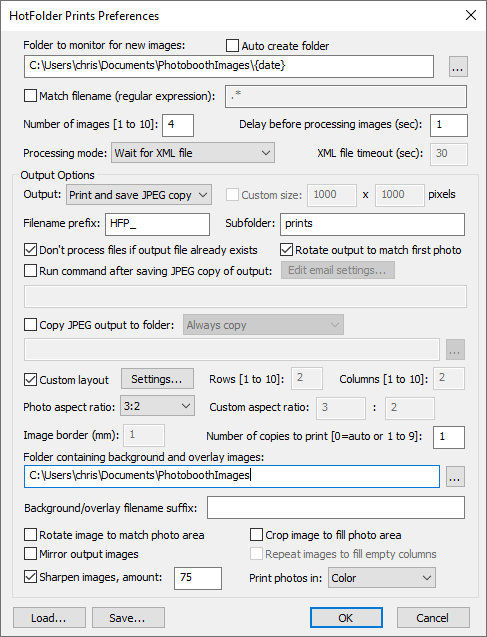
Select the folder to monitor by pressing the "..." browse button to the right of the text area headed "Folder to monitor for new images". The folder path can also include date based tokens e.g. C:\Photobooth\%Y-%m-%D. The folder path is checked every 60 seconds and updated if it has changed. Select the "Auto create folder" if you want Hotfolder Prints to create the folder to be monitored if it doesn't exist.
Then specify the number of images to be used in each layout. When Hotfolder Prints is running it will monitor the folder for new JPEG files. Once it has detected the required number of images it will automatically format and print them.
The "Match filename (regular expression):" option normally isn't needed and can be left unchecked. You only need to use this option if you want Hotfolder Prints to only process some of the images added to the folder being monitored e.g. to process even numbered files and ignore odd numbered files the regular expression should be set to .*[02468]\.JPG
Please note: an explanation of how to use regular expressions is beyond the scope of this help file. There are many websites with more information about using regular expressions.
Select the processing mode from the "Processing mode:" dropdown list. There are three options described below. The "Wait for XML file" option is the recommended setting if you are using Hotfolder Prints with our photo booth software.
"Wait for JPEGs" |
Hotfolder Prints will monitor the folder for new JPEG images and will process them when enough images are available |
"Wait for PNGs" |
Hotfolder Prints will monitor the folder for new PNG images and will process them when enough images are available |
"Wait for JPEGs or PNGs" |
Hotfolder Prints will monitor the folder for new JPEG or PNG images and will process them when enough images are available |
"Wait for videos" |
Hotfolder Prints will monitor the folder for new MP4 or MOV videos and will process them when enough videos are available by extracting a still image from each video. Use the "Secs into video" setting to specify where in the video the still image should be extracted e.g. if the video has a 3 sec intro section "Secs into video" could be set to 4 seconds to skip the intro. |
"Wait for XML file" |
Hotfolder Prints will monitor the folder for new XML files. Hotfolder Prints will then read the XML file for a list of JPEG images to process. The XML file should be in the same format as the XML summary file written by Breeze Systems' photo booth software. This is the recommended option if you are using Hotfolder Prints with our photo booth software. |
"Wait for XML file with timeout" |
This is the same as the "Wait for JPEGs option" except that Hotfolder Prints will wait for an XML file with the same name as the first JPEG in the set. The JPEG images will be processed if the timeout occurs before the XML file is found. |
The delay before processing images can be set to any value from 0 to 120 seconds. Normally a value of 1 second should be fine, but it may be necessary to use a larger delay if images take a long time to copy to the hot folder. A longer delay may also be required to allow users time to enter their email address when using Hotfolder Prints with the touchscreen keyboard option in our photo booth software. Alternatively select the "Wait for XML file" processing option and Hotfolder Prints will wait until the photo booth software has written the XML file containing the user's email address before it starts processing the images.
Use the output dropdown list to specify how the formatted layouts should be output. The "Print only" option will print the layout using the currently selected printer. The "JPEG copy only" option will save a JPEG copy of the layout in a subfolder of the folder being monitored named "Prints". The "Print and save JPEG copy" option will print the layout and save a copy in the "Prints" subfolder. When the output is set to "Print only" or "Print and save JPEG copy" the page size is is defined by the current printer settings. When the output is set to "JPEG copy only" a custom page size can be defined by selecting the custom size checkbox and entering the page width and height in pixels.
An optional prefix can be added to the filenames of JPEG copies of the layout to help identify them. The JPEG copies should be saved in a different folder from the hot folder being monitored and this should be specified using the "Sub folder" field. The default settings are for filenames to be prefixed by HFP_ and to the JPEG copies to be saved in a subfolder named "prints". The filename will be the filename prefix plus the date and time of the first image in the current set in the form YYYYMMDD_hhmmss e.g. if the first image was taken at 20:30:05 on 12th August 2012 the filename will be HFP_20120812_203005.jpg. This can be overridden by using tokens in the filename prefix e.g. setting the filename prefix to %o will save the JPEG file using the same filename as the first photo in the sequence. Please see the section on Tokens for a list of available tokens.
If there is already a filename of the same name in the folder an underscore followed by a number will be added to the filename to prevent the existing file from being overwritten.
The "Don't process files if output file already exists" option is useful when using the File->Rescan XML files option. When "Don't process files if output file already exists" is set Hotfolder Prints checks the output filename and if it already exists it doesn't process the file again. If "Don't process files if output file already exists" is set Hotfolder Prints will create a new copy of the file (with a _1 suffix) if the output file already exists.
The "Background/overlay filename suffix" setting provides a way to select different backgrounds and overlays for prints. This setting can use tokens to provide values that are read at run time e.g. random numbers or data entered in the survey screens. For example to add a randomly selected overlay to a print layout the "Background/overlay filename suffix" could be set to random{random,1,3}. The token {random,1,3} evaluates to a random number between 1 and 3 giving a randomly generated suffix. When preparing the print layout the software will look for an overlay named overlay_random1.png, overlay_random2.png or overlay_random3.png depending on the random number. If it can't find an overlay file with the filename suffix it will use the standard filename, overlay.png, instead.
The "Rotate output to match first photo" will rotate the JPEG copy of the print output to match the EXIF orientation of the first photo added to the print layout. This option is useful for processing single photos which may have different orientations e.g. backend processing for a virtual photo booth which receives photos from cell phones which could be shot in portrait or landscape orientation.
An optional command can be run after saving the JPEG copy of the output by selecting the checkbox and entering the command in the text edit area. This command could be used to automatically upload the JPEG to a site such as Flickr or Facebook or to email a copy of the photo to the users. Please see the section on uploading to photo sharing and social networking sites for more details.
The JPEG copy of the output can also be copied to another folder e.g. for automatic uploading to Facebook. To use this select the "Copy JPEG output to folder:" option and enter the destination folder in the text area. Use the dropdown list to control when the JPEG images should be copied. The options are "Always copy", "Only copy if <chkbox1> is set" and "Only copy if <chkbox2> is set". <chkbox1> and <chkbox2> refer to information read from the XML status file written by our photo booth software. Please see the section on uploading to photo sharing and social networking sites for more details.
Please note: The command run on the JPEG output and the JPEG copy options are not available when the output setting is "Print only"
The printer can be setup by selecting "Printer Setup..." from the "File" menu in the main window.
Tip: To save having to setup the printer preferences every time Hotfolder Prints is run you can go to the Windows Control Panel, select "Printers and Faxes" then right click on the printer to change its preferences.
Set the number of copies of to print to the required number or to 0 for automatic. When the automatic option is selected the number of prints is read from the XML summary file written by Breeze Sytems' photo booth software. This allows the number of prints to be set using the photobooth software. If Hotfolder Prints can't find the XML summary file it will print one copy.
Next define the print layout using the automatic layout option or the custom layout option.
The images can be sharpened by selecting the "Sharpen images" checkbox and specifying a sharpening amount in the range 0 to 100. The amount of sharpening required depends on personal taste, the camera and the printer. A value of around 75 is a good starting point.
Use the "Print photos in:" dropdown list to select whether the photos should be printed in color, black and white or "Auto color/B&W". The "Auto color/B&W" option will read the <bw_mode> tag in the XML summary file written by Breeze Systems' photo booth software to determine whether to print the photos in color, B&W or B&W (toned). This will default to color if the XML file is not found or it does not contain a <bw_mode> tag. "Auto color/B&W" is the recommended when using Hotfolder Prints with our photo booth software as this will ensure Hotfolder Prints processes the JPEGs with the same color/B&W/B&W toning settings as selected in the photo booth software.
When using the auto layout option up to two captions can be added to the layout. These could be used to personalize the prints by adding the name of the event or to include information such as the date and time to make it easier to identify the layout for reprints. Please see the section on adding captions for more details.
When using the custom layout option captions can be added using the print layout editor.
Example photo booth summary XML file
The sample photo booth summary XML file below was created using Breeze Systems' Webcam Photobooth software. The XML summary files written by our other photo booth software (DSLR Remote Pro for Windows, NKRemote and PSRemote) have a similar formats:
<?xml version="1.0" ?>
<breeze_systems_photobooth version="1.1">
<photo_information>
<date>2013/04/16</date>
<time>09:16:20</time>
<user_data>sales@breezesys.com</user_data>
<prints>1</prints>
<photobooth_images_folder>C:\Users\Chris\Documents\PhotoboothImages\example</photobooth_images_folder>
<caption1></caption1>
<caption2></caption2>
<bw_mode hue="200" saturation="200">2</bw_mode>
<photos>
<photo image="1">20130416_091620.jpg</photo>
<photo image="2">20130416_091625.jpg</photo>
<photo image="3">20130416_091630.jpg</photo>
<photo image="4">20130416_091635.jpg</photo>
<output>prints\130416_091620.jpg</output>
</photos>
</photo_information>
</breeze_systems_photobooth>
The {user_data} used in the email command will read the value "sales@breezesys.com" from the <user_data> tag. The auto prints option will read the value 1 from the <prints> tag. The auto color/B&W option will read the value 2 and the attributes hue=200 and saturation from the <bw_mode> tag. This will print the photos as B&W toned with a hue of 200 and saturation of 40 to give a monochrome sepia look. The <bw_mode> tag can also be set to 0 for color or 1 for B&W without toning.
When the processing mode is set to "Wait for XML file" the following filenames of images to process will be read from the XML file: 20130416_091620.jpg, 20130416_091625.jpg, 20130416_091630.jpg, 20130416_091635.jpg
Saving settings for future reference
Settings can be saved to file for future reference by pressing the "Save..." button and reloaded by pressing the "Load..." button. Please note that layout depends on the size of the page which is affected by the printer settings. The current printer settings are saved to file with the other settings and reloaded when loading the settings from file.
You can load settings from file at startup by dragging and dropping a settings file onto the Hotfolder Prints desktop shortcut or by right clicking on the Hotfolder Prints desktop shortcut, selecting properties and adding the pathname to settings file to the "Target" (or command line).
Hotfolder Prints can also read print layouts saved using our other photobooth products: DSLR Remote Pro for Windows, PSRemote, Webcam Photobooth and NKRemote.
In Operation
When Hotfolder Prints is running the main window look something like the screenshot below:
The name of the folder being monitored is displayed in the window title bar (C:\Photobooth\2012-01-17 in the example above). The main part of the window shows an activity log and the current status is summarized in the status bar at the bottom of the window.
The number of copies to print of each layout can be specified using the "Settings" menu or by typing Ctrl+1, Ctrl+2, Ctrl+3, Ctrl+4 or Ctrl+5.
The settings menu also has an option to print images in color or black and white.
When Hotfolder Prints adds a new file it also takes a copy of the settings (number of copies and whether to print in color or B&W) and will use these settings when the images are printed.
The queue can be emptied by selecting "Reset" from the "File" menu or by typing Ctrl+R. This will remove all pending images from the queue including any images being prepared for printing.
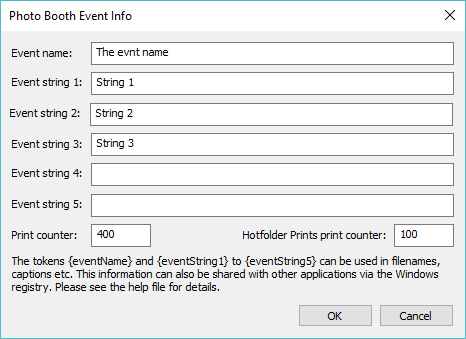
Event information can be defined and used in filenames, captions etc. in Hotfolder Prints. The event information is also read by the Twitter Hashtag Monitor, the SmugMug Uploader and Breeze Viewer slideshow software.
The information is saved in the Windows registry so that it may be shared with other applications and is read from the Windows registry before it is used so that it can use information supplied by other applications. The "Photo Booth Event Info" dialog can be displayed by selecting "Event info..." from the File menu):
The information is also saved in the Windows registry using the registry key: HKEY_CURRENT_USER\Software\BreezeSystems\Event Info.
Please note: Do not use the characters \ / : * ? " | < > in the event info if it is going to be used to define filenames. Windows does not allow these characters to be used in filenames and this may prevent the files from being saved.
Item |
Token |
Registry value |
Event name |
{eventName} |
HKEY_CURRENT_USER\Software\BreezeSystems\Event Info\EventName |
Event string 1 |
{eventString1} |
HKEY_CURRENT_USER\Software\BreezeSystems\Event Info\EventString1 |
Event string 2 |
{eventString2} |
HKEY_CURRENT_USER\Software\BreezeSystems\Event Info\EventString2 |
Event string 3 |
{eventString3} |
HKEY_CURRENT_USER\Software\BreezeSystems\Event Info\EventString3 |
Event string 4 |
{eventString4} |
HKEY_CURRENT_USER\Software\BreezeSystems\Event Info\EventString4 |
Event string 5 |
{eventString5} |
HKEY_CURRENT_USER\Software\BreezeSystems\Event Info\EventString5 |
Print counter |
{eventPrintCounter} |
HKEY_CURRENT_USER\Software\BreezeSystems\Event Info\PrintCounter |
Two print counters are available:
| 1. | "Print counter" - this is a print counter shared via the Windows registry with other apps (e.g. DSLR Remote Pro or Breeze Kiosk) and is decremented each time any app prints a photo |
| 2. | "Hotfolder Prints print counter" - this is a private print counter only used by Hotfolder Prints. The counter is decremented each time a photo is printed. |