Focus stacking is a technique for increasing the depth of field by taking a series of photographs with different focus settings and then combining them together using the areas in focus from each image. This technique is useful for macro and close-up photography, landscapes, product photography and any other image where the depth of field is critical and the subject isn't moving.
The live view display in NKRemote makes it simple to automate the process of taking a sequence of images with different focus settings by running a script. Once the pictures have been taken they can be combined using free software such as CombineZM or commercial software like Helicon Focus (the example on this page was combined using CombineZM).
Please note: The photos below were taken using our DSLR Remote Pro software for Canon EOS digital SLRs. Focus stacking using NKRemote and a Nikon DSLR will produce similar results.
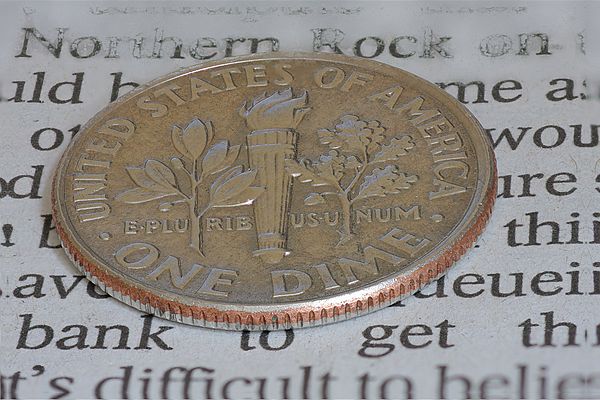
Image combined using CombineZM from a series of 40 individual shots shot taken with a Canon EOS 40D and Tamron 90mm macro lens set f/5. This is a full frame image which has been resized to fit on the page and shows the edge effects to the left and right of the image resulting in the text being reflected and also edge effects at the top and bottom. These can easily be cropped from the final image but it is worth noting that it is a good idea not to frame the image too tightly when taking the photos.

Single shot taken with Canon EOS 40D with Tamron 90mm macro lens at f/5. A smaller aperture could have been used to get greater depth of field but the image quality would be affected due to diffraction effects if too small an aperture is used. One of the advantages of the focus stacking technique is the lens can be set at its optimum aperture to give the best possible quality.
How to take the photos using NKRemote
What do you need?
| 1. | A Nikon DSLR which supports live view e.g. Nikon D7200, Nikon D7100, Nikon D7000, Nikon D5500, Nikon D5300, Nikon D5200, Nikon D5100, Nikon D5000, Nikon D90, Nikon D300, Nikon D300s, Nikon D610, Nikon D600, Nikon D750, Nikon D700, Nikon D810, Nikon D800, Nikon D800E, Nikon D3s, Nikon D3, Nikon D3X, Nikon D4S, Nikon D4 |
| 2. | A copy of NKRemote (you can use the free trial version for 15-days) and a USB cable connecting your camera to your computer |
| 3. | A sturdy tripod to hold the camera steady while taking the sequence |
| 4. | AutoHotKey - a free scripting tool which can be downloaded from http://www.autohotkey.com |
| 5. | focus_stacking.ahk - an AutoHotKey script for taking the photos and adjusting the focus which can be found in the NKRemote installation folder (usually C:\Program Files\BreezeSys\NKRemote) |
| 6. | CombineZM - a free program for combining the images (download CombineZM) |
First mount the camera on the tripod, select manual exposure mode and compose the shot, roughly focusing the lens on the subject. Then connect the camera to your PC using the USB cable and run NKRemote. Activate the live view on the PC by typing Ctrl+L and use the mouse wheel or cursor keys focus the lens on the nearest part of the subject. Finally, double click on the focus_stacking.ahk file to run the script to take the photos. NKRemote's live view window will appear and a sequence of shots with different focus settings will be taken. Please don't touch you computer while the sequence is being taken otherwise it may not work properly.
By default the focus_stacking.ahk script will take 30 images. This can be changed either by editing the script using a text editor or by running the script from the Windows Command Prompt and specifying the number of images on the command line e.g.
C:\> focus_stacking.ahk 15
Combining the images (or focus stack)
Run CombineZM and select "New" from the "File" menu. Locate the folder containing the images taken earlier, select all the images in the file open dialog and click "Open". CombineZM will load the images (this may take a few seconds). Then select "Do Stack" from the "Macro" menu to combine the image (this may take a few minutes). When it has finished the combined image will be displayed in CombineZM's main window. The image can be saved by selecting "Save Frame/Picture As" from the "File" menu.