After taking the photos a screen allowing users to sign the prints or draw on them can be displayed by selecting the "Sign or draw on photos before printing" option in the "Output Settings" dialog.
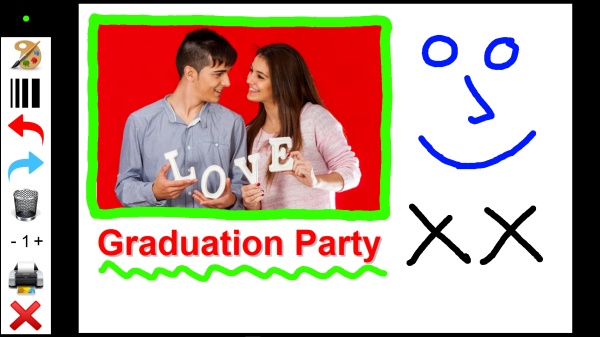
The print layout is displayed full screen with a menubar down the left hand side. The current line width and pen color is displayed in the top left hand corner. Users can sign their print or draw on it using a touchscreen or mouse. Tapping the color palette icon in the menubar will display a panel of colors allowing users to choose the pen color:
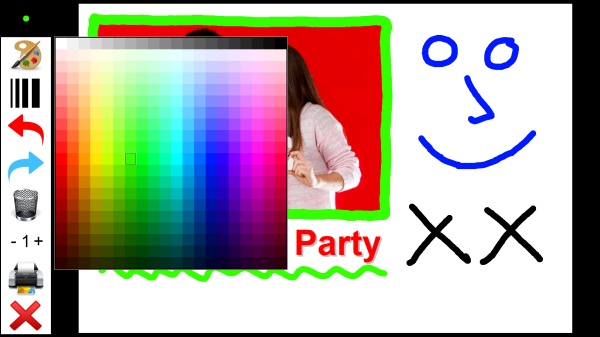
When the user taps on a color in the panel it is highlighted and the pen width and color indicator in the top left corner is updated to show the color. The color panel can be dismissed by tapping anywhere in the menubar or by drawing on the print.
Tapping the line width icon in the menu bar will display a slider allowing users to adjust the line width:
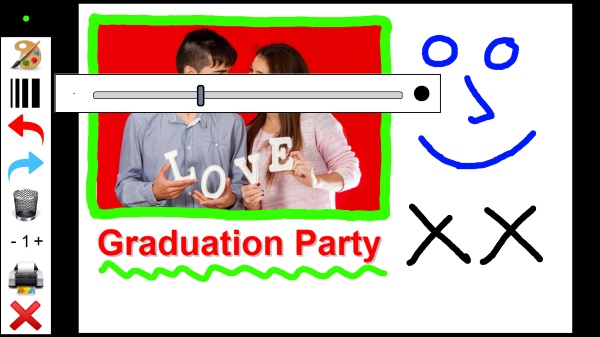
The pen width can be adjusted by moving the slider left or right and the pen width and color indicator in the top left corner is updated to show the new pen width. The pen width slider can be dismissed by tapping anywhere in the menubar or by drawing on the print.
If the user makes a mistake they can undo the last action by tapping the "Undo" icon (the red arrow in the menubar). Alternatively they can start again by tapping the trashcan icon. Actions that have been undone by tapping on the undo or trashcan icons can be re-done by tapping the "Redo" icon (the blue arrow in the menubar).
The number of copies to print can be increased by tapping the + symbol to the right of the number of copies display in the menubar and decreased by tapping the - symbol.
Tapping the printer icon accepts the the photos together with any drawing added by the user and prints the selected number of copies.
Tapping on the cancel icon (the red cross in the menubar) will reject photos and the photo booth will return to the ready screen without printing the photos.
Modifying the appearance of the screen
The default screen appearance is a black background with a white menubar area. The icons for the actions in the menubar a defined using PNG files in the icons subfolder of in the installation folder:
color.png - image used for the color palette icon
width.png - image used for the pen width icon
redo.png - image used for "Redo" icon
undo.png - image used for the "Undo" icon
clear.png - image used for the clear/trashcan icon
print.png - image used for the print icon
cancel.png - image used for the cancel icon
The appearance of the icons can be changed by replacing the PNG images in the icons subfolder with new images or by placing PNG images in the current photobooth images folder.
The appearance of the whole screen can be modified by creating a JPEG screen image named usermodifyprint.jpg and placing it in the current photobooth images folder. The screen image should be the same size in pixels as the screen on which the photo booth will be displayed.
An optional overlay can be placed on top of the background and print layout by creating a PNG screen image named usermodifyprint_overlay.png and placing it in the current photobooth images folder. The overlay image should be the same size in pixels as the screen on which the photo booth will be displayed and should contain transparency information in the alpha channel. The overlay can be used to display instructions to the user and will appear on screen but not in the final prints.
Editing the settings
Hold down the shift and ctrl keys and left click the mouse to display the settings dialog:
Use the checkboxes in the "Menu Items" area to select which actions should be made available to the user in the menubar area.
The initial color setting specifies the pen color that is selected when the screen is displayed. Click on the "..." button to choose a different color.
The initial line width specifies the line width in pixels of the pen when the screen is first displayed. The min line width and max line width settings specify the range of line widths the user can select if the "Line width selector" menu option is enabled.
The "Inactivity timeout (secs):" setting allows a timeout to be set. If the user does not touch the screen for a period longer than the timeout value the screen will be closed and the photos either printed or canceled depending on the timeout action setting. Setting the timeout to 0 will disable the timeout.
The max copies setting specifies the maximum number of print copies the user can select by tapping the + symbol in the menubar.
By default users can draw anywhere on the print, but this can be limited by enabling the clipping and exclusion clipping regions. The clipping region is used to specify a region where the user is allowed to draw. The exclusion region allows an area within the drawing area to be protected e.g. to stop people drawing on corporate logos. The clipping and exclusion clipping regions can be edited by clicking on the "OK" button. The clipping region will be displayed by a green rectangle and the exclusion clipping region by a red rectangle. Click on one of the rectangles to select it and then adjust its size and position by dragging it corners. Click in the menubar area to save the settings and return to drawing mode.
Select the "Show mouse cursor" to display the mouse cursor to allow users to draw on the prints using a mouse.
Implementation notes
The signing and drawing screen is implemented using a dynamic library named UserModifyPrint.dll and saves its settings in the Windows registry using the following registry key:
HKEY_CURRENT_USER\SOFTWARE\BreezeSystems\NKRemote\100\UserModifyPrint
If different drawing and signing functionality is required it can be implemented by creating a new dynamic library to replace the default UserModifyPrint.dll library without requiring a custom build of NKRemote.
Copyright information for icons used by UserModifyPrint.dll:
Undo/Redo/Cancel icons: These icons are provided by icons8 as Creative Commons Attribution-NoDerivs 3.0. You can copy, use and distribute this icon, even for commercial purposes, all without asking permission provided you link to icons8.com website from any page you use this icon. You may not alter, transform, or build upon this work. https://icons8.com
Color Palette/Trashcan icons from http://downloadicons.net
Printer icon: royalty free icon purchased from http://artistsvalley.com. This icon may only be used with Breeze Systems' products unless a separate license is purchased from Artists Valey.
Line width: Copyright Breeze Systems Limited. This icon may only be used with Breeze Systems' products.