Burst GIFs are short silent movies that play in a continuous loop. They sometimes referred to as boomerang GIFs when they play a sequence forwards and then backwards,
Click on the "Burst GIFs" tab of the "Photo Booth Settings" dialog to edit the settings:
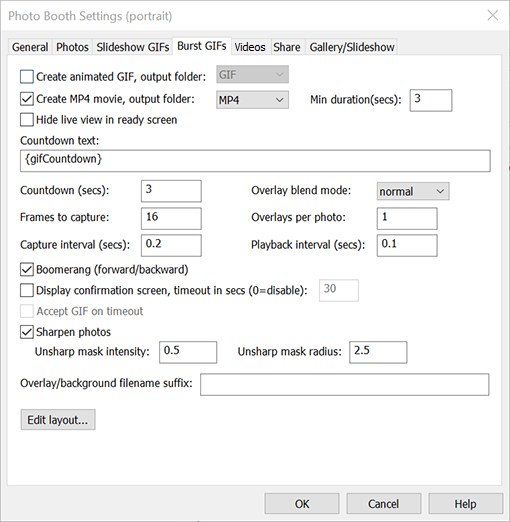
Select "Create animated GIF" to create a burst GIF and use the output folder setting to specify where it should be saved.
Select "Create MP4 movie" to create an MP4 copy of the burst GIF and use the output folder setting to specify where it should be saved. MP4 movies don't play in a continuous loop like animated GIFs and so you also need to specify their minimum duration. When the app creates the MP4 movie it will repeat it as many times is as necessary to make sure it as at least as long a the minimum duration setting. The minimum recommended setting for the duration is 3 seconds because this is the minimum duration that is accepted by Instagram. If you select a shorter duration users won't be able to share their movies on Instagram.
Animated GIFs have the advantage that they automatically play back in a continuous loop and can be embedded in an HTML formatted email in the same way as JPEG images. They have the disadvantage that they can only display 256 colors per frame out of the 16 million colors that could be in a photo. They also have the disadvantage that they use lossless compression which can result in large file sizes and cannot include an audio soundtrack.
MP4 movies have the advantage that they can represent the same number of colors as normal JPEG photos and they use similar compression to JPEGs to reduce the file size. The main disadvantages of MP4 movies is that they don't automatically play in a continuous loop and they can't be embedded into HTML formatted emails. Instead they need to be included as a file attachment to the email.
Normally live view images are displayed in the GIF ready screen but this can be disabled (e.g. for a menu screen) by selecting "Hide live view in ready screen".
The "Countdown text" specifies how the countdown text should be formatted during the countdown before taking each photo. It can use the following token:
{gifCountdown} - the number of seconds remaining in the countdown before capturing the GIF
Use the "Countdown (secs)" setting to specify duration of the countdown.
Please note: These settings are ignored if an animated GIF or video animation is used for the countdown. When an animation is used for the countdown the duration of the animation determines the duration of the countdown.
The overlay blend mode can be selected using the overlay blend mode dropdown list. This controls how the optional overlay images (e.g. gif_overlay.png or gif_overlay_1.png, gif_overlay_2.png etc.) are blended with the GIF layout.
The following blend modes are available:
normal, lighten,darken, overlay, screen, hard light,soft light, multiply, difference, exclusion, color dodge, color burn, hue, saturation, color, luminosity:
A detailed description of each blend mode is beyond the scope of this help file. Please see this wikipedia article for more information about blend modes: https://en.wikipedia.org/wiki/Blend_modes. Alternatively use an image editor such as Photoshop that supports levels and blend modes to see the effect of different blend modes on overlays applied to photos.
The "Frames to capture" setting specifies how many frames to capture from the live view display when creating the GIF, Normally this is set to at least 10 frames to create a good animation.
The "Overlays per photo" setting specifies how many overlay frames are created per photo. This can create an animated frame that updates at a faster rate than the photos e.g. if overlays per photo is set to 2 the sequence would be:
photo 1 + overlay 1, photo 1 + overlay 2, photo 2 + overlay 3, photo 2 + overlay 4, photo 3 + overlay 5, photo 3 + overlay 6, etc.
The "Capture interval (secs)" setting determines how long it takes to capture the sequence i.e. duration = capture interval x number of frames. The minimum usable setting for the capture interval is around 0.05 secs but this will depend on the model of the iPad and the exposure settings.
The "Playback interval (secs)" setting specifies how long to display each frame of the GIF. Set this to a longer setting than the capture interval to create slow motion GIFs or to a shorter setting to display the GIF at faster than normal speed.
Select the "Boomerang (forward/backward)" setting to create a boomerang GIF. This will display the photos in forwards order followed by reverse order e.g. if there are 10 frames in the GIF it will display them in the order 1, 2, 3, 4, 5, 6, 7, 8, 9, 10, 9, 8,, 7, 6, 5, 4, 3, 2 and then repeat. When the boomerang option is not selected the frames will be displayed in the order 1, 2, 3, 4, 5, 6, 7, 8, 9, 10 then repeat.
Select "Display confirmation screen" to display the GIF in the confirm printing screen after capture. The confirmation screen gives the user the chance to review the GIF and to accept or reject it.
Set the timeout to the number of seconds the confirmation screen should be displayed before it is closed automatically. Set "Accept GIF on timeout" to automatically accept the GIF if the timeout occurs otherwise it will be cancelled and the photo booth will return to the ready screen.
Select "Sharpen photos" to sharpen each photo before adding it to the GIF. The "Unsharp mask intensity" and "Unsharp mask radius" settings control the type and amount of sharpening. (More information about sharpening can be found by searching the internet for "Unsharp mask").
The "Overlay/background filename suffix" provides a way of dynamically selecting different overlays and backgrounds for the GIFs. Normally the filename for the background images used for GIFs is gif_background.jpg or gif_background_<n>.jpg and the overlay is gif_overlay.png or gif_overlay_<n>.png but this can be modified to dynamically select different overlay and background images using information such as the time, user responses to surveys or random numbers.
Please see GIF Layout Editor for information on how to use this setting.
The overlay/background suffix can also be used to select the countdown, capture and share screens. One use for this is when using a survey to select different backgrounds when using AI background removal.
Click on "Edit layout..." to display the GIF Layout Editor.