The display settings allow you to adjust the appearance of the main kiosk display:
Use the "Layout:" dropdown list to choose one of the following display layouts:
| 1. | No thumbnails - only displays a large copy of the currently selected photo or video with icons displayed below |
| 2. | Thumbnails and photo - similar the the "No thumbnails" option but with the addition of thumbnails displayed vertically down the left hand side |
| 3. | Thumbnail grid - displays a grid of thumbnails. When a thumbnail is selected a screen showing a large copy of the photo or video with icons displayed below and a "Close" cross in the top right hand corner. The screen will be displayed until the users closes it or the "Full screen timeout" occurs |
| 4. | Privacy mode - users must enter a code (e.g. the image filename) to view and share their photo. When the correct code has been entered only the matching photo or video will be displayed. |
When the layout is set to "Thumbnails and photo" you can enable a clipboard to allow multiple images to be selected and shared. Click on the "Multiple selections..." button to enable the clipboard and configure its settings.
Please see Clipboard and Selecting Multiple Images for more details.
The default layout, "Thumbnails and photos", for the main kiosk is shown below:
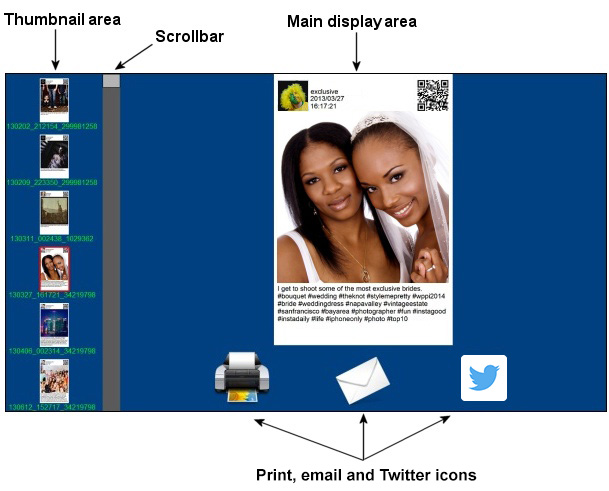
Select the "Thumbnails and photo" layout option to display thumbnails down the left side of the screen. The with and height of the thumbnails can be specified using the "Thumbnail size (pixels):" setting.
The "Thumbnail size (pixels):" settings specify the width and height of the area used to display each thumbnail. The "Thumbnail spacing (pixels):" setting specifies the spacing between thumbnails. The "Crop thumbnails" option can be used to crop a thumbnail image before it is displayed. This is useful if the thumbnail represents a double strip of three or four photos and you only want to display it as a single strip.
The thumbnail highlight color setting specifies the color of the outline drawn around the currently selected thumbnail. Click on the "..." button to the right of the color display to select a different color.
The thumbnails can be cropped before they are displayed by checking the "Crop thumbnails" checkbox and specifying the area to be cropped. This can be useful if Breeze Kiosk is being used to display images that have been formatted by Hotfolder Prints after downloading them from Instagram using Hotfolder Prints' Hashtag Monitor so that the thumbnail only shows the photo part of the download.
Select the "Thumbnail caption" checkbox to display a caption under each thumbnail. The caption text can use tokens such as {filename} for the photo's filename and %H:%M:%S for the time.
The font type and size of the thumbnail caption displayed below each thumbnail can be edited by clicking on the "..." button to the right of the "Caption font:" display. Click on the "..." button to the right of the caption color display to specify the color used for the thumbnail caption.
The "Scrollbar width (pixels):" setting specifies the width of the scrollbar used for scrolling the thumbnail display. You can also specify the colors of the scrollbar slider and background area. The appearance of the scrollbar can also be customized by placing PNG images in the screen images folder (see general greferences for details).
By default the main area background is dark blue. A different background color can be specified using the "Window background color" setting. A JPEG image can also be used for the window background by placing a suitable JPEG image named background.jpg in the screen images folder. Please see the general preferences section for more information.
The "Icon area height (pixels):" setting specifies the height of the icon area at the bottom of the main display area. Please make sure this is large enough to display the print, email and Twitter icons. If it is too small the photo displayed in the upper part of the main display area may obscure the icons.
Select "Jump to top/bottom in scrollbar" to enable the ability to jump to the first image by tapping the top of the scrollbar or to jump to the last image by tapping the bottom of the scrollbar. When this option is selected the scrollbar-jump-icon.png image will shown at the top and bottom of the scrollbar: When this option is not selected the scrollbar-icon.png image is displayed at the top and bottom of the scrollbar. Please see screen images for details.
Select the "Double click in bottom right corner to exit full screen mode" checkbox if you want to be able to exit full screen mode using the touchscreen. If this option is not selected the only way to exit full screen mode is to hit the escape key on the keyboard. If the "Require password" checkbox is selected the touchscreen keyboard will be displayed after double clicking on the bottom right corner and the software will only exit fullscreen mode if the correct password is entered.
Select the "Double click top right corner to delete" if you want to be able to delete unwanted or inappropriate images. This option will be protected using the same password as the exit full screen mode option if "Require password" is selected. After entering the password, if required, a delete confirmation screen will be displayed. If you choose to delete the photo or video it will be moved to a subfolder named "DELETED" and removed from the display. The default delete confirmation screen can be replaced using a screen image named delete.jpg.
By default the full area of each photo is displayed in the thumbnails and in the main display area. The photos can be cropped before they are displayed by checking the "Crop displayed image" or "Crop thumbnails" checkboxes and specifying the area to be cropped. This can be useful if Breeze Kiosk is being used to display images from a photo booth set up for double strip of 4 printing and you only want to display one strip of the photos in Breeze Kiosk.
The "Max image size (0=auto):" settings specify the maximum display size of images and videos e.g. if an image is 400x600 pixels in size and the max image size height is set to 300 the image be resized to 200x300 and centered in the main display area. Set this to zero to let Breeze Kiosk size the photos automatically to fit the display area. The "Max percentage scaling" option specifies the maximum amount of scaling that will be applied when resizing a photo or video to fit the display area. Normally this will be set to 100 but it can be used to enlarge videos or animated GIFs which would otherwise appear very small on a high resolution display. Setting the max scaling too high (e.g. 400) may result in the photos or videos appearing pixellated.
The "Screen timeout (secs):" setting specifies the timeout for hiding the image screen and returning to the touchscreen keyboard ready for a new code to be entered.
Select the "Display QR code" checkbox to display a QR code in the bottom right hand corner of the screen. Enter the next to be encoded in the QR code in the text field to the right of the checkbox. The text can include tokens to display dynamically generated QR codes. This could be used to link to a microsite by using the {filename} token to include the currently displayed image's filename in the URL e.g.
https://mysite.com/MyEvent/{filename}
or
https://mysite.com/viewer.php?id={filename}
Thumbnail grid layout:
