Overview
The "Camera settings mode:" dropdown in the "Photobooth Settings" dialog has three options: simple, bank 1, bank 2
For photo booths only offering photos the simple setting can be used. This will use the current camera settings for the shutter speed, aperture, ISO and white balance when taking photos. The color balance of the live view images can be improved by enabling "Live view white balance" and selecting a suitable white balance e.g. "Auto (ambience)".
If "External flash mode" is selected the simple camera setting mode will automatically set the shutter speed to bulb when live view is displayed and 1/125 sec when taking photos.
If more control over the camera settings is required (e.g. for a photo booth that offers both photos and videos) the camera settings mode should be set to "Bank 1" or "Bank 2". When bank 1 or bank 2 is selected the live view white balance checkbox is replaced with a "Camera settings..." button. Click on this button to adjust the camera settings:
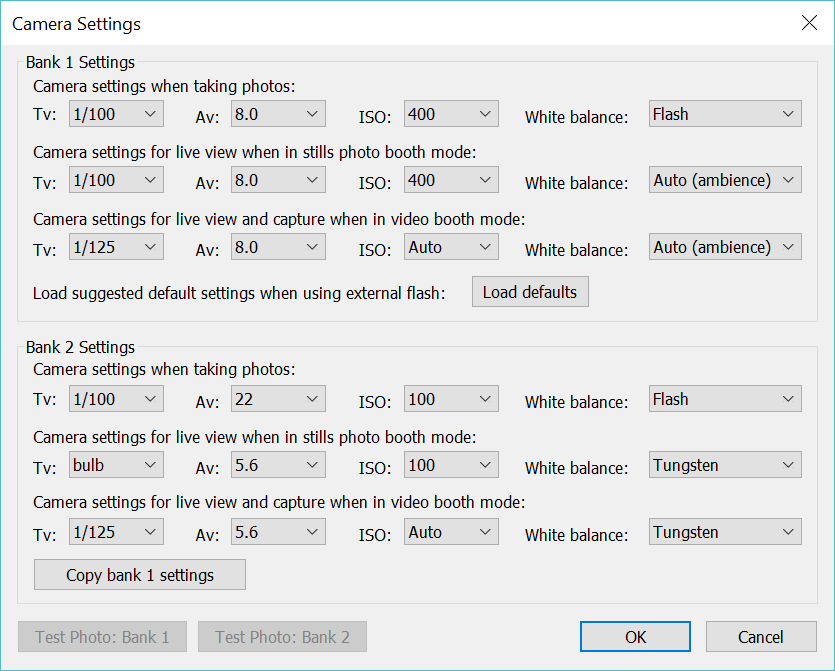
The top half of the "Camera Settings" dialog is shows the settings for bank 1 and the bottom half shows the settings for bank 2. Which bank of settings to use when the photo booth is running is specified by the "Camera settings mode" in the "Photobooth Settings dialog". Please note that only the camera settings mode is saved to file and loaded using when profiles. This allows profiles to be used to select different camera settings. The individual camera settings for each bank are not saved in profiles because these will depend on the lighting conditions when setting up the photo booth at the venue.
The exposure mode dial on the camera should be set to M (manual exposure) in order for the settings to work.
Click on the "Test Photo: Bank 1" button to set the camera to the bank 1 settings and take a preview photo to test the exposure. Click on the "Test Photo: Bank 2" button to test the exposure settings for bank 2.
Please note: It may not be possible for all the specified settings to be applied if the camera does not support them e.g. basic Rebel series cameras only support fully automatic exposure and white balance in video mode and so any settings specified in the "Camera settings for live view and capture when in video booth mode" will be ignored. Selecting a value that is out of range will result in the nearest available setting being used e.g. selecting an aperture of f/1.8 will result with a lens that has a maximum aperture of f/4 will result in f/4 being used.
Camera Settings for Photo Booths with Studio Strobes, E-TTL Flash or the Camera's Flash
Camera settings for all camera models: Set the camera exposure mode to manual (by turning the exposure mode dial on the camera to M), shutter speed to 1/125 sec, aperture to f/8, ISO to 400 and white balance to Flash:
DSLR Remote Pro main window showing suggested camera settings for all camera models when using flash
Additional camera settings for mid to high end cameras
Disable live view exposure simulation and "Silent LV shoot" in the camera settings and disable "External flash mode" in the "Photo booth Settings" dialog.
Additional camera settings for Canon EOS M50
Ensure the rear LCD is facing outwards (otherwise live view may freeze after a few seconds).
Disable live view exposure simulation in the camera settings and disable "External flash mode" in the "Photo Booth Settings" dialog.
Set the camera to manual exposure by turning the exposure mode dial on the camera to 'M'.
Set the camera settings in the "Photo Booth Settings" dialog to "Bank 1" or "Bank 2" and in the "Camera setting when taking photos" set the shutter speed to 1/100, the aperture to 8.0 and the ISO to 400.
IMPORTANT: Do not select a shutter speed faster than 1/100 sec when triggering external flashes or studio strobes via the camera's hotshoe. There is a bug in the camera's firmware which makes flash triggering unreliable if the shutter speed is set higher than 1/100 sec.
Suggested 'Bank 1' camera settings for a Canon EOS M50 taking photos and videos
Take a test photo by pressing the "Preview (F9)" button in the main window. If the photo is too dark it can be made brighter by increasing the power setting on the flash, by increasing the ISO setting on the camera or by using a larger aperture (by reducing the Av setting). If the photo is too light it can be darker brighter by decreasing the ISO setting on the camera or by using a smaller aperture (by increasing the Av setting) or by reducing the power setting on the flash.
Try to keep the ISO setting below 1600 to give the best image quality.
Photo Booth Settings for "Photo only" Photo Booths
Rebel series cameras using studio strobes In the "Photobooth Settings" dialog enable "External flash mode", set the "Camera settings mode" to simple, enable "Live view white balance" and select "Auto (ambience)":
Suggested settings in the "Photobooth Settings" dialog for Rebel series cameras when using studio strobes
Rebel series cameras using the camera's flash or an E-TTL flashgun and mid to high end cameras using all types of flash: These should use the same settings as above except "External flash mode" should be disabled.
Settings for "Video only" Photo Booths
All camera models: Set the camera exposure mode to manual (by turning the exposure mode dial on the camera to M), shutter speed to 1/30 sec, aperture to f/5.6, ISO to 1600 and white balance to "Auto (ambience)" or "Tungsten" depending on the lighting being used:
Please note that basic Rebel series cameras use fully automatic exposure and white balance for video and so changing the camera settings will have no effect.
If the lighting is likely to vary the ISO can be set to auto so that the camera can adjust the ISO to adjust the exposure.
In the "Photobooth Settings" dialog set the "Camera settings mode" to simple and disable "Live view white balance". Flash is not used when capturing video and so it doesn't matter whether "External flash mode" is selected or not.
To set the correct exposure and white balance in video mode type Ctrl+L in the main DSLR Remote Pro window to display the live view window. Then click on the "Video" button to select video mode. If the live view is too dark adjust the exposure by reducing the shutter speed, selecting a wider aperture (by reducing the Av setting), selecting a higher ISO setting or by increasing the power of the lights. If the live view is too light adjust the exposure by by selecting a lower ISO setting, selecting a smaller aperture (by increasing the Av setting), selecting a higher shutter speed or by reducing the power of the lights.
If the ISO is set to auto and the live view is too dark it means that there is not enough light for correct exposure event with the highest ISO setting selected by the camera. To correct this reduce the shutter speed, select a wider aperture (by reducing the Av setting) or increase the power of the lights.
Settings for Photo Booths using both Photo and Video Modes
Set the camera settings for taking photos using flash using the settings above i.e. manual exposure, Tv=1/125 sec, Av=8.0, ISO=400.
Rebel series cameras need the "External flash mode" setting to be selected in the "Photobooth Settings" dialog when using flash. Mid to high end cameras do not need the "External flash mode" setting to be selected.
Basic Rebel series cameras use fully automatic exposure and white balance in video mode the camera and so the settings in the "Photobooth Settings" dialog can be the same as for taking photos i.e. "Camera settings mode" set to simple and live view white balance set to "Auto (ambience)".
Other cameras allow manual control over exposure and white balance in video mode. Photo booths using flash for photos and continuous lighting for video will have different lighting conditions for photos and videos and will therefore require different camera settings. To do this set the "Camera settings mode" to "Bank 1" and press the "Camera settings..." button to display the "Camera settings" dialog:
Two banks of camera settings are available for advanced setups, but for a simple video and photo setup only bank 1 is required. Each bank allows different settings to be used for the camera exposure and white balance when taking photos, displaying live view and for capturing video. Settings can be set to specific values, e.g. Tv: 1/125, or to "camera". The "camera" setting will use the same setting that was set on the camera before entering full screen photo booth mode.
The first row of settings, headed "Camera settings when taking photos", is used to specify the camera settings to use when taking photos. The suggested settings are Tv: 1/125 sec (so that the camera syncs with the flash - NB use 1/100 sec with the Canon EOS M50). Av: "camera", ISO: "camera" and white balance "camera". Using "camera" for most of the settings allows the exposure when taking photos to be adjusted by taking test photos and changing the camera settings in the main window.
The second row of settings, headed "Camera settings for live view in stills photo booth mode", is used to specify the camera settings for the live view display when in photo booth mode (i.e. when the ready and countdown screens are displayed). For Rebel series cameras Tv needs to be set to "bulb" to ensure that the live view images are correctly exposed. For mid to high end cameras the Tv setting should be set to "camera". The aperture (Av) and ISO settings don't have much effect the live view and should be set to "camera". The white balance setting should be set to "Auto (ambience)", "Tungsten" or one of the other preset white balance settings to give good color balance in live view. The camera white balance when taking the photos will be set to "Flash", but this setting will give excessively yellow colors if used for live view in the ready and countdown screens.
The third row of settings, "Camera settings for live view and capture when in video booth mode", is used to specify the camera settings when in video booth mode. Video capture requires continuous lighting and same lighting will be used for live view in the ready and countdown screens as is used when capturing the video. The lighting is likely to be less bright than the flash used for taking photos and so the shutter speed and ISO need to be lower and the ISO higher to compensate. Suggested settings are Tv: 1/30 (the slowest available shutter speed in video mode), Av: 5.6 (to give some depth of field while still letting in plenty of light) and ISO 1600.
Tip: When using manual exposure mode and bank 1 or bank 2 camera settings the live view brightness can be adjusted in photo booth mode using the cursor up and cursor down keys. Press cursor up to lighten live view by selecting a slower shutter speed or press cursor down to darken live view by selecting a faster shutter speed. Note: pressing cursor up when the shutter speed is set to 30 sec on a Rebel series camera will select bulb which will use auto exposure for live view.
Advanced Usage of Camera Settings
Sometimes different settings are required for different photo booth activities e.g. a photo booth that allows users to choose between standard photos with flash and "painting with light" photos. Standard photos with flash normally require a shutter speed close to the camera's flash sync speed (e.g. 1/125) with a medium aperture (e.g. f/5.6) and ISO (e.g. 400). Painting with light photos may also use flash to illuminate the subject, but require a longer shutter speed to record light trails from torches etc. They also need to minimize the effects of ambient lighting by using a very small aperture (e.g. f/22) and a low ISO (e.g. 100). The ability to switch between these settings using profiles can be achieved by using bank 1 for the standard photos with flash camera settings and bank 2 for the painting with light camera settings. The profile used to select standard photos with flash should be saved with the "Camera settings mode" set to "Bank 1" and the profile used to select painting with light should be set to "Bank 2".
Basic Rebel series cameras: e.g. Canon Rebel T7/EOS 2000D, , Canon Rebel T6/EOS 1300D, Canon Rebel T5/EOS 1200D, Canon Rebel T3/EOS 1100D, Canon EOS 4000D
| • | Cost-effective cameras for normal photo booth shooting. |
| • | Require the use of "external flash mode" when using external studio flash. |
| • | Not so good for video because they have limited video resolutions and are unable to use an external microphone. The camera's built-in microphone may give poor sound recording at noisy venues. |
| • | Unable to use continuous AF in live view |
Enthusiast Rebel series cameras: e.g. Canon Rebel T6s/EOS 760D, Canon Rebel T6i/EOS 750D, Canon Rebel T5i/EOS 700D,, Canon Rebel SL1/EOS 100D
| • | Suitable for normal photo booths and video capture. |
| • | Require the use of "external flash mode" when using external studio flash. |
| • | Good support for video capture including full control over exposure, ISO and white balance and the ability to use an external microphone for improved sound recording |
| • | Most models support continuous AF in live view but this is slow except for the Rebel T6s/EOS 760D and Rebel T6i/EOS 750D |
Enthusiast Rebel cameras with dual pixel AF in live view: e.g. Canon EOS 77D, Canon EOS 800D/Rebel T7i, Canon EOS 250D/200D Mark II/Rebel SL3, Canon EOS 200D/Rebel SL2
| • | Suitable for normal photo booths and video capture. |
| • | Require the use of "external flash mode" when using external studio flash. |
| • | Good support for video capture including full control over exposure, ISO and white balance and the ability to use an external microphone for improved sound recording. |
| • | Excellent continuous AF in live view with face tracking. The use of an STM lens is recommended when capturing video with continuous AF |
Mid to high end cameras: e.g. Canon EOS 60D, Canon EOS 50D, Canon EOS 7D, Canon EOS 6D, Canon EOS 5D Mark III, Canon EOS 5D Mark II
| • | Suitable for normal photo booths and video capture. |
| • | Do not require the use of "external flash mode" when using external studio flash if the live view settings in the camera are set to disable live view exposure simulation and disable silent shooting mode. |
| • | Good support for video capture including full control over exposure, ISO and white balance and the ability to use an external microphone for improved sound recording |
| • | Support continuous AF in live view but this is slow |
Mid to high end cameras with dual pixel AF in live view: e.g. Canon EOS 90D, Canon EOS 80D, Canon EOS 70D, Canon EOS 7D Mark II, Canon EOS 6D Mark II, Canon EOS 5D Mark IV
| • | Suitable for normal photo booths and video capture. |
| • | Do not require the use of "external flash mode" when using external studio flash if the live view settings in the camera are set to disable live view exposure simulation and disable silent shooting mode. |
| • | Good support for video capture including full control over exposure, ISO and white balance and the ability to use an external microphone for improved sound recording. |
| • | Excellent continuous AF in live view with face tracking. The use of an STM lens is recommended when capturing video with continuous AF |
Mirrorless cameras: Canon EOS M50, Canon EOS M6 Mark II, Canon EOS M200
| • | Suitable for normal photo booths and video capture. |
| • | Does not require the use of "external flash mode" when using external studio flash if "Expo simulation" is disabled in the camera (in the SHOOT3 menu of the camera settings) |
| • | Good support for video capture including full control over exposure, ISO and white balance and the ability to use an external microphone for improved sound recording. |
| • | Excellent continuous AF in live view with face tracking. The use of an STM lens is recommended when capturing video with continuous AF |
| • | Slow motion video capability when 120fps video capture is selected. Play back is at 1/4 normal speed (30fps) and does not include sound |
| • | Very compact, particularly when used with the EF-M 22mm lens |
Recommendations:
| 1. | Canon Rebel T6/EOS 1300D or Canon Rebel T7/EOS 2000D with standard 18-55mm kit lens These cameras are excellent value for money and are suitable for all photo booths which do not need to capture video. They can be used for video capture, but the inability to use an external microphone may give poor sound recordings at noisy venues. |
| 2. | Canon Rebel T7i/EOS 800D or Canon Rebel SL2/EOS 200D with 18-55mm STM kit lens These camera models are more expensive than the Rebel T6/EOS 1300D, but have a microphone socket and can therefore use an external microphone to give better sound recordings when capturing video. The Canon Rebel T7i/EOS 800D and Rebel SL2/EOS 200D also have Canon's excellent dual pixel live view AF system which can provide continuous auto focus with face detect when used in photo booth mode. |
| 3. | Canon EOS M50 with EF-M 22mm STM lens or EF-M 15-45mm STM lens This camera is very compact, has a microphone socket, excellent dual pixel auto focus and 120fps slow motion video capability. This is probably the best value all round camera currently available for photo booth use. |
Most photo booths either use a studio strobe or an E-TTL compatible flash (e.g. the camera's built-in flash or a Canon E-TTL compatible flash in the camera's hotshoe) to light the subject when taking photos. Additional lighting is required for the live view display between photos and this is normally provided by the modeling light on studio strobes, additional lights (e.g. an LED lighting panel) or the ambient lighting at the venue. Normally it is best not to rely on the ambient lighting at the venue because you have little or no control over it and it may change during the course of the event.
When using flash the exposure is determined by the amount of light, the camera ISO setting and the lens aperture. It is recommended that the exposure mode dial on the camera is set to M to give complete control over the camera settings. The exposure mode must be set to M when using external flash mode.
The shutter speed does not affect the exposure and should be set to a value that is the same as or lower than the camera's flash sync speed and fast enough that ambient light is unlikely to affect the exposure e.g. 1/125 sec.
The lens aperture affects the exposure and the depth of field: a small aperture like f/22 will give a wide depth of field but does not let much light in and therefore will require a more powerful flash or higher ISO setting to get the correct exposure. An aperture of f/8 is a good starting value.
The ISO setting affects the exposure by setting the gain or amplification of the image from the sensor. A higher ISO setting will give lighter images than a lower ISO setting but may reduce image quality by introducing noise. Normally an ISO value of between 100 and 1600 will give excellent results. An ISO setting of 400 is a good starting point.
The power of the flash also affects the exposure. Most studio flash units have variable power settings to control their output. Direct flash can produce harsh lighting and so it is usually fired through a diffuser or bounced off a reflector or umbrella to give softer lighting but this will reduce its output. Moving the flash closer to the subject will increase the lighting and moving it away from the subject will reduce it. Normally it is best to adjust the exposure by adjusting the flash power and only changing the ISO and aperture if the flash is not powerful enough.
Flash can't be used when capturing video and so some form of continuous lighting is required e.g. LED lighting panels. It is recommended that the exposure mode dial on the camera is set to M to give complete control over the camera settings. However, if you are using a basic Rebel series camera to capture video the exposure will be set automatically by the camera and the only adjustments you can make are the exposure compensation setting on the camera and the lighting. With most other camera models the shutter speed, aperture and ISO can be set when capturing video.
The shutter speed affects the exposure and the amount of motion blur. A slower shutter speed will give lighter images than a faster shutter speed. The slowest available shutter speed, 1/30 sec, will give good results for most setups. A faster shutter speed nromally is only needed if fast moving subjects are to be captured and played back in slow motion.
The lens aperture affects the exposure and the depth of field: a small aperture like f/22 will give a wide depth of field but does not let much light in and therefore will require a more powerful lighting or higher ISO setting to get the correct exposure. An aperture of f/5.6 is a good starting value.
The ISO setting affects the exposure by setting the gain or amplification of the image from the sensor. A higher ISO setting will give lighter images than a lower ISO setting but may reduce image quality by introducing noise. Normally an ISO value of between 100 and 3200 will give good results when capturing video. An ISO setting of 1600 is a good starting point.
The power of the lighting also affects the exposure. Normally it is best to adjust the exposure by adjusting the power of the lights or changing the ISO setting.
The camera's white balance setting affects the color balance of the photos, video and the live view display. The color balance is also affected by the color temperature of the lighting.
When taking photos using studio strobes or flash guns setting the camera's white balance to "flash" should give pleasing results. However, the lighting used for the live view will almost certainly be different and will require a different white balance setting to give good results .e.g a studio strobe with a tungsten modeling light will give live view images that are too yellow if the live view white balance is set to "flash". Setting the live view white balance to "tungsten" or "auto" will give better looking live view images.
When capturing video the white balance setting will depend on the type of lighting and you may need to try different white balance settings to get the best results. It's normally better to use one of the preset white balance settings as this is likely to give more consistent results than auto white balance.
The camera's white balance setting and live view white balance settings need to be set to the same value.
If having accurate colors is important a custom white balance setting can be used. This normally involves taking a test photo of a neutral gray target and telling the camera to use the settings from this photo as the custom white balance setting (please see the camera manual for details on how to do this). Once the white balance setting has been stored in the camera it can be selected by setting the camera's white balance to "custom".
Cameras without dual pixel AF in live view
It is recommended that auto focus is not used for most photo booths. This is because it can take several seconds for the camera to focus at the end of the countdown and this makes it difficult to know exactly when the photo is going to be taken. Also, if the camera is unable to auto focus it won't take the photo. DSLR Remote Pro handles this by displaying an error message indicated that it is unable to focus and will tri to take the photo again after a few seconds.
The simplest way to disable auto focus is to set the AF/MF switch on the camera lens to the MF position. When setting up the booth you can focus by turning the focus ring on the lens and checking the focus on the live view display on the PC screen.
An alternative method of using manual focus is to set the custom function "C.Fn IV: Operations/Others - Shutter/AE lock button" to "1:AE lock/AF" (please see the camera manual for information on how to set this). This setting has the advantage that focus can still be adjusted remotely from the PC but auto focus won't be used when taking a photo. With this setting the lens can be focused in full screen photo booth mode by typing Ctrl+A. For more precise control of focus exit photo booth mode and type Ctrl+L to display the live view window. Then use the <<<, <<, <, >, >>, >> buttons or the mouse wheel to manually adjust the focus.
Cameras with dual pixel AF in live view
Auto focus can be used very effectively in live view when using recent cameras that have Canon's dual pixel auto focus e.g. Canon EOS M50, Canon EOS 800D/Rebel T7i, Canon EOS 200D/Rebel SL2, Canon EOS 70D, Canon EOS 77D, Canon EOS 80D, Canon EOS 7D Mark II, Canon EOS 6D Mark II, Canon EOS 5D Mark IV.
To use auto focus in live view (for all models except the Canon EOS 77D, Canon EOS 800D/Rebel T7i, and Canon EOS 200D/Rebel SL2) select "Continuous AF" in the camera's settings and set the AF method to face detect.
Continuous AF can also be selected using DSLR Remote Pro by typing Ctrl+L in the main window to open the live view window and then right clicking on the live view display and selecting the "Continuous auto focus" menu option. Then, with the live view window still open, select "Face detect" from the "AF mode:" dropdown list in the main window.
Note: the AF/MF switch on the camera's lens needs to be set to the AF position
When continuous AF with face detect is enabled the camera will automatically detect faces and focus on them when live view is active in photo booth mode. When the camera takes each photo it will use the current focus setting and won't attempt to refocus or cause additional delays before taking the photo.
This technique can also be used with recent Rebel series cameras (e.g Rebel T6i/EOS 750D and Rebel T6s/EOS 760D) that have improved AF in live view. Other recent camera models also support continuous AF in live view but this can be slow.
Some cameras (e.g. Canon EOS 6D Mark II, Canon EOS 77D, Canon EOS 800D/Rebel T7i and Canon EOS 200D/Rebel SL2) have dual pixel AF in live view but don't support continuous AF. To use face detect AF in live view with this type of camera they need to be set up as described below.
Press the live view button on the back of the camera to select live view and then press the 'Q' button to adjust the settings:
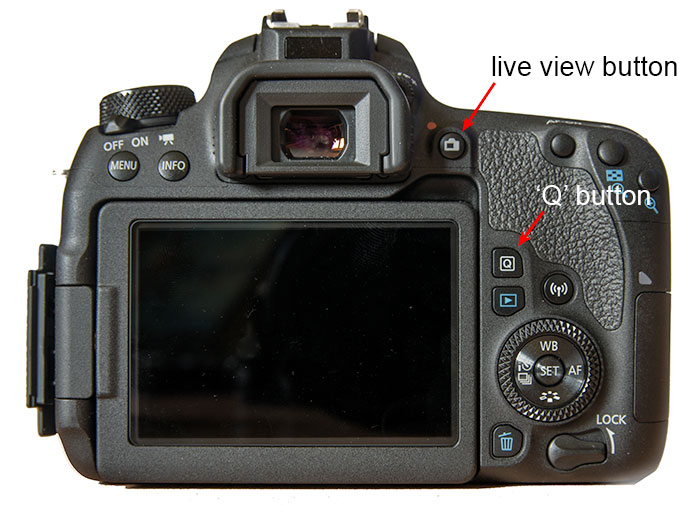
Set the AF Method to face detect AF with tracking by tapping the "AF method" icon in the top left corner of the camera's touchscreen and then tap the face detect with tracking icon (the first icon on the left at the bottom of the screen):
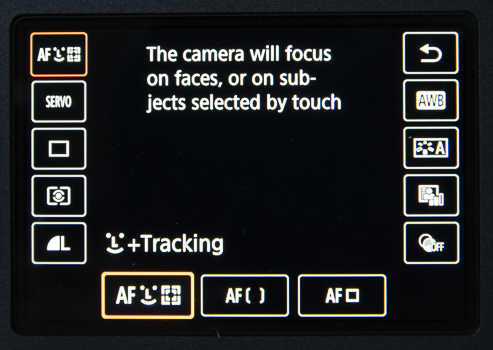
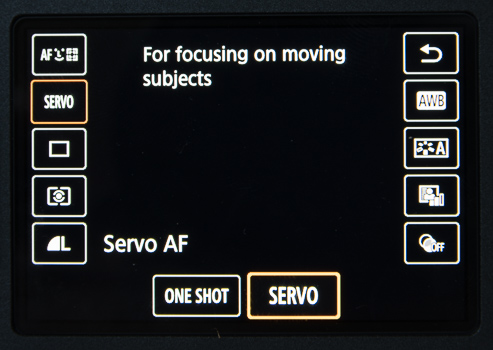
Set the AF Operation to Servo AF by tapping on the "AF Operation" icon in the top left corner of the screen, below the AF Method icon. Then tap on "SERVO" at the bottom of the screen:
Then press the live view button again to disable live view and also check that the AF/MF switch on the camera's lens is in the AF position.
Shutter lag is the time it takes from pressing the shutter release button to when the camera actually takes the photo. Most cameras have a shutter lag of around 1/10 sec when taking normal photos. The shutter lag is longer if live view is used and longer still if external flash mode is used. The shutter lag for some basic Rebel series cameras can be over 1/2 sec when using live view and external flash mode. A typical shooting sequence with a Rebel series camera using live view and external flash mode is:
User presses the start button to start a 5 second countdown
t=0 sec: countdown screen (e.g. 1.jpg) displayed with "5"
t=1 sec: countdown screen (e.g. 1.jpg) displayed with "4"
t=2 sec: countdown screen (e.g. 1.jpg) displayed with "3"
t=3 sec: countdown screen (e.g. 1.jpg) displayed with "2"
t=4 sec: taking.jpg screen displayed with "1"
t=5 sec: release.jpg screen displayed, live view display hidden and commands to take the photo sent to the camera
t=5.5 sec: flash fires and camera takes the photo
The extra delay due to shutter lag can confuse some users by taking the photo slightly later than expected. The delay due to shutter lag can be compensated for by exiting DSLR Remote Pro and setting the following value in the Windows registry to the delay in milliseconds:
HKEY_CURRENT_USER\Software\BreezeSystems\DSLRRemotePro\100\PhotoboothShutterLag
This setting can also be changed exiting DSLR Remote Pro and then running the Configure.exe utility in the installation folder.
For example setting this registry value to 500 will tell DSLR Remote Pro to send the command to take the photo 500ms (1/2 second) before reaching the end of the countdown:
User presses the start button to start a 5 second countdown
t=0 sec: countdown screen (e.g. 1.jpg) displayed with "5"
t=1 sec: countdown screen (e.g. 1.jpg) displayed with "4"
t=2 sec: countdown screen (e.g. 1.jpg) displayed with "3"
t=3 sec: countdown screen (e.g. 1.jpg) displayed with "2"
t=4 sec: taking.jpg screen displayed with "1"
t=4.5 sec: release.jpg screen displayed, live view display hidden and commands to take the photo sent to the camera
t=5 sec: flash fires and camera takes the photo