"Instagram" Style Filters
In addition to the color, B&W and monochrome toned filters there are 6 different Instagram style filters that can be applied to images. The effects of these filters are shown in the live view images and are applied to photos in print layouts and in animated GIFs. The standard filters can be replaced with user defined filters if different effects are required.
The filters can be selected using the touchscreen actions "Select filter 1" through "Select filter 2" or the using keyboard shortcuts below:
Shift+Ctrl+F - select filter 1
Shift+Ctrl+G - select filter 2
Shift+Ctrl+H - select filter 3
Shift+Ctrl+I - select filter 4
Shift+Ctrl+J - select filter 5
Shift+Ctrl+K - select filter 6
W - cycle through color, B&W, B&W (toned), filter 1, filter 2, filter 3, filter 4, filter 5, filter 6
User defined filters
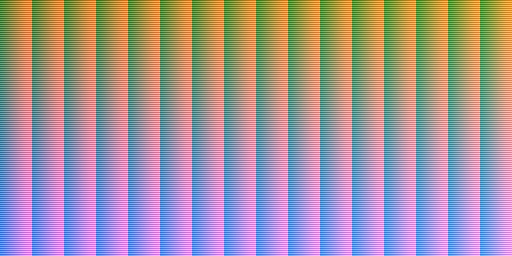
The filters use a color lookup table to map each color in the photo to a new color and optionally darken the corners to create a vignetting effect. The lookup table is read from a JPEG image 2048x1024 pixels in size with the same name as the filter e.g. filter1.jpg, filter2.jpg, filter3.jpg etc. Vignetting is applied if the filename ends with _vignette e.g. filter1_vignette.jpg.
The rest of the filename is ignored and can be used to identify the filter e.g. the following are valid names for filter 1:
filter1.jpg - filter 1 with no vignetting applied
filter1_my_sketch_filder.jpg - filter 1 with no vignetting applied
filter1_vignette.jpg - filter 1 with vignetting applied
filter1_vignette_popart.jpg - filter 1 with vignetting applied
DSLR Remote Pro will look for a filter file in the current photo booth images folder first. If a filter file is not found in the current photo booth images folder it will use the default filter in the installation folder.
The simplest way to create a new JPEG color lookup file is to download the following Photoshop PSD file and edit it in Photoshop: https://breezesys.com/downloads/filter_setup.psd
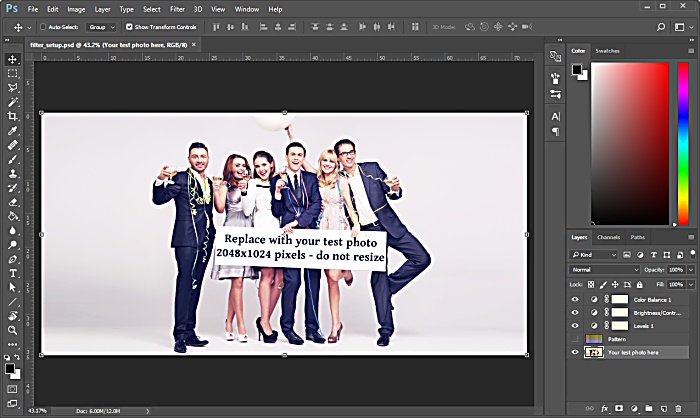
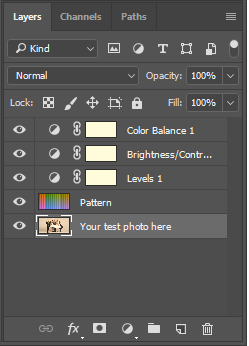
Then either use the test image in the "Your test photo here" layer or replace it with your own test photo. Add adjustment layers to modify the output as required. The adjustment layers can apply any adjustment that is applied to single pixels (e.g. level, curves, contrast, brightness, color fill, color balance etc.). Adjustments that apply to groups of pixels (e.g. sharpening, masking, blur, noise filters etc.) can't be used.
When you are happy with the changes, turn the visibility of the "Pattern" layer on:
Then save the file as a JPEG named filter1.jpg, filter2.jpg, filter3.jpg, filter4.jpg, filter5.jpg or filter1.jpg and save it in the current photo booth images folder. Append _vignette to the filename to darken the corners of the images.
Do not resize the filter_setup.psd image as this will prevent the filter from working.
The JPEG filter file should be 2048x1024 pixels in size and look something like this:
The photo booth creative filters give the option of applying a variety of special effects to photo booth photos and to the live view images displayed before taking the photos. The default filters include color and monochrome negative images, color and monochrome posterization effects, desaturation and over saturation effects and selective saturation. The filters are applied using a DLL which means that experienced C or C++ programmers can write their own filters if required. A sample VC++ 2005 project can be downloaded from http://www.breezesys.com/downloads/SampleCreativeFilter.zip
Please note that some filters may produce different results in the live view and final photos if flash is used. This is because flash will probably give different highlight and shadow areas which will affect how the posterization effects are applied. This is less of a problem if continuous lighting is used.
Creative filters that affect the colors may not work properly with green screen shooting.
To use creative filters you need put a copy of the PhotoboothCreativeFilter.dll file in your photo booth images folder. The PhotoboothCreativeFilter.dll file can be found in the installation folder (from the installation folder (normally C:\Program Files (x86)\BreezeSys\DSLR Remote Pro). The creative filter DLL can be given any name ending with Filter.dll e.g. glitch_filter.dll.
When you enter full screen photo booth mode the software will automatically load the filter DLL and the live view images will display the default filter which is color negative. Type Ctrl+Shift+C to display the setup page to select a different effect or to configure the settings. The following settings dialog will be displayed:
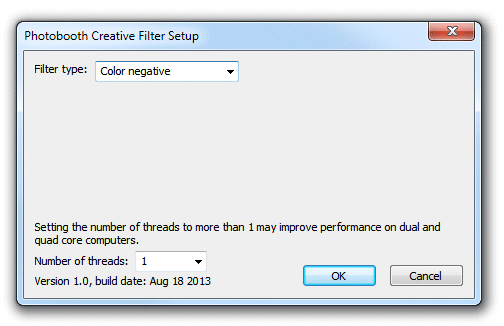
The processing of the filters in real time for the live view display can put quite a load on the computer which may cause the live view refresh rate to slow down. On a dual or quad core computer the load can be shared between the processor cores by setting the number of threads to more than 1.
The filter type can be selected from the drop down list. The various filter types that are available with the PhotoboothCreativeFilter.dll that comes with the software are described below.
Color negative
This filter creates a negative color image e.g. yellow items will appear as blue and blue items will appear as red. There are no controls for adjusting how this filter behaves.

Original image

Image with color negative filter applied
Monochrome negative
This filter converts the image to grayscale and displays the negative e.g. dark items will appear light and light items will appear dark. There are no controls for adjusting how this filter behaves.
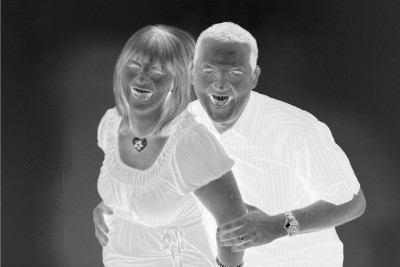
Image with the monochrome negative filter effect applied
Posterize
This filter produces a thresholding/posterization effect with an adjustable number of levels. The strength slider controls the size of each threshold with 0 having no effect and 255 producing an image just made up of fully saturated colors. The recommended range of settings is 10 to 100.
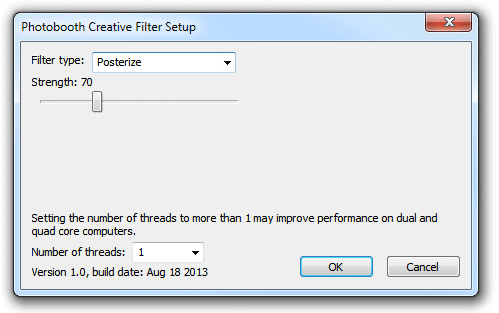
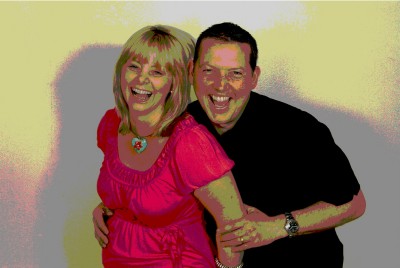
Image with the posterize filter applied with the strength set to 70.
Monochrome posterize
This is a highly configurable filter which converts the images to monochrome then posterizes it and colorizes with one or two colors. It's probably simpler to experiment with the different settings below and see their effect than to try explain how this filter works. The settings are shown below:
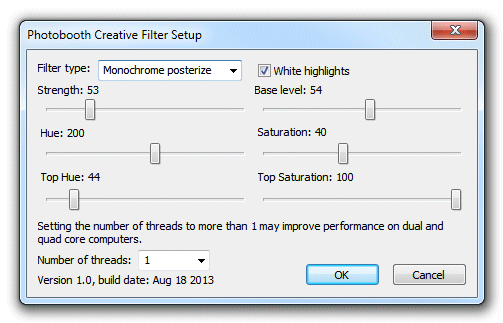
Strength - this controls the size of each threshold from 0, which has no effect, to 255 which gives only a few solid colors.
White highlights - this controls whether bright highlights appear as one of the colors (top or bottom color) or as white
Hue - this controls hue of the color displayed in the image
Saturation - this controls how strongly saturated the color is
Top Hue - this controls hue of the color displayed at the top of the image which randomly fades to the main color at the bottom of the image. If this is set to 0 only the main color is used.
Top Saturation - this controls how strongly saturated the bottom color is
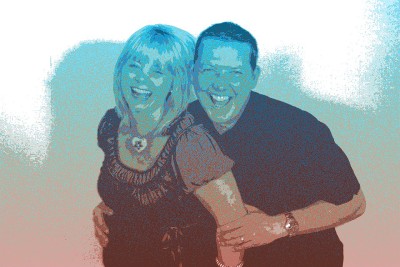
Image with the monochrome posterize filter applied: strength=53, base level=54, hue=8, saturation=40, top hue=195, top saturation=100, white highlights=on

Image with the monochrome posterize filter applied: strength=53, base level=54, hue=193, saturation=40, top hue=0, top saturation=100, white highlights=on
Saturation
This filter allows the image saturation to be boosted to produce an over saturated image or reduced to produce a more subtle desaturated image. Setting the strength to 100 will leave the saturation unchanged.
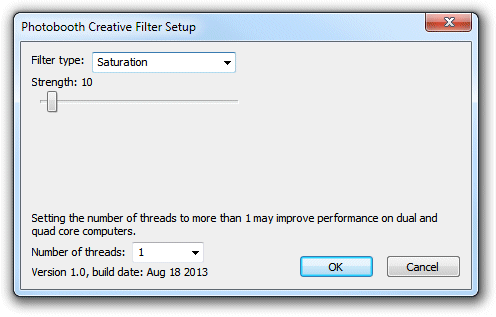
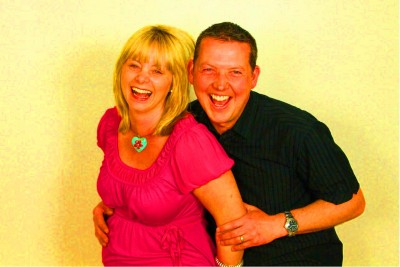
Image with the saturation filter applied: strength=200 (strongly increasing the saturation of the colors)

Image with the saturation filter applied: strength=10 (almost desaturating to grayscale)
Pop Art
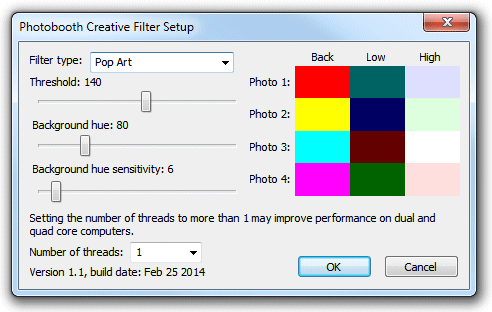
This filter produces a three color "pop art" effect reminiscent of some of the work by Andy Warhol. The photo is reduced to three colors: the background, dark areas of the subject and light areas.
This filter requires a green or a blue background and works best with continuous lighting rather than flash. Set the threshold to a middle value (e.g. 140) and the sensitivity to a low value (e.g. 6) and then adjust the background hue slider until the background is replaced with the background color for the first photo (the default setting is red). A background hue setting of around 80 should be suitable with a green background.
Then adjust the threshold and sensitivity sliders to get the desired result. The background, low light and highlight colors used for each photo can be changed by clicking on them in the setup dialog.
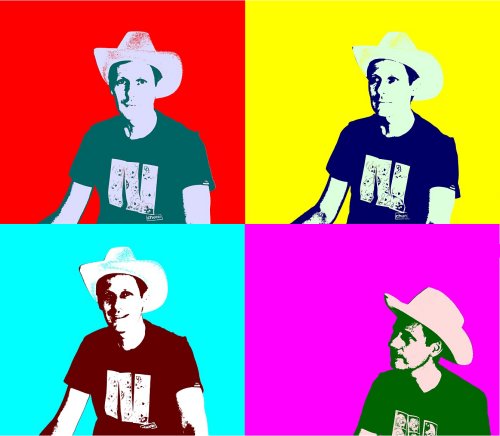
Set of 4 photos shot using the pop art filter
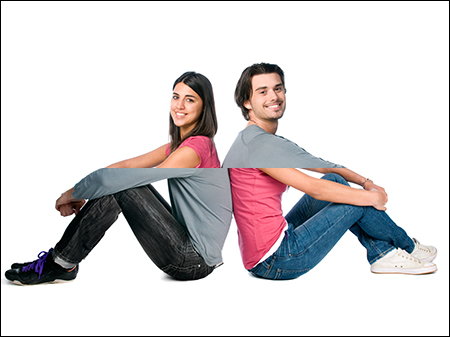
Mirror Filters
The mirror filters mirror different parts of the photo to give fun effects when taking photos or capturing animated GIFs. These filters are designed to be used with the camera in landscape orientation. They can also be used with the camera in portrait orientation but the swap top halves may not give the expected results.
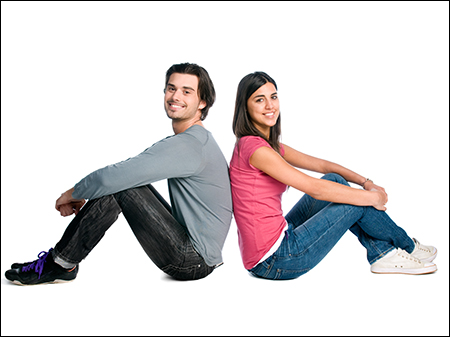
Original photo without mirroring
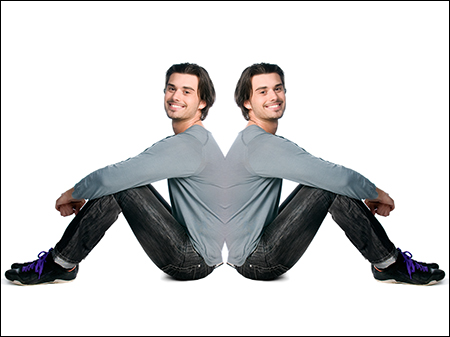
Mirror left/right
Please note: this option will mirror the top and bottom of the photo when the camera is in portrait orientation. Please use the "Mirror top/bottom" option to mirror the left and right halves when the camera is in portrait orientation.
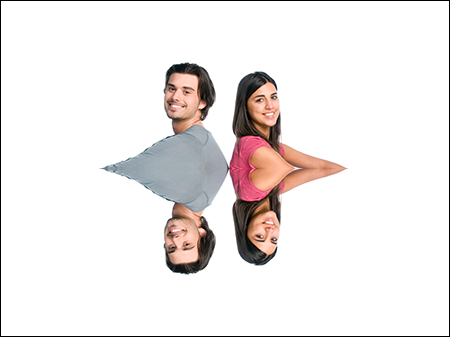
Mirror top/bottom
Please note: this option will mirror the left and right halves of the photo when the camera is in portrait orientation. Please use the "Mirror left/right" option to mirror the top and bottom when the camera is in portrait orientation.
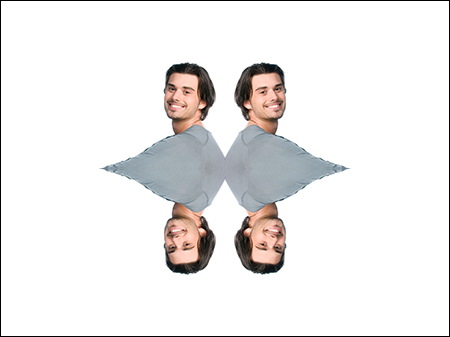
Mirror 2x2 mosaic
Mirror swap top halves
Please note this option is only designed to work when the camera is in landscape orientation.
User selection of different filter effects
The settings for the filter are saved using the name of the photo booth images folder which means that different effects can be applied in by using profiles to switch to different folders. For example users could be given the choice between normal, over saturated and under saturated colors by creating three photo booth images folders:
C:\PhotoboothImages\normal
C:\PhotoboothImages\over
C:\PhotoboothImages\under
Then save the photo booth settings to three different settings files:
C:\PhotoboothImages\normal\settings.xml - with the photo booth images folder set to C:\PhotoboothImages\normal
C:\PhotoboothImages\over\settings.xml - with the photo booth images folder set to C:\PhotoboothImages\over
C:\PhotoboothImages\underl\settings.xml - with the photo booth images folder set to C:\PhotoboothImages\under
Please note: if you are using a touchscreen you need to create touchscreen actions to load profiles 1 to 3 before saving the settings.
Next create three profiles:
Profile 1 loads C:\PhotoboothImages\normal\settings.xml
Profile 2 loads C:\PhotoboothImages\over\settings.xml
Profile 3 loads C:\PhotoboothImages\saturation\settings.xml
Then copy the PhotoboothCreativeFilter.dll to the "over" and "under" folders (don't copy it to the normal folder). Now run the booth in full screen photo booth mode and select profile 2 to switch to the "over" photo booth images folder. Type Shift+Ctrl+C to display the settings and select "Saturation" from the filter type combo, set the strength to 200 and click on OK to save the settings. Next select profile 3 to switch to the "under" photo booth images folder. Type Shift+Ctrl+C to display the settings and select "Saturation" from the filter type combo, set the strength to 10 and click on OK to save the settings. Check everything is working by selecting profile 1 which should display normal live view images, profile 2 which should display over saturated live view images and profile 3 which should display under saturated images.
Please see the section on Saving settings for future reference and using profiles for more information on using profiles.
Saving a copy of each filtered photo
Select "Save copy of processed photos" in the "Output Settings" dialog to save a copy of each photo after the creative filter effect has been applied.