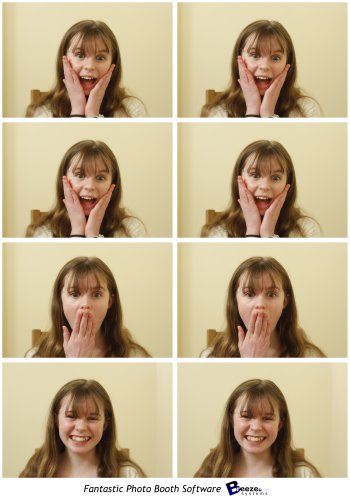
Breeze Viewer is a standalone program for monitoring the contents of a folder and displaying JPEG images or animated GIFs in a slideshow. New images added to the folder are automatically added to the slideshow after a preset "stable time". Breeze Viewer displays the images as a full screen slideshow with a black background and an optional caption showing the image filename. It can be setup to display the newest image only or to run a slideshow of all the images in the folder being monitored.
The following dialog is displayed when Breeze Viewer is run:
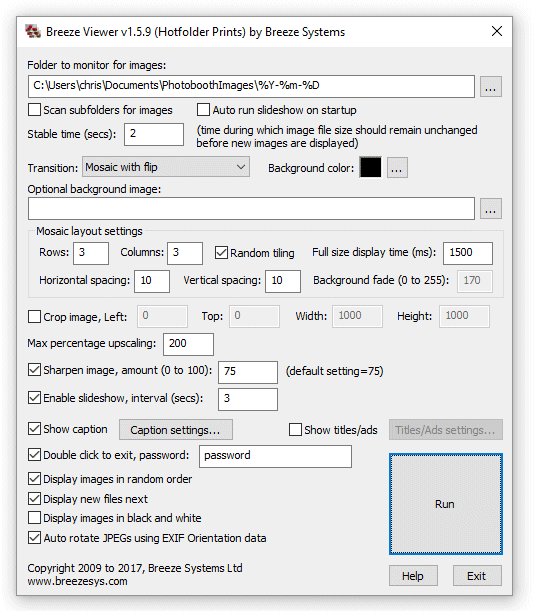
First select the folder to be monitored for images. When new images are found in the folder being monitored they are added to the slideshow and images deleted from the folder are removed from the slideshow. If the "Scan subfolders for images" option is selected BreezeViewer will also scan subfolders for images to include in the slideshow.
Tokens for the date can be used when specifying the folder to be monitored for images e.g. C:\Users\Chris\Documents\PhotoboothImages\%Y-%m-%D. Please see the section on tokens for details of date based tokens.
Select the "Auto run slideshow on startup" if you would like the slideshow to start automatically when Breeze Viewer is run.
The normal way to exit the slideshow is to press the escape key on the keyboard, but this can be a problem if the slideshow is running on a tablet PC which doesn't have a keyboard. If this is a problem, you can select the "Double click to exit" option to exit the slideshow by double clicking in the bottom right corner of the screen. Enter a password in the "password:" edit box to prevent users from being able to exit the slideshow. When a password is defined a touchscreen keyboard asking for the password will be displayed when double clicking in the bottom right corner of the screen.
The "stable time" is the number of seconds the file size must stay the same before the image is displayed by Breeze Viewer. This can be set to a low value such as 2 seconds if the images are simply being copied into the folder from another folder on the disk. A longer value is useful if the images are being transferred by FTP from a remote computer where network delays may cause the transfer to pause for several seconds. This will prevent Breeze Viewer from trying to display an image which has only been partially transferred from the remote computer.
The transition between images can be set to one of the following:
"None" - images are displayed instantly
"Vertical slide" - the next image slides down from the top of the screen and pushes the current image off the bottom
"Diagonal slide" - the next image slides down from the top, right of the screen and pushes the current image off the bottom, left
"Horizontal slide" - the next image slides down from the right of the screen and pushes the current image off the left
"Fade to black" - the current image fades to black then the screen fades from black to the next image
"Dissolve" - the current image dissolves into the next image
"Flip" - the screen flips like turning a playing card to hide the current image and reveal the next image
"Cube" - the screen rotates like a cube to hide the current image and reveal the next image
"Random slides" - randomly uses a vertical, horizontal or diagonal slide for each transition
"Random " - randomly uses one of the above transitions
"Mosaic" - displays a mosaic of images on the screen using the specified number of rows and columns
"Mosaic with fade" - same as mosaic, uses fade to black when switching images
"Mosaic with dissolve" - same as mosaic, uses dissolve when switching images
"Mosaic with zoom" - same as mosaic, but displays each image full screen first then zooms it down to its mosaic display position
"Mosaic with zoom + bg fade" - same as ""mosaic with zoom", but fades the mosaic background when displaying the zoomed image. The "Background fade" setting specifies the amount by which the background is faded (0=no fade, 255=fade to black)
"Mosaic with flip" - same as mosaic, but when updating an image the old image is flipped out and the new image flipped in
Please note: some graphics cards my have limited support for the graphics acceleration required for some of the slideshow transitions and the slideshow may run very slow. Please use the "None" or "Mosaic" slideshow transitions if you experience performance problems.
The background color used for the slideshow can be changed by clicking on the "..." button to the right of the "Background color:" display.
The slideshow can be displayed on an optional JPEG background image by entering the full pathname of image in the "Optional background image:" text box or by clicking on the "..." button and selecting the background file. When the slideshow runs the background image will be resized to fit the screen. If the background image doesn't have the same aspect ratio as the screen the background color will be visible above and below or to the left and right of the background image.
When one of the mosaic layout transitions is selected the "Mosaic layout settings" can be used to adjust the layout. Use the "Rows" and "Columns" settings to specify the number of rows and columns of photos to show. When the "Random tiling" option is selected the photos are updated in random positions on the display. When it is not selected the photos are placed in order from the left to right and top to bottom. The horizontal and vertical spacing options allow the spacing between photos to be adjusted. When using the mosaic with zoom options the "Full screen display time (ms):" setting specifies how long the zoomed image is displayed on the screen before it is displayed in the mosaic e.g. set this to 2000 to display the full size image for 2 seconds.
Images can be cropped before they are displayed by selecting the "Crop image" checkbox and specifying the crop area using the "left", "top", "width" and "height" settings. This option is useful if you are running a slideshow of photos from a photo booth setup to print double strips of 4. You can use the crop option to crop the double strip of 4 into a single strip for display and then maybe use the mosaic display option to display several strips at a time. For example suppose the photo booth is printing double strips of 4 photos on 6"x4" paper @ 300 dpi. The print layout will be 1228 x 1864 pixels in size, including the printer margins, and this can be cropped into a single strip by setting left=14, top=16, width=600 and height=1800.
The "Max percentage upscaling" setting controls the amount by which images can be scaled up to fill the screen. This setting is useful when displaying animated GIF files which may be too small if displayed at their normal size. The default setting is 100% which means that images are not scaled up beyond their normal size. It is recommended that this setting is not set to more than 300% otherwise the images may appear pixellated.
Select "Sharpen image" and the sharpening amount to sharpen the displayed images. This uses the same HQ sharpening method as BreezeBrowser Pro. The default setting is 75.
Select "Enable slideshow" and a suitable interval to display all the images in the folder in a continuous loop. The interval in seconds can be specified in the "Interval (secs):" text box. Use a negative value to specify the interval in milliseconds e.g. -200 to display a slide every 200ms (or 5 slides per second). Please note that minimum slideshow interval may be limited by the speed of the computer.
Select "Show caption" to display the full pathname of each image in the top left corner of the screen. Click on the "Caption settings..." button to specify the caption text, font, color and placement:
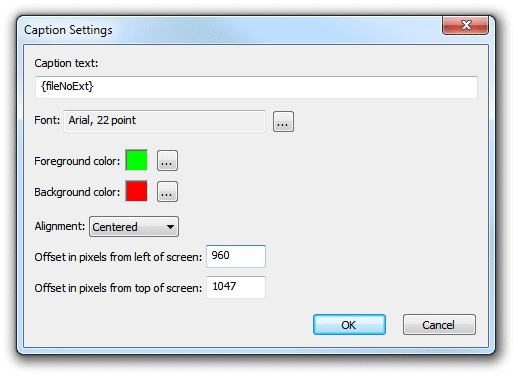
The caption text can use the following tokens to display information about the currently displayed image:
{pathname} - the full pathname of the image including drive letter, folder and filename e.g. C:\photobooth\2012-12-16\IMG_0001.JPG
{dir} - the pathname of the folder being monitored for images e.g. C:\photobooth\2012-12-16
{file} - the filename of the image including the file extension e.g. IMG_0001.JPG
{fileNoExt} - the filename of the image without the file extension e.g. IMG_0001
{time} - the file creation time of the image in 12 hour format e.g. 9:45:07
{time24} - the file creation time of the image in 24 hour format e.g. 21:45:07
%a to %z - various formatting codes to display the date and time using the file creation time (Google strftime for details) e.g. %a gives the abbreviated weekday name
{left,n,str} - Extracts the first n characters from str (which can be a string or token) e.g. {left,4,{file}} gives the first 4 characters of the filename
{mid,n,m,str} - Extracts m characters starting from the n'th character from str (which can be a string or token) e.g. {mid,1,2,{file}} gives the 2nd and 3rd characters of the filename
{right,n,str} - Extracts the last n characters from str (which can be a string or token) e.g. {right,4,{fileNoExt}} gives the last 4 characters of the filename
Click on the "..." button to the right of the font display to select the font type, size and style. Then click on "..." buttons to the right of the foreground and background colors to select the colors.
Use the alignment dropdown list to select the text alignment (left justified, centered or right justified). Then define the placement of the text using the left and top offset values.
When captions are not selected the image is displayed on a plain black background.
Select "Show titles/ads" to display title pages or adverts every few images during the slideshow. Click on the "Titles/Ads settings..." button to display the titles/ads settings page:
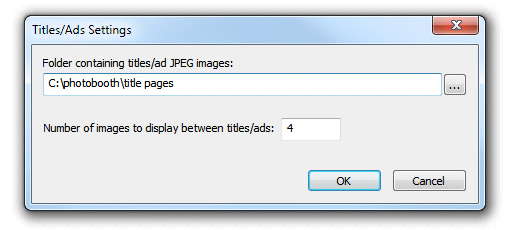
The title pages/adverts need to be in a different folder to the folder that is being monitored for slideshow images and can be selected by clicking on the "..." browse button on the right. The frequency with which the titles/ads are displayed is set using the "Number of images to display between titles/ads" field. When the slideshow is started it scans the folder containing titles/ad JPEG images and sorts them so that they are displayed in alphabetical order.
Select "Display images in random order" to display each image in a random order. To ensure each image is displayed this works in a similar way to shuffling a deck of cards then dealing each card in turn before shuffling again and repeating the process. You can also select the option to "Display new files next" when "Display images in random order" is selected. This will ensure that new files added to the folder are displayed as the next image rather than in random order.
Normally images are automatically rotated using the rotation value read from the EXIF Orientation tag in the image shooting data. Uncheck the "Auto rotate JPEGs using EXIF Oirentation data" option to display images without rotation.
Press the "Run" button to start the viewer using the current settings. On a dual monitor system drag the settings dialog to the monitor you wish to display the images on before pressing the "Run" button. If the "Auto run" option is selected Breeze Viewer will automatically start running the slideshow using the saved settings when it starts up.
Press the "Esc" key to exit the slideshow and return to the settings dialog.
Using Hotfolder Prints to prepare images for Breeze Viewer
A popular use for Breeze Viewer is to display a slideshow of images taken in a photo booth at an event. The simplest way to do this would be to set up the photo booth to make a JPEG copy of the print layout and for Breeze Viewer to display these JPEGs. However, this is something of a compromise because the JPEG copy of the print layout from the photo booth is optimized for printing not for display on a monitor. An alternative option would be to use Hotfolder Prints to create a layout which is optimized for screen display and to display these images in the slideshow. This can be done as follows: first check the resolution of the screen displaying the images, e.g. a 1080p HDTV display has a resolution of 1920x1080 pixels. Then set up Hotfolder Prints to monitor the folder where the photo booth images are saved, and to lay them out on a screen sized page and save them in a subfolder named "slideshow" for Breeze Viewer to display:
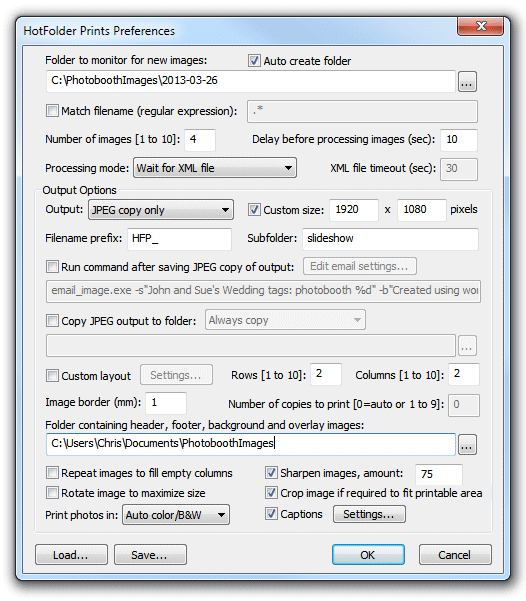
Hotfolder Prints settings for creating a layout for a slideshow. The output option is set to "JPEG only" and a custom size of 1920x1080 pixels is used to match the screen size of the monitor displaying the slideshow. The subfolder is set to "slideshow" so that the JPEG layout images are saved in a separate folder.
The Breeze Viewer settings to display the slideshow would look something like:
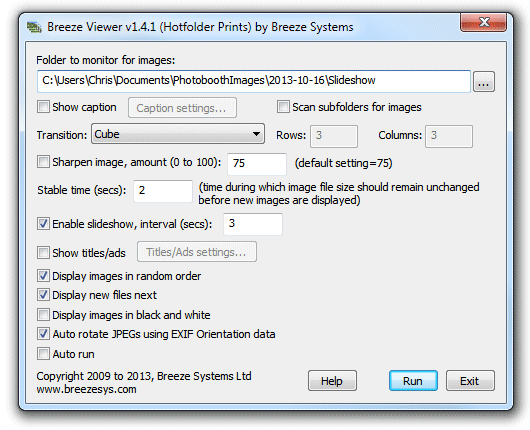
Breeze Viewer slideshow settings to display images saved in the slideshow subfolder by Hotfolder Prints. Note that image sharpening is disabled because the images have already been sharpened by Hotfolder Prints
The images formatted for the slideshow would look something like this:
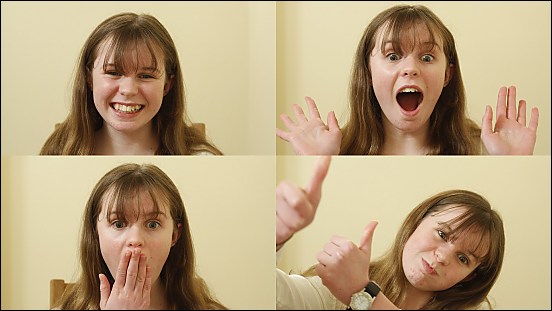
Whereas the JPEG copy of the print layout saved by the photo booth software would look more like this:
|
