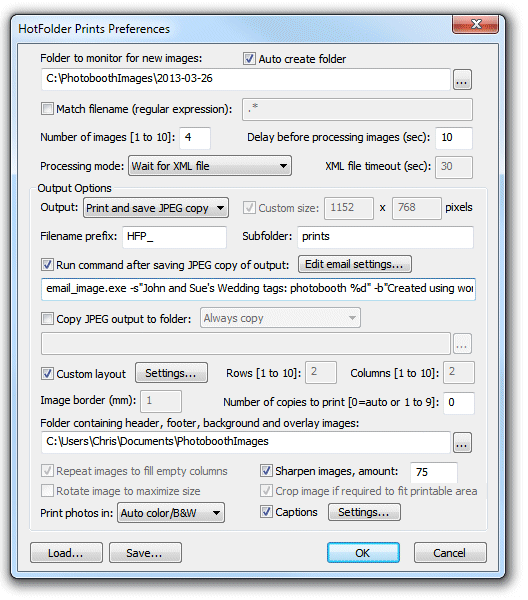
When the output option is set to "Print and JPEG copy" or "JPEG copy only" an optional command can be run on the JPEG copy of the layout:

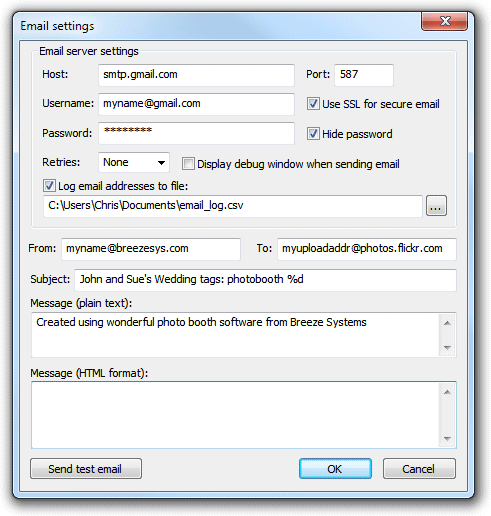
This command is normally used to send an email using the email_image.exe utility included with Hotfolder Prints. Click on the "Edit email settings..." button to display the email settings dialog:

To send an email you need to specify at least the originator's email address (the "From:" field), the recipient's email address (the "To:" field") and the host name of your email server. Most email servers also require a username and a password to prevent unauthorized users from sending spam emails. For additional security select the "Use SSL for secure email" option to send the email using SSL. The port number should normally be set to 587 when using SSL secure email or 25 otherwise (please check the port numbers used by your ISP). Google's free GMail service is a convenient way to send emails and can be set up using the settings shown above and replacing myname@gmail.com with your GMail email address and entering your password.
The subject and message fields can include any of the standard tokens (e.g. %d for the date). The special token {pathname} is be used as a placeholder for the path of the JPEG layout image to be uploaded and is automatically added to the command line by the email settings dialog.
In normal operation no window will be displayed when an email is set. Select the "Display debug window when sending email" if you want to display a window showing information about the sending of the email for debug purposes. If the sending of the email fails for any reason a window containing an error message is displayed for a few seconds. If the internet connection is unreliable the "Retries" setting can be used to set the number of times it attempts to send the email.
Once the email server settings have been entered a test email can be sent by pressing the "Send test email" button. This will call email_images.exe in debug mode and send a short test email and image to test the connection and settings.
The screenshot above shows typical settings for uploading images to Flickr using Google's gmail mail servers.
The email_image.exe command line email utility has the following options:
-d display debug window when sending email
-o<originator> the originator's email address
-r<recipient> the recipient's email address (where the email is sent to)
-s<subject> optional subject line
-b<body> optional message body (plain text)
-H<body> optional message body (HTML format)
-h<host>:<port> hostname of email server and optional port number
-u<username> username of account on email server
-p<password> password of account on email server
-S send email as a secure email using SSL
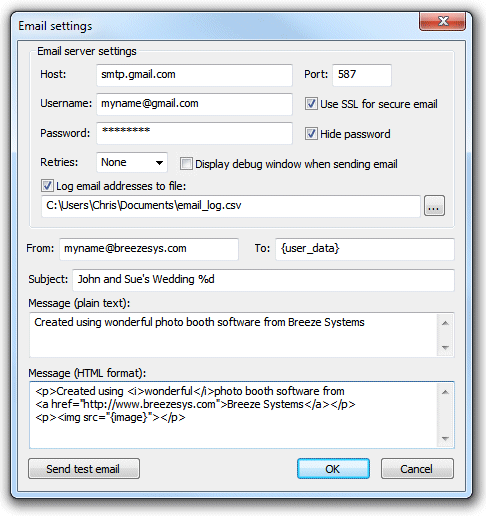
Hotfolder Prints will read user data stored in the XML saved by our photobooth software and make this available in the {user_data} token. This allows users to enter their email address using the touchscreen keyboard option in the photobooth and for Hotfolder Prints to format the images for emailing and then send them to the user's email address:

Multiple user email addresses can be processed by setting the "To:" address to {user_data_emails}. When the {user_data_emails} token is used all the user data tokens (i.e. {user_data} and {user2_data} through {user9_data}) are scanned for correctly formed email addresses and the command is run for each with the email address passed in the {user_data_emails} token. Email addresses must not contain spaces and should start with one or more characters followed by @ and one or more characters followed by . and one or more characters e.g. name@domain.com
Users' email addresses can be saved to a CSV log file for future reference by selecting "Log email addresses to file" and specifying the name and location of the log file. The information is stored in the following format:
<date>,<time>,<email>,<image>,<status>
Where <date> is the date in the form YYYYMMDD, <time> is the time in the form hhmmss, <email> is the user's email address and <status> is "sent" if the email was sent successfully or "fail" if there was an error.
Plain text and HTML format emails
Emails can be sent as plain text only with the image file sent as an attachment or as HTML format emails with the image file embedded in the email. Images can be embedded in an HTML format email by using the <img> tag e.g. <img src="{image}">. When the email is sent the token {image} is replaced with the URL for the embedded image. Multiple images can be embedded in the email by adding their pathnames to the end of the email command (after {filename}) and accessed in the email using the tokens {image2} for the second image, {image3} for the third image etc.
Logging email failures and sending emails after an event
If the internet connection at an event is unreliable or not available Hotfolder Prints may not be able to send the emails during the event but can save a batch file which can be run later when a reliable internet connection is available to send the emails. To enable the writing of the failed emails batch file select the "Log email addresses to file" option and specify the name of the log file. In additional to writing the log file, the commands to send any failed emails will be written to a separate log file which has the same name as the main log file but with _failed.log appended e.g. in the screenshot above the main log file is C:\Users\Chris\Documents\email_log.csv and the failed emails log file would be named C:\Users\Chris\Documents\email_log_failed.log. To send the failed emails simply rename the log file to give it a .bat file extension, e.g. C:\Users\Chris\Documents\email_log_failed.bat, and then run the batch file by double clicking on it in Windows Explorer.
XML file containing user data
Hotfolder reads the email address from an XML file in the folder being monitored and with the same name as the first photo e.g. if you are running a photobooth which takes sets of four photos saved a folder named D:\Photobooth\20121210 with the following filenames:
D:\Photobooth\20121210\IMG_0001.JPG
D:\Photobooth\20121210\IMG_0002.JPG
D:\Photobooth\20121210\IMG_0003.JPG
D:\Photobooth\20121210\IMG_0004.JPG
Hotfolder prints will look for an XML file named D:\Photobooth\20121210\IMG_0001.XML. The touchscreen keyboard option in Breeze Systems' photobooth software will automatically save the information entered by the user to the XML file to be picked up by Hotfolder Prints when it processes the images. If the photobooth software is setup to display the touchscreen keyboard after taking the photos you need to make sure Hotfolder Prints doesn't process the images before users have had time to enter their email address. There are two ways to do this:
| 1. | Set the "Delay before processing images:" to a long enough time to allow users to enter their details e.g. 60 secs |
| 2. | Select the "Wait for XML file before processing images" option so that Hotfolder Prints won't process the images until the XML file has been written and the user data is available |
Option 2 is the recommended method to use because it will start processing the images as soon as the XML file is written whereas option always waits for a "safe" amount of time which may cause a delay. However, if you use the "Wait for XML file" option you do need to make sure that the XML file is written otherwise Hotfolder Prints will keep waiting for the XML file and will stop processing new images. You can avoid this problem by setting a suitable timeout e.g. 120 secs before Hotfolder Prints gives up waiting for the XML file.
Recommended settings: Select "Wait for XML file before processing images" and set a suitable timeout of 120 secs (or more) just in case the XML file isn't written.
Note: Hotfolder Prints looks for the XML file in the same folder as the JPEG images but it can't find the XML file it looks in the parent folder. This is useful when using green screen with Breeze Systems' photo booth software because the XML file and the unmodified JPEG images from the camera are saved in the same folder and a green screened copy of the photos is saved in a subfolder named green screen e.g.
D:\Photobooth\20121210\IMG_0001.JPG - unmodified photo 1 downloaded from the camera showing the green background
D:\Photobooth\20121210\IMG_0002.JPG - unmodified photo 2 downloaded from the camera showing the green background
D:\Photobooth\20121210\IMG_0003.JPG - unmodified photo 3 downloaded from the camera showing the green background
D:\Photobooth\20121210\IMG_0004.JPG - unmodified photo 4 downloaded from the camera showing the green background
D:\Photobooth\20121210\IMG_0004.XML - XML file containing information entered by the user with the photo booth software's touchscreen keyboard
D:\Photobooth\20121210\greenscreen\IMG_0001.JPG - green screened copy of photo 1 with the green background replaced with the green screen background image
D:\Photobooth\20121210\greenscreen\IMG_0002.JPG - green screened copy of photo 2 with the green background replaced with the green screen background image
D:\Photobooth\20121210\greenscreen\IMG_0003.JPG - green screened copy of photo 3 with the green background replaced with the green screen background image
D:\Photobooth\20121210\greenscreen\IMG_0004.JPG - green screened copy of photo 4 with the green background replaced with the green screen background image
With this setup you want to Hotfolder Prints to monitor the D:\Photobooth\20121210\greenscreen folder so that it processes the green screened images not the original photos from the camera which show the green background. Hotfolder Prints will still find the XML file because it looks for the XML file in the D:\Photobooth\20121210\greenscreen folder first and then tries the parent folder D:\Photobooth\20121210