The TriggerBox from ESPER provides a convenient way to trigger all the cameras at the same time. It is particularly useful when using flash because it allows the flash to be triggered after a preset delay so that it is in sync with the cameras.
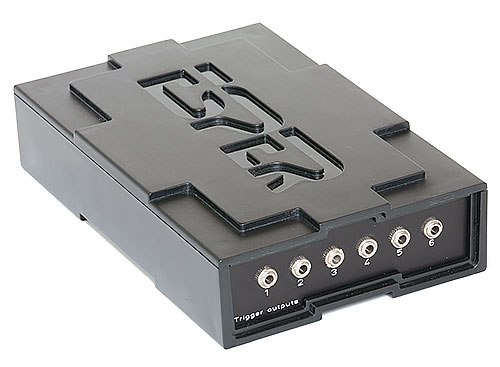
Each TriggerBox has 6 output channels. Each output can be programmed with a different delay and can be used to trigger one or more cameras or flash units. The output sockets are standard 3.5mm stereo sockets and can be connected to the remote release sockets on the cameras using standard 3.5mm to 2.5mm stereo cables.
Multiple TriggerBoxes can be daisy chained together by connecting the link output from the "master" TriggerBox to input of the next TriggerBox and connecting its link output to the input of the next TriggerBox in the chain etc.
Important: Only use stereo cables with standard 3 contact jacks. This is necessary to allow the AF signal and the release signal to be used on each camera. Activating the AF signal shortly before the release signal will give more accurate camera synchronization.
The TriggerBox is powered by a standard USB C cable. This should be connected to the computer running Multi-Camera if you want to be able to use the photo booth mode or to adjust the TriggerBox settings.
The TriggerBox has an input connection which can be used to trigger the cameras using a standard camera remote release or wireless release. The Link connection can be used to link multiple TriggerBoxes together when triggering large numbers of cameras. The link output from the main TriggerBox should be connected to the input socket of the next TriggerBox (and its link output connected to the input of the next TriggerBox and so on).
The TriggerBox also has a mode switch which should be glowing blue. If it is showing green you need to press the mode button to select blue mode. Blue mode allows programmable delays on each channel and control via the USB interface. Green mode disables the output delays and doesn't allow triggering via USB.
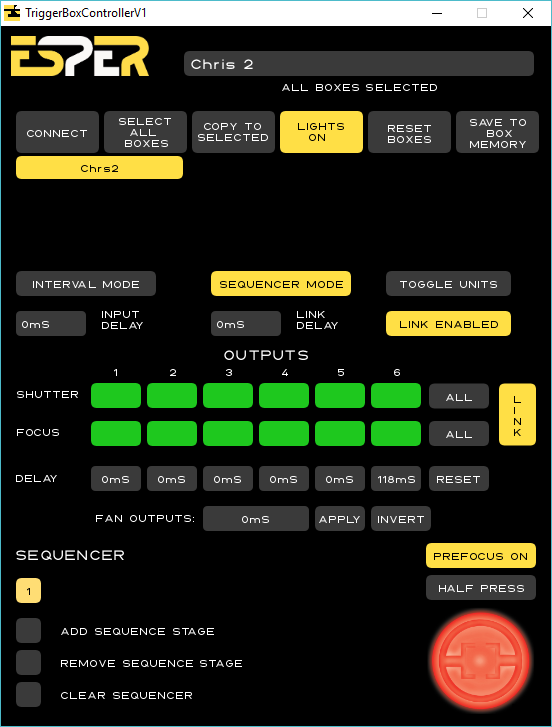
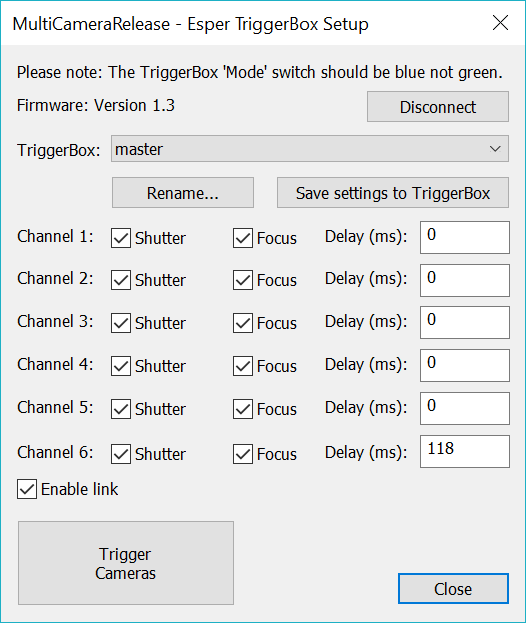
The TriggerBox can be setup using ESPER's control software or by using a simplified interface available by selecting File->Trigger setup... in Multi-Camera. Screenshots from the two tools are shown below:
The ESPER TriggerBox set up application
Multi-Camera's simplified setup tool
If multiple TriggerBoxes are detected they can be selected using the "TriggerBox:" dropdown list.
Set the name of the TriggerBox to identify it. A name will be automatically assigned to each TriggerBox which doesn't have one already. The first unnamed TriggerBox will be named "master" and the remaining ones named "slave1", slave2" etc.
When multiple TriggerBoxes are used the TriggerBoxes are sorted alphabetically by name and the command to trigger the cameras is sent to the first TriggerBox. Suggested naming scheme: first TriggerBox: "master", remaining TriggerBoxes: "slave1", "slave2" etc. This will ensure trigger commands are sent to the TriggerBox named"master".
Each channel has individual setting to enable its shutter release and focus (AF) output and a programmable delay. When using flash channels 1 to 5 are normally used to trigger the cameras and channel 6 is used for the flash.
Enable the shutter and focus outputs for each camera channel and the shutter output for the flash channel (the focus output may also be selected if required).
Normally when using flash the cameras need to be triggered first and the flash after a short delay so that it fires when all the camera shutters are fully open. The settings in the screenshot above should give good results when using a Canon EOS 1300D/Rebel T6. Different camera models may require different settings.
Set "Enable link" when using multiple TriggerBoxes. This will send the AF and release signals to the link output to Trigger the next TriggerBox in line. Please see the notes on using multiple TriggerBoxes at the bottom of this page for more information.
Test photos can be taken by pressing the "Trigger Cameras" button.
Press the "Save settings to TriggerBox" button after adjusting the settings otherwise they changes will be lost when the TriggerBox is turned off.
Syncing Multiple Cameras with Flash
The problem:
The flash needs to be triggered when the shutters from all the cameras are fully open otherwise the images will show dark horizontal bands or will be completely dark. The shutter lag on each camera (the delay between pressing the shutter release button and actually taking the photo) varies by a few milliseconds. This is a problem because most flashes only last for about 1ms and so if the flash is triggered from the hotshoe of one of the cameras it may go off before the other cameras are ready.
For example: if each camera has a shutter lag of between 100ms and 103ms and the flash is triggered from the hotshoe of camera #1 the flash will be triggered too early if camera #1's shutter lag is 100ms and camera #2's shutter lag is 103ms.
The solution:
Use the slowest acceptable shutter speed and trigger the flash after a delay so that it fires mid-way through the exposure.
If the shutter speed is set to the normal flash sync speed (e.g. 1/200 sec) the camera's shutter will be fully open for less than 5ms whereas if the shutter speed is set to 1/30 sec the shutter will be fully open for around 30ms. Using a slower shutter speed does not affect the flash exposure (this is only affected by the aperture and the ISO setting). By using a slower shutter speed we have a much bigger time window in which the flash can be fired and reduces the chances of it being affected by small variations in the shutter lags of each camera.
e.g. if each camera has a shutter lag between 100ms and 103ms and the shutter is fully open for 30ms the fastest camera will have its shutter fully open from 100ms to 130ms after it was triggered and the slowest camera will have its shutter fully open from 103ms to 133ms. This means the flash can be triggered any time between 103ms and 130ms after the camera trigger signal. Ideally we want to trigger the flash in the middle of this window i.e. 116ms after sending the trigger signal.
Note: Use the slowest shutter speed you can that is not affected by the ambient lighting i.e. gives dark photos when the flash is turned off. If the ambient lighting is bright you may need to use a faster shutter speed otherwise you may get some ghosting.
How to determine the correct flash delay
1) Setup:
Set the cameras to manual exposure with a shutter speed of 1/60 sec, aperture f8 and ISO 100.
Connect the cameras to channels 1 to 5 of the TriggerBox and the flash to channel 6.
Set the delays for channels 1 to 5 to 0 and the delay for channel 6 to 50.
2) Find the earliest time when all the shutters are fully open:
Press the "Trigger Cameras" button and check the photos taken by each camera - they should all be too dark because the flash fired too early.
Add 10 to the delay for channel 6 and take another set of test photos.
Keep repeating this, adding 10 ms to the delay until all the photos are bright and evenly lit.
Now subtract 1 from the delay and take another set of test photos. Keep subtracting one and taking test photos until some of the photos are dark or not evenly lit.
Make a note of the shortest delay which gives bright, evenly exposed photos from all cameras.
3) Find the latest time when all the shutter are fully open
Add 10 to the delay found in step 2 and take a test photo. All the photos should still be bright and evenly lit.
Keep adding 10ms to the delay and taking test photos until some of the cameras have dark photos or are not evenly lit.
Now subtract 1 from the delay and take another set of test photos. Keep subtracting one and taking test photos until all of the photos are bright and evenly lit.
This is the longest delay which gives bright, evenly exposed photos from all cameras.
4) Take the average time from steps 2 and 3 and set this as the delay for channel 6 e.g. if step 2 gave a minimum time of 100ms and step 3 gave a maximum time of 116ms, set the delay to 108ms.
This will trigger the flash in the middle of the average exposure of all the cameras and will maximize the chances of it being triggered when all the camera shutters are fully open.
5) Save the settings to the TriggerBox.
Notes on using multiple TriggerBoxes
Each TriggerBox has an input, a link output and six outputs to trigger cameras or flashes. One TriggerBox can be used to trigger 5 cameras with flash or up to 10 cameras with flash by using splitter cables on each output.
Larger numbers of cameras can be triggered by using multiple TriggerBoxes and daisy chaining them together by connecting the link output from the first TriggerBox to the input of the next TriggerBox and connecting its output to the next TriggerBox in line and so on.
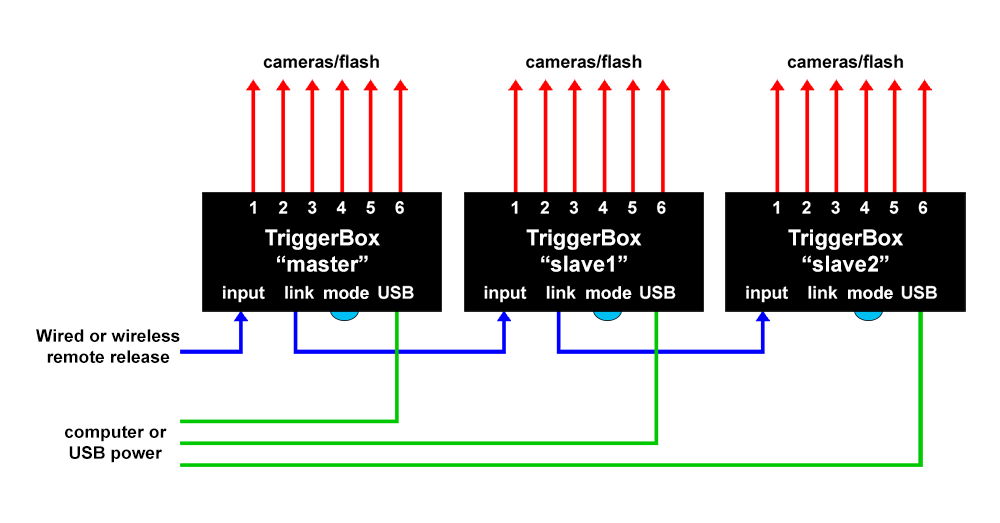
If you are using photo booth mode the cameras will be triggered by the computer sending a command via the TriggerBox's USB interface. If multiple TriggerBoxes are connected to the computer it is important to name them so that the command is sent to the correct TriggerBox. The names are sorted alphabetically and the command is sent to the first TriggerBox e.g. if the TriggerBoxes are named "master", "slave1", "slave2" etc. the command will be sent to the TriggerBox named "master". The "master" TriggerBox needs to be connected to the computer controlling the cameras so that it receives the USB command to trigger the cameras. The remaining TriggerBoxes can be either be connected to the same computer or to USB power supplies. Once the TriggerBoxes have been programmed and the settings saved they can be connected to USB power adapters. This reduce the time it takes to connect to the TriggerBoxes when selecting photo booth mode.
IMPORTANT: Please check that each TriggerBox has firmware version 1.3 or later if they are to be powered from USB power adapters. This is because there is a problem with the AF signal not being sent to the link output when using firmware version 1.2. This will cause the camera sync to be unreliable: to get reliable sync you need to set AF (or half-press the shutter release) and then trigger the cameras.
If you are not using photo booth mode the cameras can be triggered by connecting a wired or wireless remote release to the master TriggerBox. This will work with all versions of TriggerBox firmware provided the "Enable link" option is selected in the TriggerBox settings.