In Operation
Once everything is setup simply run Webcam Photobooth and press F5 to enter full screen mode and display the ready screen. You probably don't want to have a keyboard on show otherwise users will be able to exit the photobooth mode and access your computer. There are a number of methods that can be used to start the photobooth shooting sequence:
| 1. | The simplest option is to use a mouse and set the start option to "Left click to start, right click to toggle B&W mode" or one of the other left click options. Provided the keyboard is hidden away the users won't be able to access your computer but use the left mouse button to start the sequence and the right mouse button to toggle between B&W and color photos. |
| 2. | Alternatively you could use a programmable USB input device which can be setup to send an F4 key press to Webcam Photobooth: a) The Powermate from Griffin Technology (http://www.griffintechnology.com/products/powermate/) is an inexpensive and nicely made device which works very well. b) The StealthSwitch (http://www.stealthswitch.com) is a very robust foot switch which simply needs to be plugged in to be used in fullscreen photobooth mode. No additional drivers need to be installed. The desktop hiding software that comes with the StealthSwitch should be disabled otherwise the photobooth screen will be hidden when the switch is pressed. |
| 3. | For a more professional setup you could use external panel mounted buttons. |
| 4. | Use a touchscreen and one of the left click start options |
The keyboard shortcuts Ctrl+1, Ctrl+2, Ctrl+3, Ctrl+4, Ctrl+5, Ctrl+6, Ctrl+7, Ctrl+8 or Ctrl+9 can be used to specify the number of copies of prints when running in full screen photobooth mode. The number pad "add" and "subtract" keys can also be used to increase or decrease the number of copies. A small confirmation message is displayed for approximately 2 seconds in the bottom right corner of the display when the number of copies is changed.
A default profile can be used to reset the photobooth to a known state after each shooting sequence.
To exit fullscreen photobooth mode either press the Esc key or hold down the SHIFT key and press the left mouse button.
Reprints
The last print layout can be reprinted by typing Ctrl+R in full screen photobooth mode. Alternatively select the output option to also save a JPEG copy and then use a browser or image editor to select and print the required layout.
Reprint Selection Screen
A reprint selection screen is available from the ready screen which allows users (or the photo booth operator) to quickly select a set of photos to be reprinted. The reprint selection screen can be displayed by typing Ctrl+Alt+P or by using the "Display reprint screen" touchscreen action. This will display a screen showing thumbnails of the JPEG copies of prints stored in the prints subfolder. The user can select one or more photos and the number of copies to be reprinted using the touchscreen or by using the cursor keys or mouse if no touchscreen is available. After selecting the photos they can be printed by pressing the Enter key or typing A or by clicking on the printer icon in the center bottom of the screen. The user can also cancel the reprint selection screen and return to the ready screen by typing Esc or X or by clicking on the cancel icon at the right bottom of the screen. The reprint selection screen will also cancel automatically if a timeout occurs. Clicking in the bottom left corner of the screen deselects all selected photos when using the ReprintMultiSelect option.
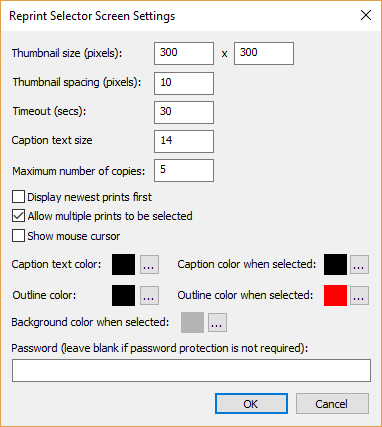
The reprint selection screen can be customized by clicking on the "Reprint screen settings..." button in the "Photobooth Settings" dialog and the "Reprint Selection Screen Settings" dialog will be displayed:
The bottom area of the reprint selection screen defaults to the Windows default background color with a printer icon and a red cross to cancel the screen. The icons can be replaced by putting PNG images named Printer-icon.png and Cancel-icon.png in your photo booth images folder. Alternatively you can use create screen image named reprint.jpg in your photo booth images folder (please note that only the bottom portion of the reprint.jpg screen will be visible).
The "Thumbnail size" setting specifies the width and height of the thumbnails and the "Thumbnail spacing" setting specifies the spacing between the thumbnails. These settings are in pixels.
The "Caption text size" specifies the size of the text used for the caption beneath each thumbnail.
The "Timeout" settings specifies how long it takes the screen to timeout and close when there is no user input.
The "Maximum number of copies" specifies the maximum number of copies the user is allowed to select. If this is set to more than 1 the currently selected number of copies will be displayed together with a - and a + sign for decreasing or increasing the number of copies to print. If a reprint.jpg screen is in the current photo booth images folder this will be displayed instead of the - and + signs.
When "Display newest prints first" is selected the thumbnails will be sorted by their file creation timestamp with the most recently created thumbnails displayed first. When this option is not selected the order will be reversed and the oldest thumbnails will be displayed first.
Select "Allow multiple prints to be selected" if you want users to be able to select more than one print. When this is selected users can select a thumbnail by tapping on it and deselect it by tapping on it a second time.
When "Allow multiple prints to be selected" is not selected only one thumbnail can be selected at a time. If another thumbnail is tapped it will be selected and the original thumbnail deselected.
Select the "Show mouse cursor" option to display the mouse cursor to make it easier to select reprints when using a mouse.
Use the "Caption text color" and "Caption color when selected" settings to set the color used to display the captions. Click on the "..." buttons to change the colors.
The thumbnails are displayed on a white background and if the thumbnails themselves have a white background it can be difficult to see them properly. By default a thin black outline is displayed around the thumbanils to make them easier to see. Use the "Outline color" setting to change the color. A different color can be used for the outline when a thumbnail is selected to help highlight it.
Use the "Background color when selected" setting to specify the color of the background used to highlight thumbnails that have been selected.
Where Photos, Videos and GIFs are Saved
Photos and videos taken by the webcam are downloaded to the PC and saved in the download folder. The location of the download folder is set in the "Output" tab of the "Webcam Photobooth Settings" dialog:
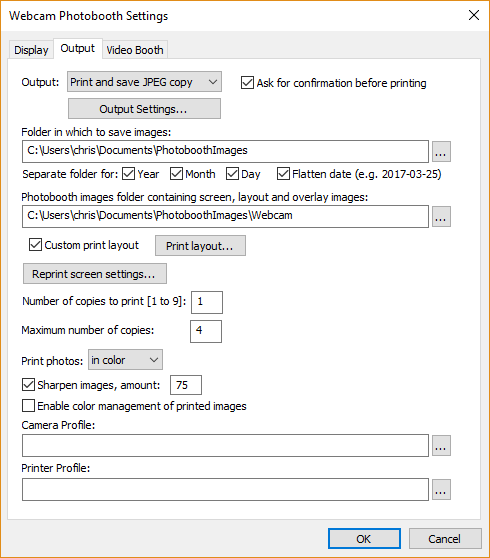
The settings shown above will save photos in a separate subfolder of C:\Users\chris\Documents\PhotoboothImages for each date.
e.g. photos and videos captured on June 15, 2016 are saved in:
C:\Users\chris\Documents\PhotoboothImages\2016-06-15
The XML shooting information file (see below) is also saved in the download folder.
If the output is set to "Print and Save JPEG copy" or "Jpeg copy only" the JPEG copy of the printed output will be saved in a subfolder of the download folder named "prints"
e.g. the JPEG copy of prints from photos taken on June 15, 2016 are saved in:
C:\Users\chris\Documents\PhotoboothImages\2016-06-15\prints
Videos are saved in a subfolder of the download folder named "video"
e.g. the videos captured on June 15, 2016 are saved in:
C:\Users\chris\Documents\PhotoboothImages\2016-06-15\video
If one of the GIF animation options is selected the animated GIFs are saved in a subfolder of the download folder named "GIF"
e.g. GIFs created on June 15, 2016 are saved in:
C:\Users\chris\Documents\PhotoboothImages\2016-06-15\GIF
After each set of shots an XML file containing information about the set of photos is written to the folder where the photos are downloaded from the camera. The XML file has the same filename as the first shot in the sequence (but with a .XML file extension). An example XML shooting information file is shown below:
<?xml version="1.0" ?>
<breeze_systems_photobooth version="1.1">
<photo_information>
<date>2011/01/26</date>
<time>16:37:19</time>
<user_data>sales@breezesys.com</user_data>
<photobooth_images_folder>C:\Photobooth\PhotoboothImages</photobooth_images_folder>
<caption1>First caption</caption1>
<caption2>Second caption</caption2>
<photos>
<photo image="1">20110126_163719_1.JPG</photo>
<photo image="2">20110126_163719_2.JPG</photo>
<photo image="3">20110126_163719_3.JPG</photo>
<photo image="4">20110126_163719_4.JPG</photo>
<output>prints\20110126_163719.jpg</output>
</photos>
</photo_information>
</breeze_systems_photobooth>
The <date> and <time> tags contain the date and time of the first shot in the sequence. Please note that the date and time will only be correct if the PC's clock is set correctly.
The <user_data> tag contains the text entered by the user if the touchscreen keyboard option is used.
The <photobooth_images_folder> contains the full pathname of the photo booth images folder.
The <caption1> and <caption2> tags contain the text used for the captions printed on the photos or empty strings if these are not defined.
The <photo> tags contain the filenames of the photos taken in the shooting sequence.
The <output> tag contains the filename of the JPEG copy of the printed output (if selected).
The writing of the XML shooting information file can be suppressed by setting the following value in the Windows registry to 1:
HKEY_CURRENT_USER\Software\BreezeSystems\WebcamPhotobooth\101\PhotoboothSuppressXml
This can be done by creating a text file named SuppressXML.reg containing the following and then double clicking on the file in Windows Explorer to copy the information to the registry:
Windows Registry Editor Version 5.00
[HKEY_CURRENT_USER\Software\BreezeSystems\WebcamPhotobooth\101]
"PhotoboothSuppressXml"=dword:00000001
Please note that this setting will be ignored and the XML will be written if the touchscreen keyboard option is used.