A video booth is similar to a photobooth except instead of taking one or more stills pictures it captures a short video clip. Video booth shooting is available with all webcams and can be used to record a video clip complete with sound.
Overview
The video booth mode works in a similar way to photobooth mode. Users are presented with a ready screen with a live view display showing what the camera sees. When the user presses the start button a countdown screen is displayed together with countdown message. At the end of the countdown the capture screen is displayed together with a progress bar that shows how much time is remaining. After the video clip has been captured the processing screen is displayed and the AVI movie file is saved to the computer's hard disk. After downloading an optional playback screen cam be displayed allowing users to review the video clip and decide whether to keep it or to try again. After playback the ready screen is displayed ready for the next video capture.
Video Booth Settings
The video booth settings page can be displayed by clicking on the "Video Booth" tab in the Webcam Photobooth settings dialog:
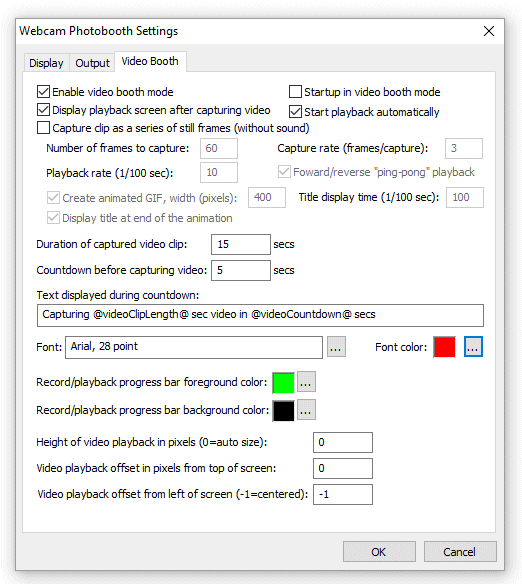
In order to use the video booth mode it must be enabled by selecting "Enable video in photobooth mode". Normally when you enter fullscreen photobooth mode (by typing F5) the photobooth ready screen will be displayed. If you wish to startup in video booth mode select the "Startup in video booth mode when selecting full screen photobooth" checkbox.
Select the "Display playback screen after capturing video" to allow users to play back the video and decide whether to accept it or reject it. The playback screen will be displayed until the user either accepts or rejects the video. When the video is rejected it is automatically deleted from the computer. When the "Start playback automatically" option is selected video playback will start automatically when the playback screen is displayed.
Use the "Duration of captured video clip" setting to specify the duration of the video clip in seconds. This can be any value up to 120 seconds (2 minutes). A touchscreen action can be defined to allow users to stop recording the clip before it reaches its preset duration. The recording can also be stopped by pressing the End key.
Use the "Countdown before capturing video" setting to specify the length of the countdown before video capture starts. The countdown text is displayed during the countdown and is updated every second. The following tokens can be used:
@videoClipLength@ - the duration of the video clip in seconds
@videoCountdown@ - the number of seconds remaining before video capture starts
Use the "..." buttons after the font and font color displays to change the font and color of the countdown text.
Use the "..." buttons after the record/playback progress bar foreground and background color displays to change the colors of the progress bar displayed during recording and playback.
Note: the progress bar can be hidden by setting the foreground and background colors to the same values.
The size and position of the video playback window can be specified using the height, top offset and left offset settings. If the height is set to 0 the video will be sized to fit the screen or up to twice the size of the video data, whichever is smallest. This is to avoid a poor quality display due to enlarging the video too much. If the left offset is set to 0 the video window will be centered horizontally on the display.
The size and position of the live view display during video capture uses the same settings as the stills photobooth and can be specified by clicking on the "Display" tab. The various screens used by the video booth should be saved in the photobooth images folder which can be specified by clicking on the "Output" tab.
Capturing a Series of Still Photos to Create an Animated GIF
Video booth mode can also be used to capture a series of still photos which can be combined to create an animated GIF which plays in a continuous loop. The animation can play the clip continuously, repeating from the start (e.g. frames 1, 2, 3, 4, 5 then frames 1, 2, 3, 4, 5 again) or it can play the clip forwards then backwards (e.g. frames 1, 2, 3, 4, 5, 4, 3, 2, 1, 2, 3, 4, 5 etc.).
The still frames are captured from the live view display and will be green screened if "Enable green screening of live view images" is selected. The size of saved photos will depend on the resolution of the live view images for the camera being used. Recent Canon DSLRs have a live view resolution of 960x640 pixels.
To enable this select the "Capture clip as a series of still frames (without sound)" option. Then select the number of frames to capture in the sequence. Setting the number of frames to between 5 and 10 works well for a 1 sec or 2 sec clip. A higher value will give a smoother animation but will result in a larger file size. A smaller value may cause the clip to appear as a series of jumps from frame to frame rather than as an animation.
The "Capture rate (frames/capture)" setting specifies how often the live view frames should be saved. The live view frame rate is approximately 12 frames/sec, but this may depend on the webcam and the speed of the computer. Setting the capture rate to 5 frames/capture will capture a frame approximately every 0.4 secs. The duration of the clip depends on the live view frame rate, the capture rate and the number of frames to capture e.g. with a live view frame rate of 12fps, capturing a total of 6 frames at a rate of one frame every 5 live view frames the clip would take 6 * 5 / 12 = 2.5 secs.
Select the "Display playback screen after capturing video" option to play back the clip after capture. The playback rate is specified as the time each frame is displayed in 1/100 sec e.g. setting this to 8 will play the clip back at approximately normal speed (approx 12fps), 16 will play it back in approximately half speed slow motion (approx 6 fps) etc.
Examples:
Number of frames to capture=10, capture rate=5, playback rate=40. This will capture a clip lasting approximately 4 secs and play it back at normal speed
Number of frames to capture=10, capture rate=1, playback rate=40. This will capture a clip lasting approximately 1 sec and play it back in slow motion lasting about 4 secs
Number of frames to capture=10, capture rate=5, playback rate=10. This will capture a clip lasting approximately 4 sec and play it back at high speed lasting about 1 sec
Normally the clip is played back in the forward direction in a loop e.g. frame 1, 2, 3, 4, 5, 6, 7, 8, 9, 10, 1, 2, 3, 4, 5, 6, 7, 8, 9, 10, 1, 2, 3 etc.
Select the 'Forward/reverse "ping-pong" playback' option to play the clip forwards then backwards before repeating e.g. frame 1, 2, 3, 4, 5, 6, 7, 8, 9, 10, 9, 8, 7, 6, 5, 4, 3, 2, 1, 2, 3, 4, 5, 6, 7, 8, 9, 10, 9, 8, 7 etc.
If the user accepts the clip in the playback screen the captured live view images are saved as JPEG files together with an XML video booth summary file. The XML summary file contains the following information:
<?xml version="1.0" encoding="UTF-8"?>
<breeze_systems_photobooth version="3.5">
<video_information>
<date>2016/05/04</date>
<time>13:50:24</time>
<photos>
<photo image="1">FYQ65498_0001_01.JPG</photo>
<photo image="2">FYQ65498_0001_02.JPG</photo>
<photo image="3">FYQ65498_0001_03.JPG</photo>
<photo image="4">FYQ65498_0001_04.JPG</photo>
<photo image="5">FYQ65498_0001_05.JPG</photo>
<photo image="6">FYQ65498_0001_06.JPG</photo>
<photo image="7">FYQ65498_0001_07.JPG</photo>
<photo image="8">FYQ65498_0001_08.JPG</photo>
</photos>
<evf_interval_ms>80</evf_interval_ms>
<num_frames>10</num_frames>
<capture_freq>5</capture_freq>
<image_delay>10</image_delay>
<ping_pong_playback>1</ping_pong_playback>
<gif_file>GIF\FYQ65498_0001_01.GIF</gif_file>
<user_data></user_data>
<photobooth_images_folder>C:\Users\Chris\Documents\PhotoboothImages\animated_gif_example</photobooth_images_folder>
</video_information>
</breeze_systems_photobooth>
Animated GIFs
Select the "Create animated GIF" option and set the width to created an animated GIF of the video clip. Please see the Animated GIF section for details on how to set this up. Breeze Systems' Breeze Kiosk software can be used to view the animated GIFs as a slideshow or interactively so that users can email the animated GIFs.
Images displayed to the user
The following screen images are displayed to the user at different stages of the video capture:
video_ready.jpg - displayed when the video booth is ready to capture the next clip
video_countdown.jpg - displayed together with the countdown text during the countdown before capturing the clip
video_capture.jpg - displayed together with a progress bar while the video clip is being captured
video_processing.jpg - displayed after video capture while the movie file is being transferred to the PC
video_playback.jpg - displayed when playing back the video that has just been captured
video_playback_finished.jpg - optional screen image displayed after playback or after downloading the video if auto playback is not enabled
The images displayed to the user should be the same size or bigger than the computer's display. If the images are too small they will be expanded to fit with a black border and a small warning message will be displayed in the bottom left corner showing the image size and the display size.
Audio prompts can be added by placing a WAV sound file in the photobooth images folder and giving it the same name as prompt screen. For example to play a sound when the video booth is ready copy a WAV file named video_ready.wav into the photobooth images folder and it will be played when the video_ready.jpg image is displayed.
In Operation
Once everything is setup simply run Webcam Photobooth and press F5 to enter full screen mode and display the ready screen. If the "Startup in video booth mode when selecting full screen photobooth" is not set the window will start in photobooth mode. You can switch from photobooth mode to video booth mode by typing Ctrl+V and from video booth mode back to photobooth mode by typing Ctrl+P. In video booth mode press F4 or F5 to start the video capture sequence. The user can then press the "End" key to stop the recording or wait until it reaches the duration setting and stops automatically.
When the video playback screen is displayed the user can type P to play the video, A to accept it or X to reject it.
Please see keyboard shortcuts for a complete list of keyboard shortcuts.
To exit fullscreen photobooth mode either press the Esc key or hold down the SHIFT key and press the left mouse button.
Please note: The black and white and image rotate options are not available when using video booth mode. These settings can only be used in stills photobooth mode.