Breeze apps offer unparalled creative control over what guests see and experience at your booth. The power and flexibility of touch screen actions are key to this experience.
Guests see a combination of the design assets (background, overlay, text and animations) plus the ‘live view’ or images taken at the booth.
When Breeze Booth apps are controlled by a touch screen, touch screen actions control what happens when a guest touches any position on the screen.
Many of these actions are generated automatically when you run the set up wizard. You can add extra actions to alter the way the booth works, and move them to vary designs using touchscreen settings.
Accessing the touch screen settings windows in Breeze apps
The touchscreen settings windows are reached by slightly different routes in each app. This section includes a labelled screenshot and short notes explaining how to open these screens.
Opening touchscreen settings in DSLR Remote Pro
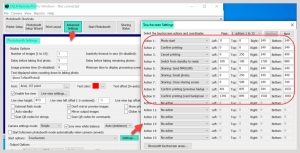
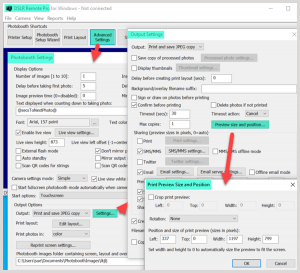
Open Advanced Settings and select the Touchscreen Settings.. button.
(1) In the Touchscreen Settings window, click on Show/edit touchscreen areas. After a short pause, you will see the Ready screen for your current design.

Opening touchscreen settings in Breeze DSLR Remote Pro
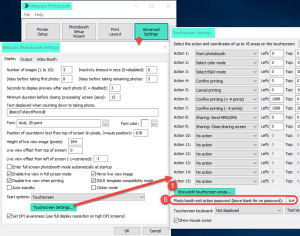
Opening touchscreen settings in Webcam Photobooth
Open Advanced Settings and select the Touchscreen Settings.. button.
(1) In the Touchscreen Settings window, click on Show/edit touchscreen areas. After a short pause, you will see the Ready screen for your current design.
Opening touchscreen settings in Breeze Webcam Photobooth
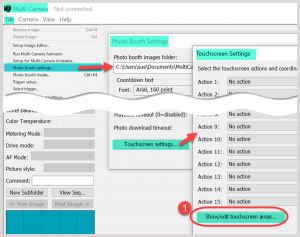
Opening touchscreen settings in Multi-Camera
Select the File dropdown menu and choose Photo booth settings.. Click on the Touchscreen settings button.
(1) In the Touchscreen Settings window, click on Show/edit touchscreen areas. After a short pause, you will see the Ready screen for your current design.
Opening touchscreen settings in Breeze Multi-Camera
Opening touchscreen settings in Breeze Flipbook
Select the Setup.. button to open the Properties window. If necessary, change Touchscreen areas: to User Defined. Once this is done click on the Settings.. button.
(1) In the Touchscreen Settings window, click on Show/edit touchscreen areas. After a short pause, you will see the Ready screen for your current design.
Opening touchscreen settings in Breeze Flipbook Photobooth
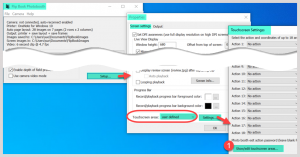
Touch screen settings windows
The touch screen settings windows work the same way in each app. They display screen backgrounds (eg ready.jpg) and any print preview area/location for each screen, superimposed by the actions.
Use these settings windows to add, remove, drag and drop touchscreen actions. You can also drag and drop print previews. Any ready screen overlay (DSLR Remote Pro and Webcam Photobooth only) will be displayed on the ready screen window.
Keyboard screens are not displayed in the touchscreen settings windows. How to customize keyboards
The following examples show how to add touch screen actions to DSLR Remote Pro. Add actions to Multi-Camera, Webcam Photobooth and Breeze Flipbook in the same way.
Example 1: Adding a hidden exit
You need a controlled way to leave the photo booth app, which your customers cannot use. Most operators use a hidden button.
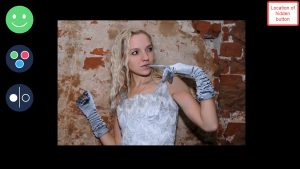
Breeze DSLR Remote Pro Ready screen showing location of secret exit
Right click anywhere on the touch screen window for the Ready screen to show the current screen and add new actions.
Adding a touch screen action to exit the photo booth screens (Breeze DSLR Remote Pro)
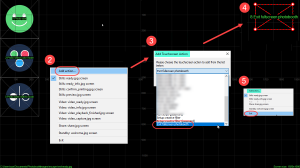
This example already has actions to start the booth and switch between color and black & white. To add the secret exit
(2) Select Add Action
(3) Choose the action Exit Full screen photobooth from the drop down list
(4) Drag and drop the action to a convenient location. Use an empty corner of your screen for hidden buttons. Guests won’t see them but you and your staff will find them easily.
(5) Right click again and choose Exit. Save your edited settings as you leave the screen.
(6) On your way out, add a password in case a guest guesses the location of your button, or touches it by mistake.
Example 2: Offering a choice of virtual backgrounds
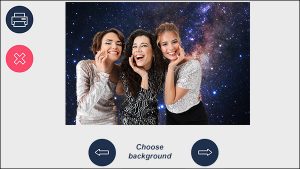
This example adds actions to the print confirmation screen so that guests can choose between different virtual backgrounds after the photo(s) are taken (DSLR Remote Pro only).
First edit the original print confirmation background (confirm_printing.jpg) in a graphics editor to show guests where to touch the screen.
Put the new version into your PhotoboothImages folder. The new background must have the same name (confirm_printing.jpg) .
Here Choose background text and left & right arrows thave been added to the confirm_printing.jpg created by the setup wizard.
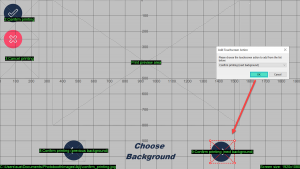
Start DSLR Remote Pro and open the touchscreen settings again. At first you will see your Ready screen
- Right click on an empty part of the screen
- Choose Stills: confirm_printing.jpg screen
- Click on the Print preview area and make it smaller to make room for your new buttons. (Keep the same aspect ratio)
- Right click and choose Add action
- Choose Confirm printing (previous background) from the dropdown list and select OK
- Drag the new action to the back arrow, and resize it to cover the button
- Repeat, adding the action Confirm printing (next background) to your forward arrow
- Right click to exit, remembering to save your changes as you leave.
Note: This tutorial covers only setting up touchscreen actions. To offer a choice of virtual backgrounds, you also need to run AI background removal and add your backgrounds to the PhotoboothImages folder More..
Links to more worked examples
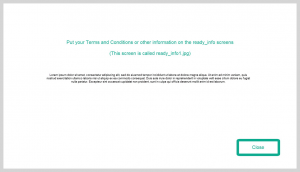
Adding information screens and privacy notices here
Offering choice with a menu driven interface here
Troubleshooting and detailed help
- It is usually simplest to create background graphics first, then drag and drop actions into position over the graphics.
- If you cannot see a screen background, check you have named it correctly. Check screen names in the online manuals*
- Overlapping actions can cause unexpected results.
- Actions can be larger than the buttons on the screen background
- For precise placement, define the position and size of touch screen actions in pixels using the Touchscreen settings window:
*Find the list of screen names by clicking on the apps link here: DSLR Remote Pro, Multi-Camera, Webcam Photobooth, Breeze Flipbook
- DSLR Remote Pro Print preview position and rotation can also be specified in the Print Preview Size and Position window
Find the full online manual for DSLR Remote Pro here
Find the full online manual forMulti-Camera here
Find the full online manual for Webcam Photobooth here
Find the full online manual forBreeze Flipbook here
Summary
This tutorial explained how to add touch screen actions to customize DSLR Remote Pro, Multi-Camera,Webcam Photobooth and Flipbook screens.
Find out more about customizing the guest interface in the tutorials section of the website
© Breeze Systems 2022