Three tutorials explain how to email photo, GIF and video images from a touchscreen photo booth running DSLR Remote Pro.
Sending Emails 3 introduces branding and personalizing emails, and selecting email attachments
- Branding and personalizing emails
- Choosing attachments
Sending Emails 1 went through the basics
- Running the setup wizard to create a full set of screens and working booth
- Setting up email server settings
- Sharing photos, GIFs and MP4s
- Image quality vs sharing speed
- Checking for unsent emails
Sending Emails 2 introduced efficient sharing at large and busy events, and reporting sharing statistics
- Efficient sharing at large and busy events
- Running a separate sharing station
- Touch free sharing
- Logging email addresses
- Sharing statistics
Note: Breeze customers are welcome to copy, use and adapt the HTML samples in this tutorial. They are supplied ‘as is’ without any warranty.
Brand and personalize email content
Standard email message
You do not have to customize the message sent with your photos and animated GIFS. The standard settings in DSLR Remote Pro include the image(s) captured in the booth and the text Your photo booth photos taken on 2 February 2022 (or whatever date the images were taken) in every email guests send.
Customizing the email subject and message
The emails guests send can be a powerful marketing tool for your business. Make them work for you by customizing the message sent with your image(s). Use your own text, Breeze tokens, link to your website or create bespoke html emails in the Email Settings screen.
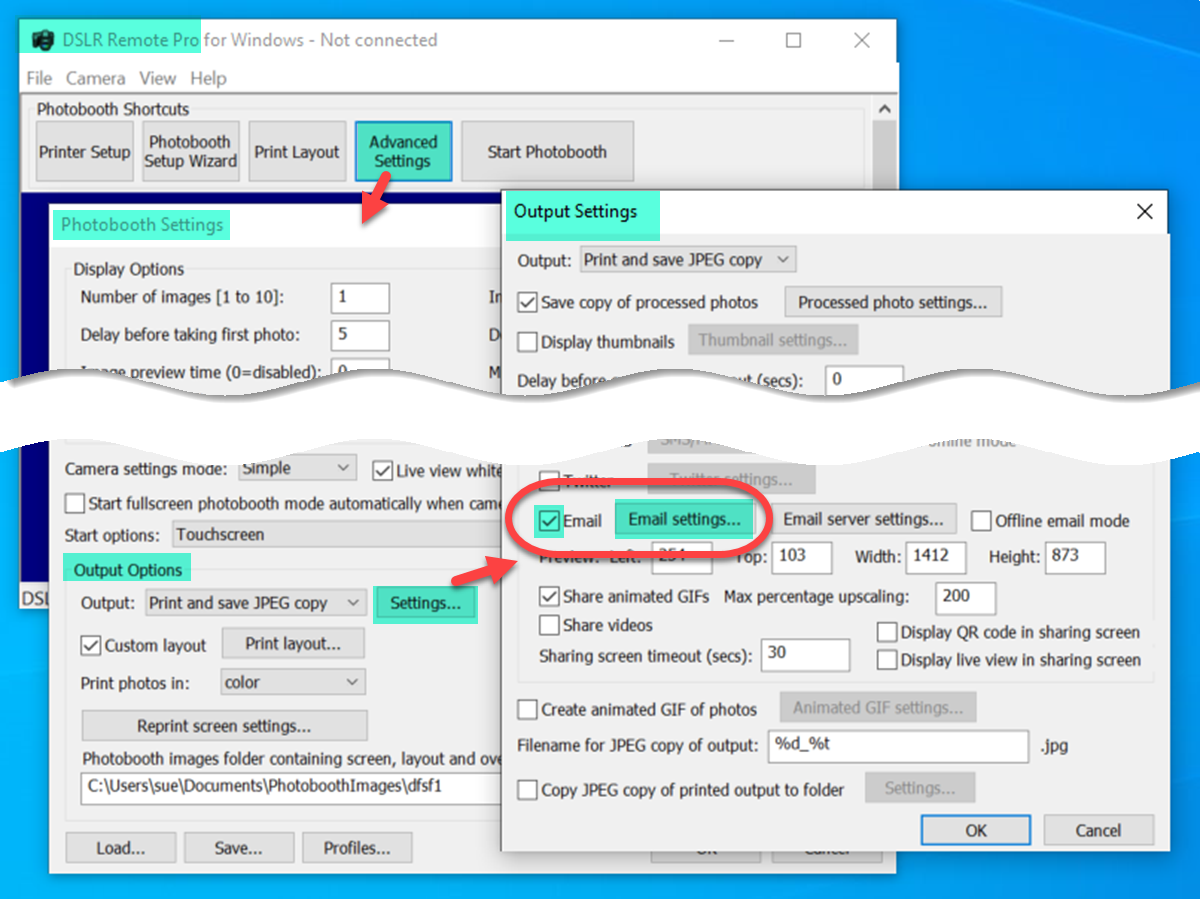
Opening the Email Settings screen (DSLR Remote Pro)
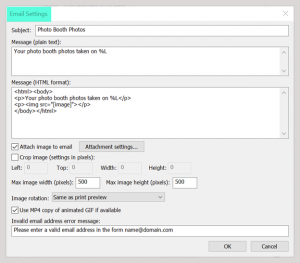
The first time you see the email settings screen it contains the default subject (Photo Booth Photos) and text (Your photo booth photos taken on 12 February 2022) DSLR Remote Pro sends with guest emails.
Initial Email Settings window DSLR Remote Pro
You can change the both the subject and content of the emails sent with guest images.
%L in the message text is a Breeze token, which will be converted to the current date.
Tokens can be used to generate the date, event name, and much more. See the full list of tokens.
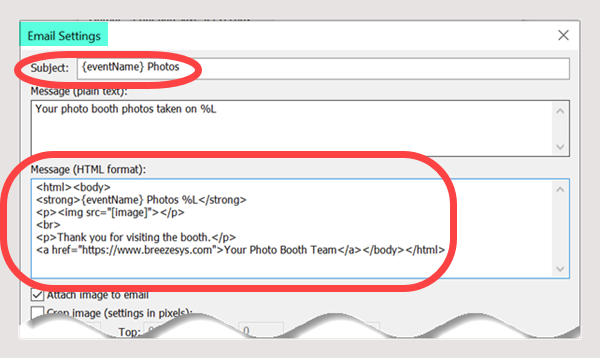
Creating an email template using the {eventName} token
{eventName} is a special Breeze token which can be shared between Breeze programs. Use {eventName} in your emails, print layouts and folder names to save time customizing them for each event.
Set {eventName} in the Photo Booth Event Info window.

Click on File then Photo Booth Event Info… to change the event name
Then you can include {eventName} in your emails.
To try this for yourself. Copy and paste the following code into the Message (html format) box
<html><body>
<strong>{eventName} Photos %L</strong>
<p><img src="{image}"></p>
<br>
<p>Thank you for visiting the booth.</p>
<a href="https://www.breezesys.com">Your Photo Booth Team</a>
</body></html>
Now change the text and website link for your own needs. You can use {eventName} to personalize the email subject as well.
Email with custom subject and message using {eventName}
Enter an event name, run the booth and send an email. When you change the event name, DSLR Remote Pro will automatically change the email content and print layout (if applicable)
Why do I need to send both plain text and html?
The emails DSLR Remote Pro sends from your booth may be viewed on lots of different devices including both the latest and ancient Apple and Android phones, tablets and PCs. Most modern devices can read html emails; we also send a plain text version in case the html version cannot be read.
Learn how to add {eventName} to print templates
Which images can I include with guest emails?
Usually one image is shared from each session:
- print layout
- MP4 copy of a burst or slideshow GIF
- Burst or slideshow GIF
- MP4 video captured when running a video booth
You can share share several items from a session, including
- MP4 copy of GIF + print layout
- Original photos
- Processed photos
- Thumbnails of photos
- Preview image from the start, middle or end of an MP4
Photos, prints, thumbnails and/or preview images and .GIFs can be included in the email body, using HTML to position and present them. They can also be shared as email attachments.
Videos and MP4 copies of GIFs are always shared as email attachments
Adding extra attachments
To add extra attachments to your emails check Attach image to email and click on Attachment settings.. in the Email Settings window.
This takes you to the Email Attachment Settings window where you can select the extra images
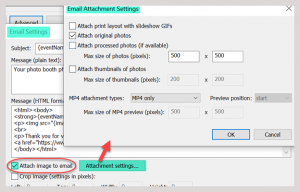
Email Attachment Settings window DSLR Remote Pro 3.16.1
Preview images
To include a preview of any MP4 copies of GIFs and videos, select MP4 attachment type JPEG preview and MP4 and choose whether the preview should be taken from the start, end or middle of the video
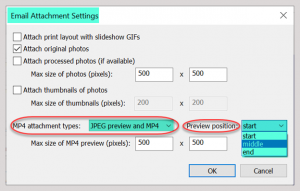
Choosing which preview image from each MP4 to place in the body of the email (DSLR Remote Pro 3.16.1)
Adding extra images to the email body
So far these images have been added as attachments. To place extra images in the email body include the appropriate token in the email HTML
- {print_layout} – the JPEG copy of the print layout
- {photo<n>} – individual photos e.g. {photo1}, {photo2} etc.
- {thumbnail<n>} – individual thumbnails e.g. {thumbnail1}, {thumbnail2} etc.
- {gif} – slideshow GIF or boomerang GIF
- {video_preview} – JPEG preview of the video
Remember – select the extra items in the Email Attachment Settings Window and include them in the email HTML.
Add a print layout to the body of the email
- Check Attach print layout… in Email Attachment Settings
- Copy and paste the following code into the Message (html format) box
<html><body>
<strong>{eventName} Photos %L</strong>
<p><img src="{print_layout}"></p>
<br>
<p>Thank you for visiting the booth.</p>
<a href="https://www.breezesys.com">Your Photo Booth Team</a>
</body></html>
Add thumbnails of 3 photos to the body of the email
- Check Attach original photos in Email Attachment Settings
- Copy and paste the following code into the Message (html format) box
<html><body>
<strong>{eventName} Photos %L</strong>
<p><img src="{photo1}"></p>
<p><img src="{photo2}"></p>
<p><img src="{photo3}"></p>
<br>
<p>Thank you for visiting the booth.</p>
<a href="https://www.breezesys.com">Your Photo Booth Team</a>
</body></html>
Add a GIF to the body of the email
This only works when DSLR Remote Pro has created a .GIF instead of MP4 copies of GIFs.
- Create animated GIF of photos must be checked in the Output Settings window, and
- Create animated GIF of photos must be checked in the Animated GIF Settings window
- Use MP4 copy of GIF if available should be unchecked in the Email Settings window.
Copy and paste the following code into the Message (html format) box:
<html><body>
<strong>{eventName} Photos %L</strong>
<p><img src="{gif}"></p>
<br>
<p>Thank you for visiting the booth.</p>
<a href="https://www.breezesys.com">Your Photo Booth Team</a>
</body></html>
Summary
This is the third tutorial about sharing emails from DSLR Remote Pro, introducing branding and personalizing emails, and choosing email attachments
and focussed on sharing emails at large and busy events, logging email addresses and reporting sharing stats.
- Sending Emails 1 runs through the basics
- Sending Emails 2 focusses on sharing emails at large and busy events, logging email addresses and reporting sharing stats.
- More detailed help can be found in the sharing section of the online manual
© Breeze Systems 2022