The first two Profiles tutorials explained how to create a menu based booth and one switching randomly between different profiles.
Breeze Profiles Part 3 starts by running through common problems, then moves on to building a Choose or Surprise Me structure.
Common problems
(1) DSLR Remote Pro keeps resetting itself to an old set of screens
This happens when you no longer want to use profiles, and forget to switch off the default profile.
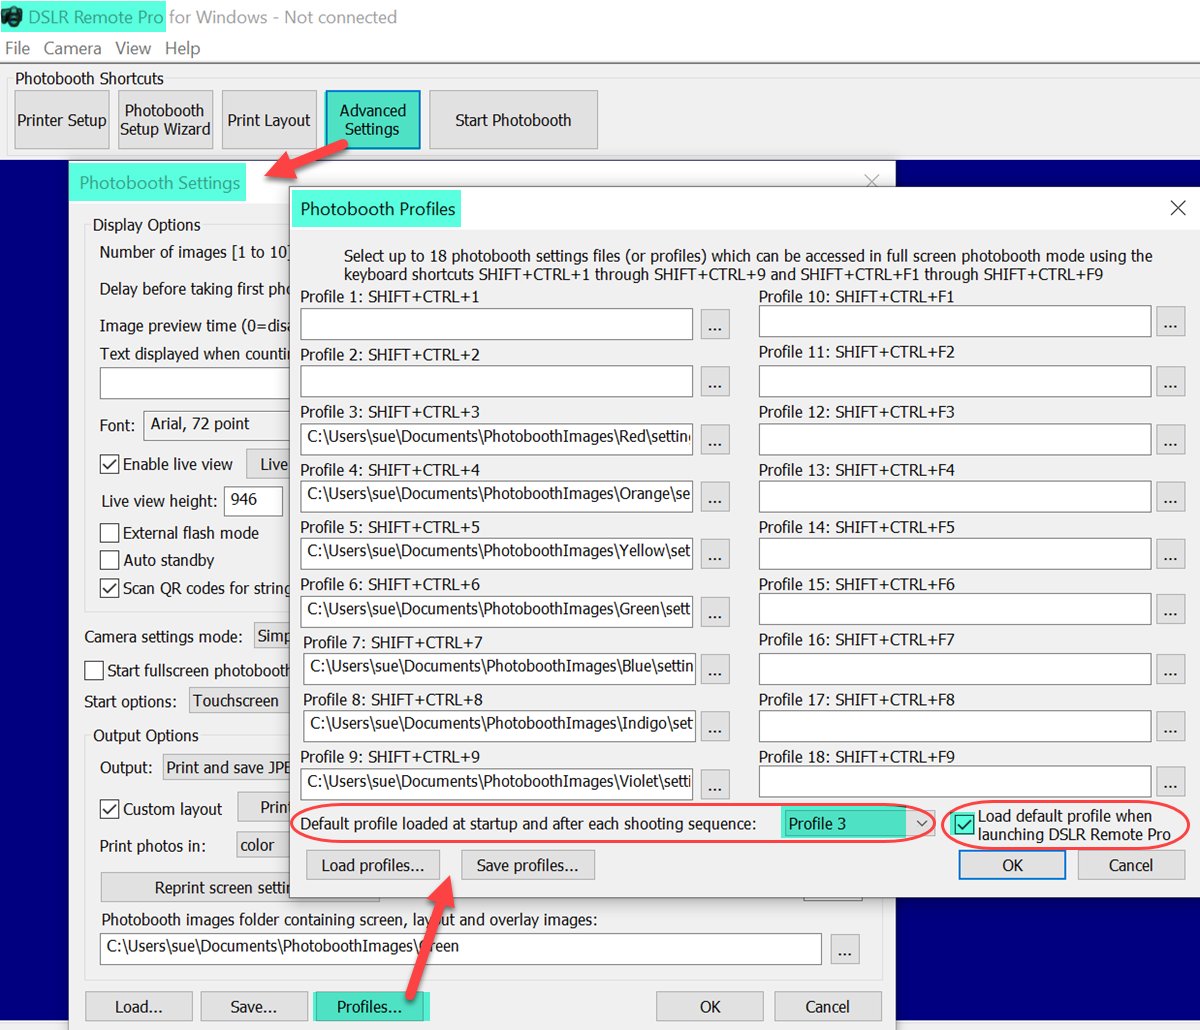
Default profile loaded at startup and after each shooting sequence set to Profile 3 ( as here) – DSLR Remote Pro will load and run this profile both when the program starts and after each shooting sequence.
Profiles will change your current photo booth settings if you forget to stop them loading when they are not needed.
When Default profile loaded at startup and after each shooting sequence is set to Profile 3 ( as above) or anything except None – DSLR Remote Pro will ‘do what it says on the tin’. The program will ignore your current photobooth settings, load and run the default profile – both when the program starts and after each shooting sequence.
Once you finish experimenting with profiles or working through a tutorial, change the default profile to None as here:

Setting the default profile to None prevents a new profile being loaded automatically when DSLR Remote Pro or a new session starts
(2) Errors displayed when trying to load profiles
Breeze uses files with ending .xml to store information about the way you use the program, and the images taken in the booth. If you choose the wrong type of XML file when loading your profiles the program displays an error message.
DSLR Remote Pro 3.15.4 introduced clearer warning messages:
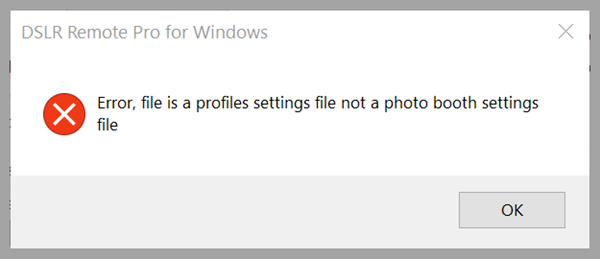
(2a) Error, file is a photo booth … file not a profile settings file (v3.15.4 onwards)
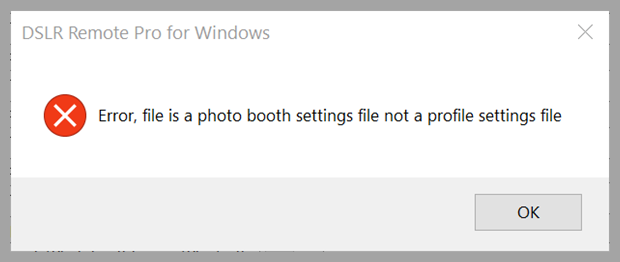
Error, file is a photo booth settings file not a profile settings file displayed when the attempting to load the wrong XML file (DSLR Remote Pro 3.15.4)
If you try to load the wrong type of XML file, DSLR displays a warning. Usually users are accidentally trying to load photo booth settings instead of profile settings, and see the message Error, file is a photo booth settings file not a profile settings file.
If you accidentally tried to load the keyboard.xml file, the error message would be Error, file is a photo booth keyboard file not a profile settings file instead.
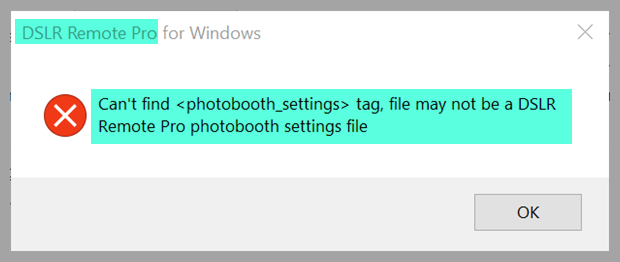
(2b) Can’t find <photobooth_profiles> tag, file may not be a DSLR Remote Pro photobooth profiles file (v3.15.3 and older versions)
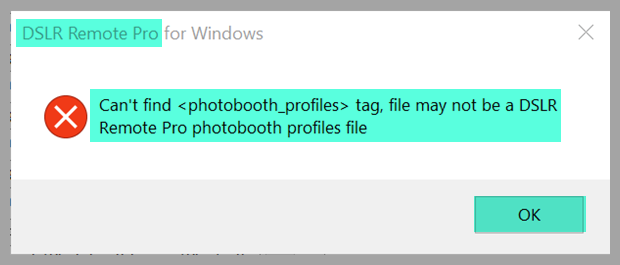
Can’t find <photobooth_profiles> tag error displayed (older releases only)
Older releases of DSLR Remote Pro show a different error message in the same situation (when you try to load a set of profiles, but accidentally select the wrong XML file). Usually this is caused by selecting the .xml file for the photobooth settings, instead of the .xml file for profiles settings.
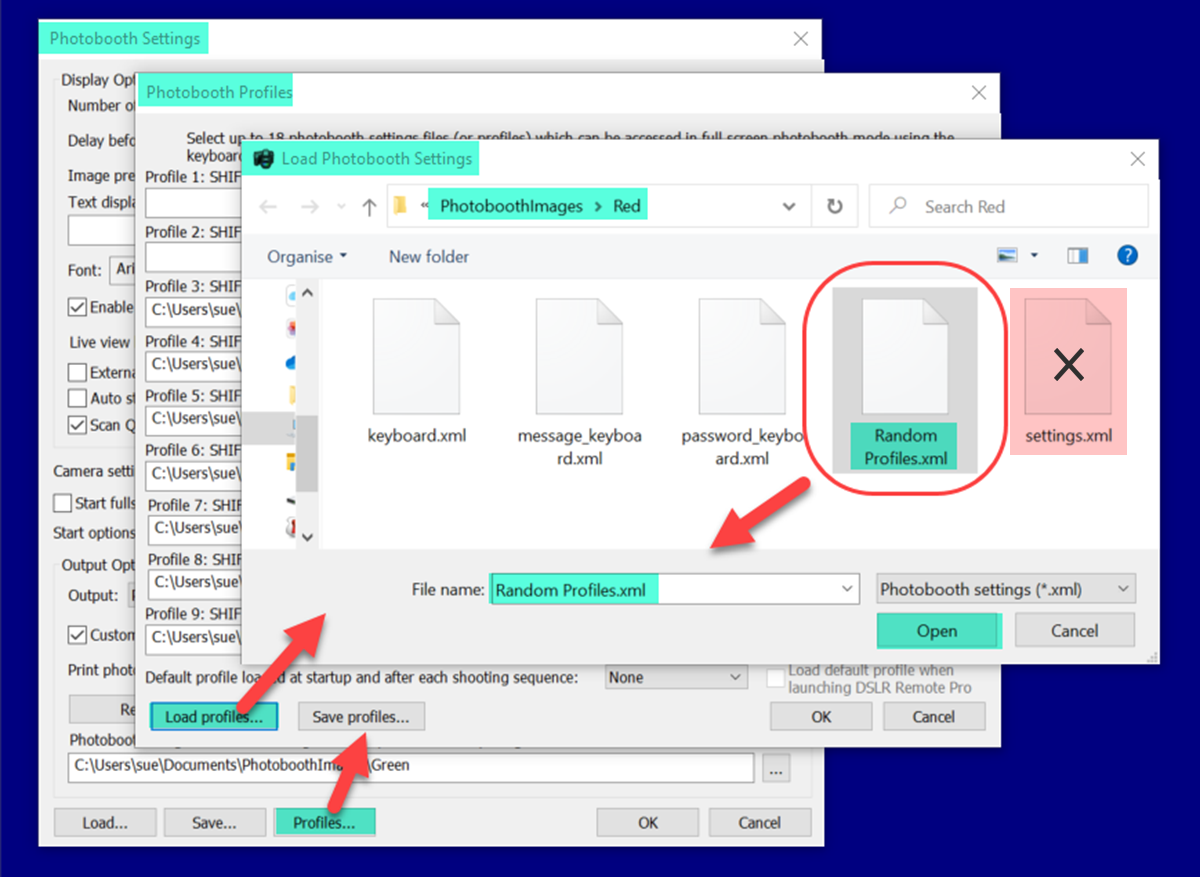
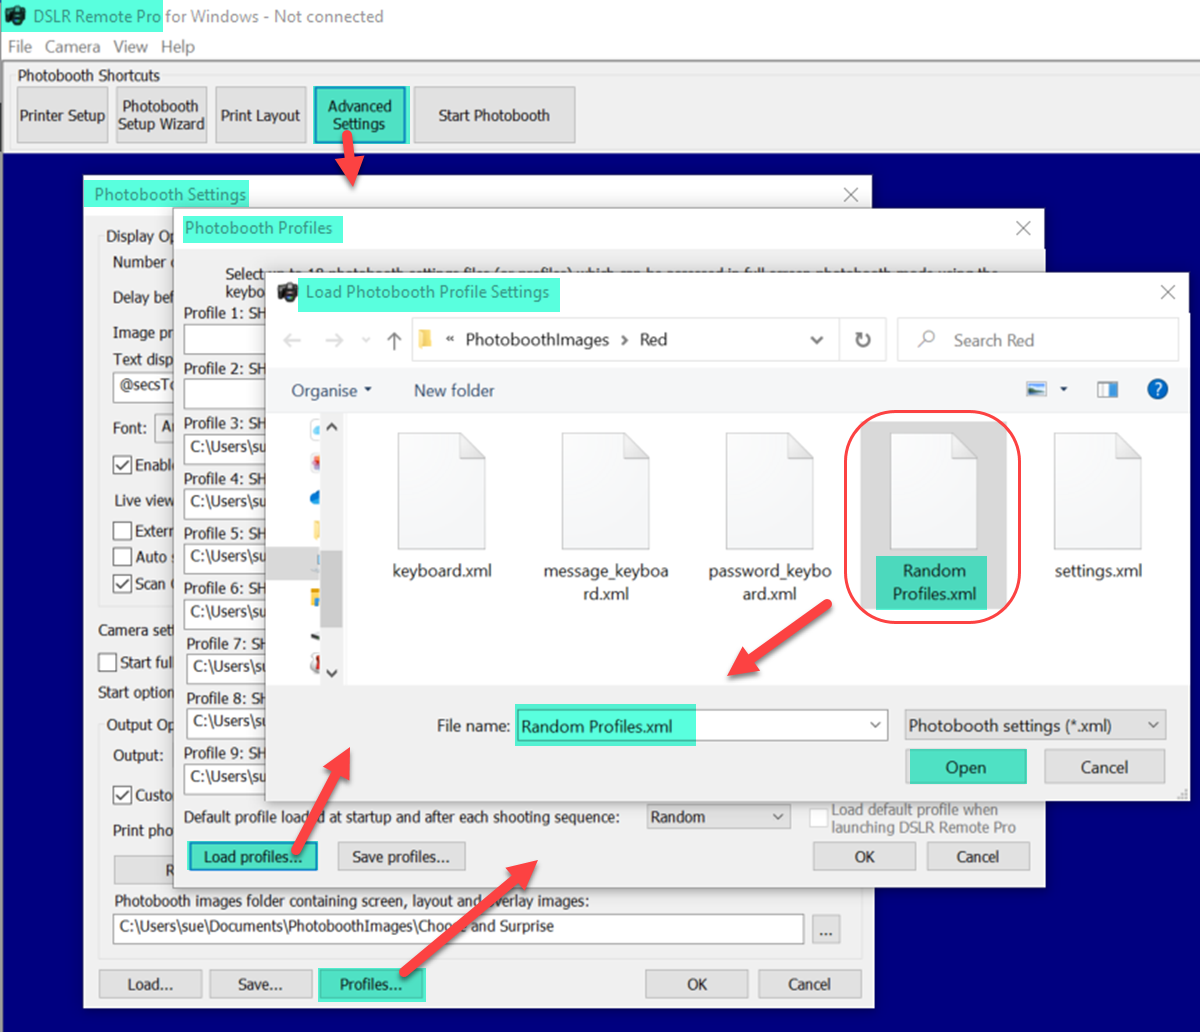
The set of profiles for Random booth (from Profiles Set 2 tutorial) have been called Random Profiles.xml . The photobooth settings for Red are called settings.xml. You will see an error if you try to load the wrong .xml file
Accidentally trying to load the Red photobooth settings.xml instead of Random Profiles.xml gives the Can’t find <photobooth_profiles> tag error
(3) Errors displayed when trying to load photo booth settings
You will see very similar error messages if you try to load the profiles XML file when you mean to load the photo booth settings XML file.
Error, file is a profile settings file not a photo booth settings file is displayed when users try to load the wrong XML file (DSLR Remote Pro 3.15.4)
Older versions of the program used a different message in the same situation:
Can’t find <photobooth_settings> tag error displayed (older releases only)
(4) Save your changes in the correct folder and file
- Whenever you make changes to the details of one of your designs, remember to save them. Take care to check both the directory and file names so that don’t save them in the wrong place ( and risk overwriting other settings).
- Save every change you make to profiles before leaving the Photoboth Profiles screen. Again, take care to check both the directory and file names.
Let’s move onto something new..
Building a Choose or Surprise Me menu structure with profiles
The first tutorial explained how to use profiles to create a custom menu, and the second explained how to use random profiles to add unexpected twists to the booth. This section combines both these to create what I call a Choose or Surprise me structure.
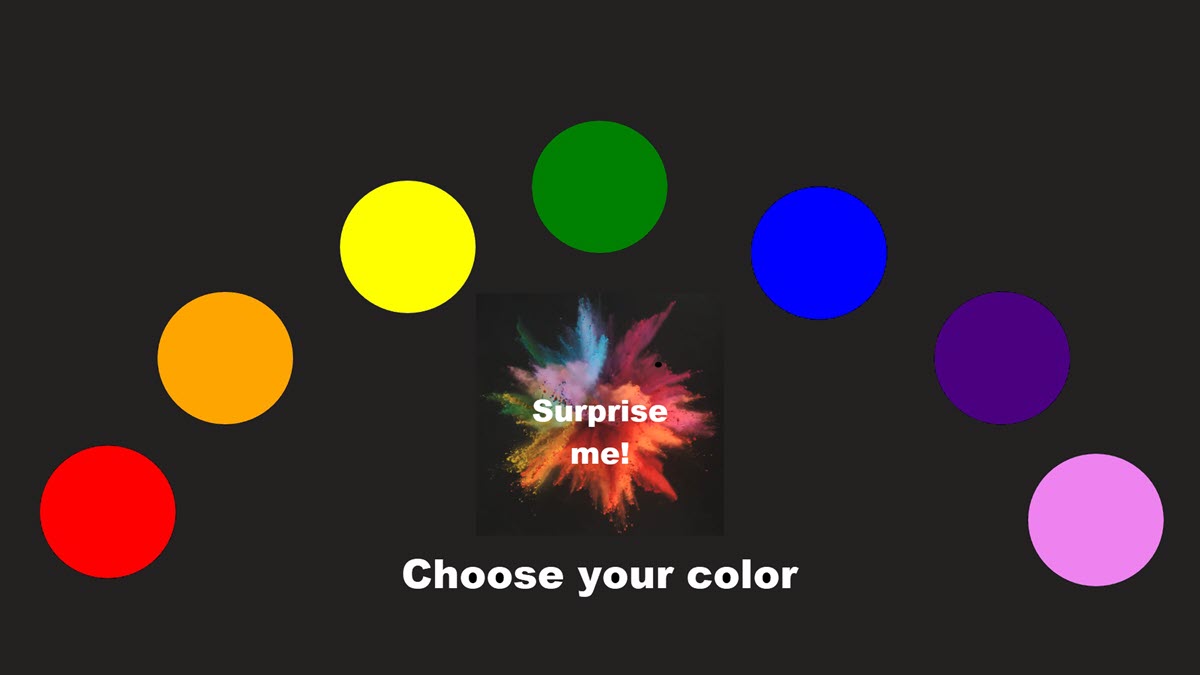
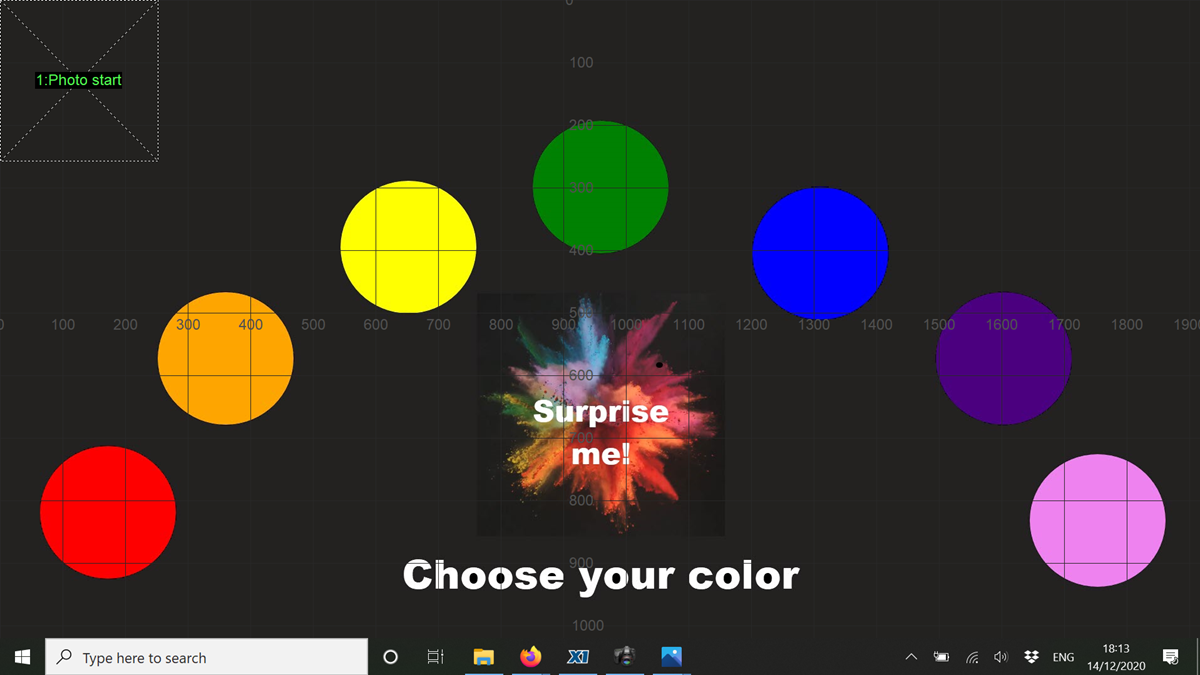
Choose and Surprise Ready screen (Breeze DSLR Remote Pro)
To save creating lots more designs, I have used the Color Booth worked example in the second profile tutorial as a start point.
Color Booth randomly switched between seven different colored screen sets. This worked example called Choose and Surprise has ready screen a menu with 8 options, one for each color of the rainbow and an extra option which randomly chooses which color to use.
Run the setup wizard to create your Choose and Surprise menu screen
Start DSLR Remote Pro and run the Setup Wizard. This time
- At Step 1 choose a meaningful name for the design. I used Choose and Surprise
- It doesn’t matter which options you choose at Steps 2 and 3 (this just runs the menu so they are not used)
Remove the live view from your menu screen
1. Select the large ‘Advanced Settings’ button and remove the live view by unchecking Enable live view.
2. Select Save and update …\PhotoboothImages\Choose and Surprise\settings.xml
Before leaving Photobooth Settings, select the Profiles button again and switch the Default profile to None if necessary
Switching the Default profile loaded to None
Create a new menu screen
Use an image editor to create a new jpg image containing icons for the 8 options. This should be the same size as the screens generated by the wizard. Replace the original ready.jpg screen in the PhotoboothImages\Choose and Surprise folder with this image.
ready.jpg for Choose or Surprise
Add the touch screen actions for your menu
Load your set of random profiles from Profile tutorial 2
Loading the set of random profiles we created for Color Booth in the Random Profiles tutorial
- Make Profile 11 ie C:\Users\sue\Documents\PhotoboothImages\Choose and Surprise\settings.xml (the photo booth settings.xml for your new menu)
- Make Profile 11 the Default profile loaded at startup and after each session.
- Save the new profiles settings as Choose_and_surprise_menu_profile_settings.xml
Select OK to close the Profiles window, and go to the Touchscreen settings to connect your new menu to each option
Adjust the touchscreen actions for the new menu screen
When you first open the touchscreen actions for the menu Ready screen, they will look something like this
Initial touchscreen settings for the menu screen
- Remove the Photo Start action
- Add actions for each color using Select profile 3 +start for Red, Select profile 4 +start for Orange etc
- Add action Random profile 3-10 +start for your Surprise me button
- Add actions for Exit fullscreen photobooth and Display reprint selection screen (optional)
The touchscreen settings should now look like this:
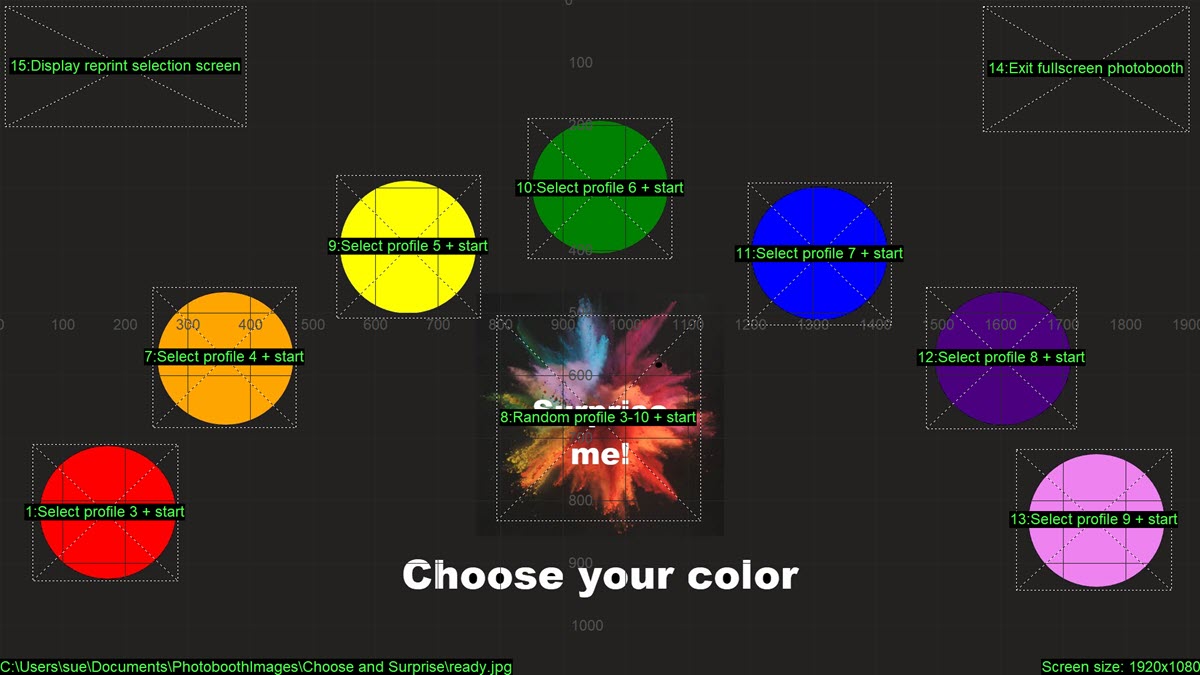
Touch screen settings for the menu Ready screen. Each color button and the Surprise me button have actions including + start.
- Leave this screen, saving your changes as you go.
- You will need to save your updated photobooth settings again (including the printer settings)
Save your photobooth settings!
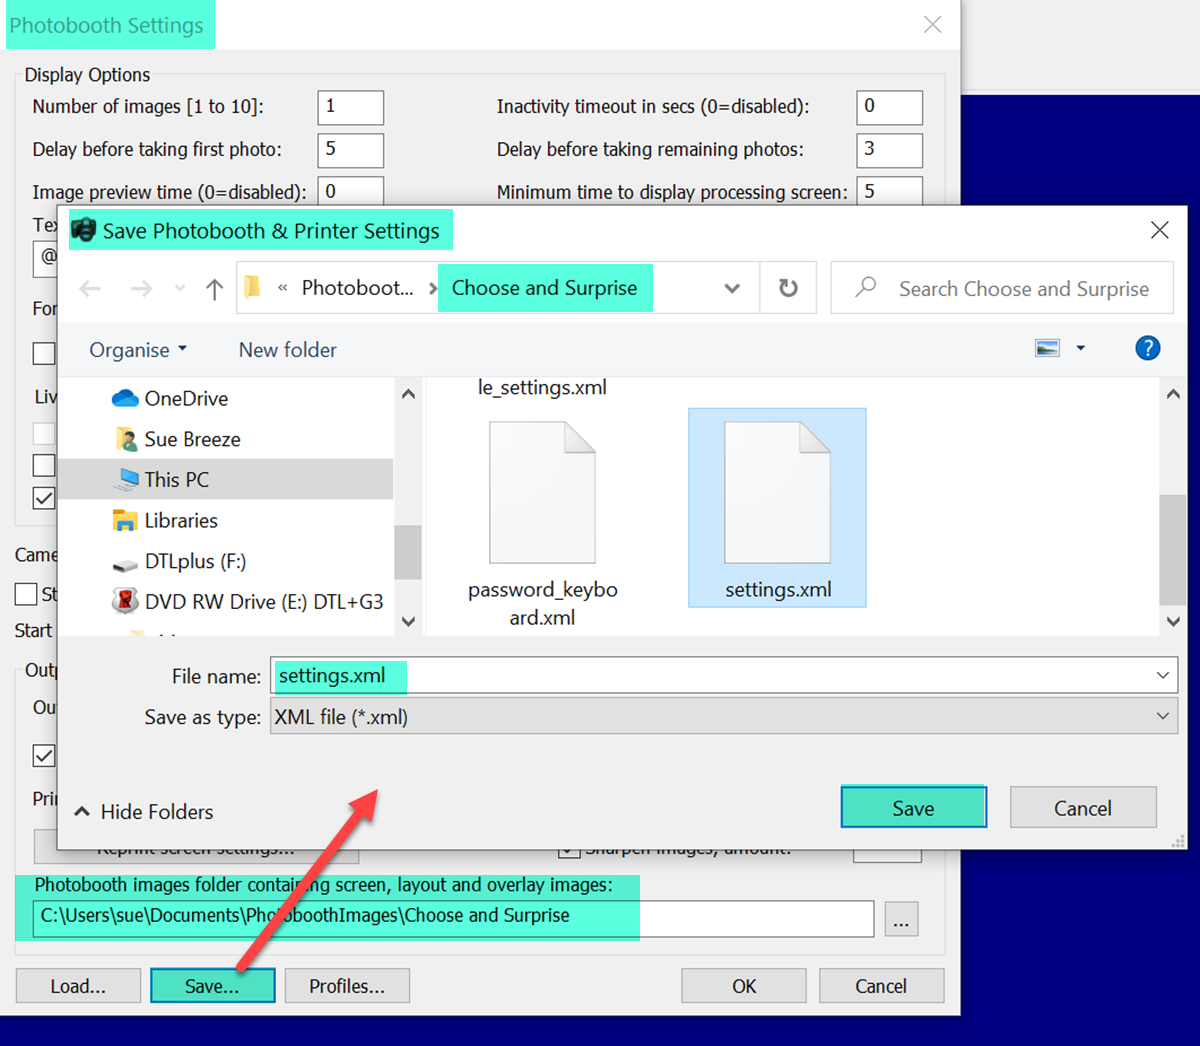
Saving the updated photobooth settings for the Choose and surprise menu
Test everything is working
Now switch on your camera, start the booth and check everything works correctly.
Adapting this design for greenscreen or AI background removal
Now you have learnt how to build a Choose and Surprise me menu, you can adapt it to create unique designs for your own clients.
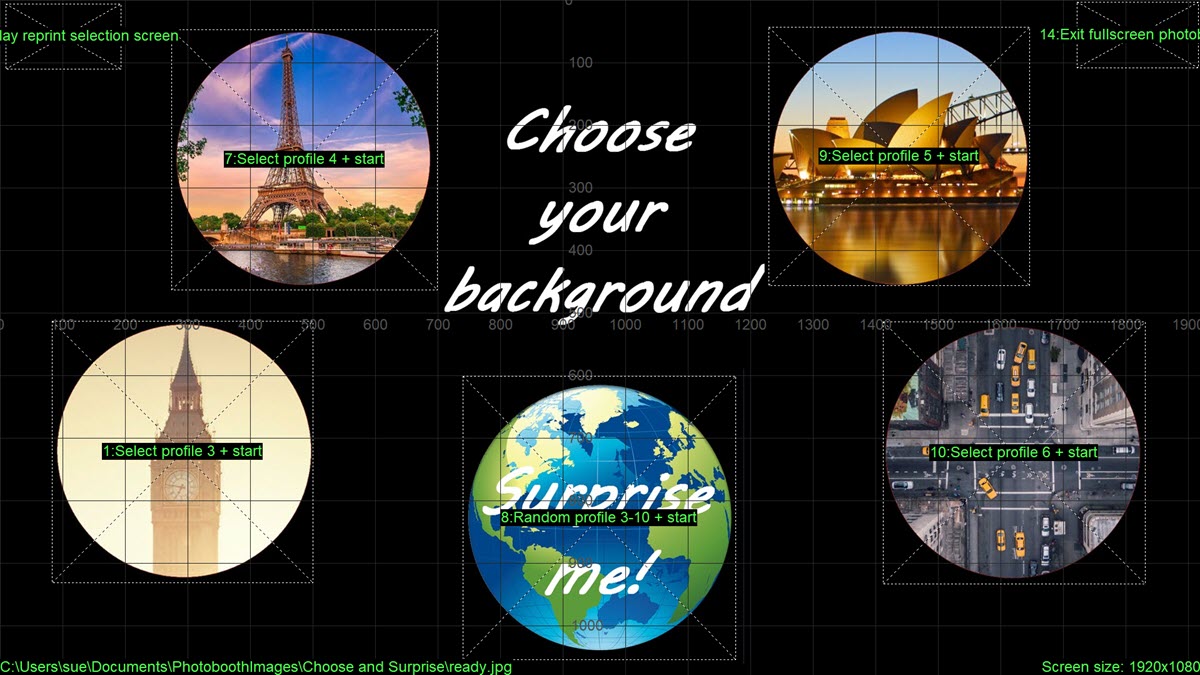
This could be the Ready menu for offering guests a choice of greenscreen or AI background removal designs

Menu screen for background removal or green screen selection
This design uses 5 profiles, 4 for specific locations London, Paris, Sydney and New York, and a random profile for the Surprise me globe button
Touchscreen actions for a background removal/green screen menu (Breeze DSLR Remote Pro 3.15.4)
Learn more about AI based background removal
Learn more about green screen
Summary
Breeze profiles are powerful building blocks you can use to customize your booths and offer guests choices such as different print layouts, captions in different languages; or to add variety and interest such as random animations in magic mirrors. The is the third of a series of tutorials which explain how to use Breeze profiles as building blocks for your booth designs.
- Part 1 introduced profiles and showed how to use them to build a simple menu. The worked example created a menu offering a choice of two print layouts.
- Part 2 showed how to spice up a booth by randomly mixing different designs.
- This tutorial (Part 3) covers both troubleshooting and combining a menu with a random ‘surprise me’ option.
You can find much more information in the online manual
Now it is over to you to creatively use profiles to create innovative designs for your customers.
© Breeze Systems December 2020