Select "Live View" or type Ctrl+L to select the live view display and display the windows below. If the camera is not already in live view mode the mirror will flip up and the camera will enter live view finder mode. The controls in the main NKRemote window can still be accessed when the live view window is displayed. If the live view window is covered by other windows it can be displayed by typing Ctrl+L when the main NKRemote window is displayed. Closing the live view window will cause the camera to exit live view mode. The window can be resized to display a larger live view image.
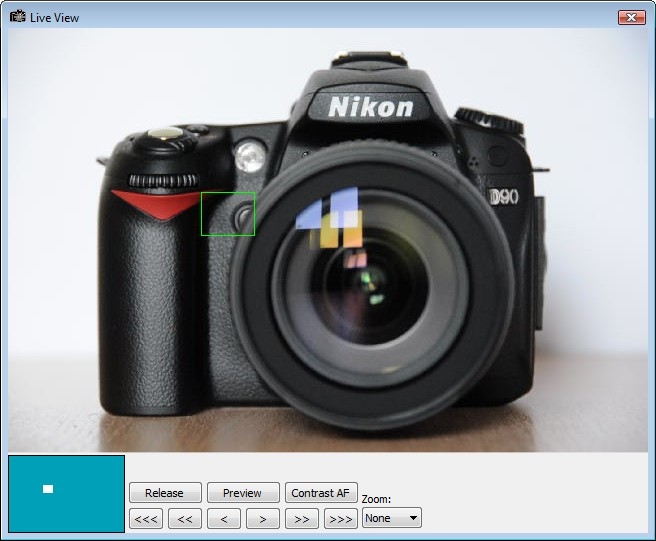
Live view images can either be displayed full frame as in the screenshot above or zoomed as shown below. The green rectangle shows the area of the zoomed image. The position of the zoomed area relative to the rest of the frame is also shown in the navigation window in the bottom left hand corner. The zoomed area can be moved by clicking on the white rectangle and dragging it using the mouse or by dragging the rectangle in the navigation window. Double click the left mouse button over the image or the navigation window to move the zoomed area and switch to the zoomed view.
Click on the "Release" or "Preview" buttons to take a image or a preview shot. The shot will be displayed in the main NKRemote window.
The lens can be focused using the arrow buttons or by using the mouse wheel. The "<<<" button shifts the focus nearer by a large increment, "<<" focuses nearer by a medium increment and "<" can be used for fine adjustment. Similarly the ">", ">>" and ">>>" focus farther away by small, medium or large increments.
The mouse wheel provides a very effective way to adjust the focus. When the Shift key is held down the mouse wheel adjusts the focus in large increments. When the Ctrl key is held down the mouse wheel adjusts the focus in medium increments and when no keys are held down the mouse wheel can be used for fine focus adjustments. The lens can also be focused using the cursor left and right keys with the Ctrl and Shift selecting medium or large increments respectively.
The size of the small, medium and large focus increments can be adjusted by right clicking on live view image and selecting "Adjust focus settings...". The dialog below will be displayed:
Different settings may be defined for each lens (the lens name is displayed in the window tittle bar).
Please note: The lens should normally be set to the auto-focus setting for the focus controls to work.
Right click on the image to display a menu for enabling or adjusting the grid overlay display. The live view shares the same grid overlay settings as the image display in the main window.
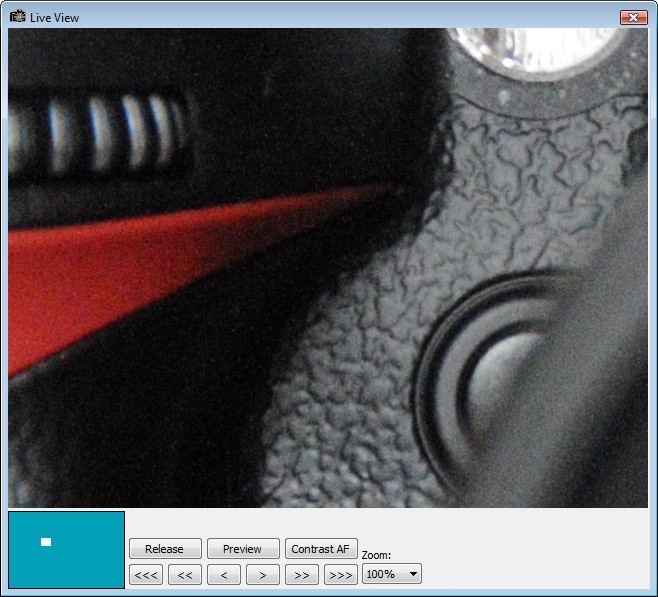
The zoomed area can be moved by clicking the mouse on the image and dragging as required or by by dragging the white rectangle in the navigation window. It can also be moved by double clicking in the navigation window.
Double click on the live view image or set the "Zoom" dropdown list to "None" to return to the full frame view.
An optional overlay image can be displayed over the live view images to help composition e.g. registration marks could be displayed to help align the camera when taking id photos. The overlay image should be a PNG file with transparency information in the alpha channel. It should be in landscape orientation with an aspect ratio of 3:2 e.g. 640x426 pixels in size. Once a suitable overlay image has been defined it can be displayed by right clicking on the live view image and selecting "Load overlay image...". An example overlay image called example_overlay.png can be found in the NKRemote installation folder.
Auto Focus
Click on the "Contrast AF" button to auto focus the lens using the camera's contrast detection AF. During AF the green AF area will be shown in red in the full frame view.
In the full frame view the area defined by the green rectangle is used to define the auto focus area. The rectangle can be dragged to a new position to auto focus in a different area of the live view image. In the zoomed view the central area of the image is used for auto focus.
Limitations: Because it takes several seconds to auto focus in live view it is not suitable for handheld shots or for moving subjects. Auto focus may fail if the image is very out of focus when AF starts, if the focus area has poor contrast or if the live view images are very noisy due to low light levels. Lenses which focus in large steps when using the fine focus settings (the "<" and ">" buttons) and lenses which focus by different amounts when focusing nearer or farther may cause AF to fail to achieve optimum focus in live view.
EVF Upscaling
The full frame live view image is 640x426 pixels in size. By default the Live View window will enlarge (or upscale) the images to fit the window. This can produce pixelated images or other display artefacts depending on the amount of upscaling or the type of subject being photographed. If this is a problem EVF upscaling can be disabled by right clicking on the image and deselecting "Allow EVF upscaling".
Mirroring and rotating the live view display
Right click on the full frame live view image to display a menu to select horizontal flipping of the live view image. Horizontal and is useful if pictures are being taken through a mirror or if you want to get the same effect as looking through a mirror e.g. mounting the camera above the computer display so that when people look at the display it is like looking through a mirror. The image can be rotated in 90 degree increments by the appropriate option from the View menu in the main window (Landscape, Portrait, Inverted or "Use Orientation Sensor"). When "Use Orientation Sensor" is selected the live view display will be automatically rotated to match the camera's orientation (please set "Auto Image Rotation" to On in the camera's Setup menu to enable this).
An optional electronic level can be displayed in live view for camera models that support it (Nikon D7200, Nikon D7100, Nikon D7000, Nikon D810, Nikon D810A, Nikon D800, Nikon D800E, Nikon D750, Nikon D610, Nikon D600, Nikon D4s and Nikon D4 at the time of writing). To display the electronic level right click on the live view display and select "Display electronic level".
Press and hold down the F2 function key to enable live view focus peaking which will highlight areas in focus in red. The sensitivity of focus peaking can be adjusted by changing the following setting in the Windows registry (you need to exit NKRemote before changing this setting):
HKEY_CURRENT_USER\Software\BreezeSystems\NKRemote\100\EvfFocusPeakingThreshold
The default setting is 400. Please note that the focus peaking display is experimental and may change in future releases.
Onion Skinning
Onion skinning is where the current live view image is displayed on top of a previous image help line up a shot. This is very useful when taking stop motion animations and in other situations where it is important to accurately line up the camera for consecutive shots.
Onion skinning is only available when the full frame view image is displayed. To start onion skinning right click on the view image and select "Onion skinning" from the menu. By default the background image is updated whenever a photo is taken but this behavior can be disabled if required.
The background image used for onion skinning can be saved and loaded to from the a file. This is useful when doing stop motion animation and you wish to save the background at the end of the day and load it again to continue work the next day. It also means you can save the background image, edit it in an image editor to add reference marks and then load it back into the live view window.
Another use for onion skinning is when taking panoramas. The onion skinning background can be offset to the left or right for panoramas taken in horizontal format or to the top or bottom for vertical format. The background is offset by 60% and is used to help align the next shot in the panorama.
Arranging Windows
Type Ctrl+A to automatically arrange the live view and main windows. Repeatedly pressing Ctrl+A will cycle through the following window layouts:
| 1. | Main window resized to just show the controls and positioned on the left of the screen with the live view window occupying the rest of the screen. This mode is useful for viewing the live view and adjusting the camera settings from the computer. |
| 2. | Live view window filling the screen - useful for composing and focusing the image |
| 3. | Main window filling the screen - useful for viewing images that have been taken |
Note: The full frame live view images from the camera are 640x426 pixels and may not fill the live view window. If EVF upscaling is enabled (right click in the live view window to display a menu to enable this) the 640x426 pixel images will be scaled to fit the window.
Keyboard Shortcuts
The following keyboard shortcuts can be used when the live view is displayed:
Spacebar or F8 |
Take a picture |
F9 |
Take a preview image |
Ctrl+L |
Close the live view window |
Cursor left |
Focus closer by a small increment |
Ctrl+Cursor left |
Focus closer by a medium increment |
Shift+Cursor left |
Focus closer by a large increment |
Cursor right |
Focus farther by a small increment |
Ctrl+Cursor right |
Focus farther by a medium increment |
Shift+Cursor right |
Focus farther by a large increment |
Cursor up |
Zoom the preview |
Cursor down |
Select full frame display |
Ctrl+O |
Toggle onion skinning on and off |
Ctrl+B |
Capture current live view image as onion skinning background |
Ctrl+A |
Arrange the main and live view windows |
Ctrl+E |
Display electronic level overlay for camera models that support it |
Ctrl+Z |
Zoom in/out |
Ctrl+Tab |
Cycle through: Controls+AF area display->AF display but no controls->live view images only |