The Main Window
The main window shows the main camera controls together with a large preview display and a histogram for assessing exposure. The main camera settings can be changed using the controls down the left hand side of the main window. Other settings are available from the menus.

Connecting to the camera
When you run PSRemote it attempts to connect to the camera. The first time it connects to a new camera model it needs to learn the camera's settings and this can take a while (30 secs or more depending on the camera model). The settings are stored and connecting the next time will be much faster.
You can manually connect and disconnect from the camera by selecting the appropriate entry from the "Camera" menu. If more than one camera is connected to the PC when PSRemote is run a selection dialog will be displayed listing the available cameras.
When the "Auto reconnect" option is selected in the Camera menu and no camera is currently connected PSRemote will attempt to connect to the camera every 6 secs until it connects to a camera. In fullscreen photobooth mode auto reconnect will automatically restart the photobooth mode, enable the live view if required and display the "ready" screen when the camera is connected.
Most versions of Windows display a dialog with a list of available applications when a camera is connected via USB. PSRemote can be added to this list by selecting "Register for camera events" from the "Camera" menu.
Release Button
Click on the Release button (or press F8) to take a picture. The picture is automatically downloaded to the PC, displayed in the main window and saved to disk. Images can be stored on the PC's hard disk, on the camera's memory card or both.
The camera's shutter release can also be used to take pictures. The shutter release is the only camera control which is enabled when the camera is in remote mode. All other camera settings have to be set from PSRemote on the PC.
Preview Button
Click on the Preview button (or press F9) to take a picture in preview mode. The picture is taken as a small JPEG with normal quality so that it is downloaded to the PC quickly. The picture is not stored on the PC's disk or the camera's CF card. The size of the preview image can be specified in preferences.
Auto Bracketing
PSRemote has flexible settings for auto bracketing (taking a sequence of shots using different exposure settings) which simplify the taking of shots which are later combined together to form a single HDR (high dynamic range) image. To enable auto bracketing select the "Auto-bracket" checkbox and then click on the "Settings..." button to display the auto bracket settings dialog below:
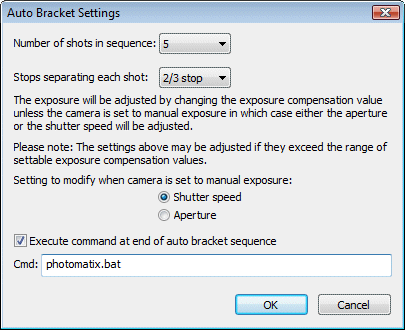
You can set the number of shots in the sequence using the first dropdown list. Then set the number of exposure stops should separate each shot. This can be set to 1/3, 2/3, 1, 1 1/3, 1 2/3 or 2 stop per shot.
The different exposures are set using the camera's exposure compensation control if the one of the auto exposure modes is selected. If manual exposure mode is selected the exposure will be varied using either the shutter speed or the aperture according to the settings in this dialog. Please note that PowerShot cameras have a limited range of apertures and so it may not be possible to take the complete sequence by varying the aperture.
PSRemote can optionally run a command at the end of the auto bracket sequence to combine the shots. To do this click on the "Execute command at end of auto bracket sequence" checkbox and enter the name of the program or script to run. In the screenshot above the script "photomatix.bat" has been entered. This will run the Windows batch file "photomatix.bat" which combines the images using Photomatix Pro (which can be purchased from http://www.hdrsoft.com) and displays the result in BreezeBrowser Pro (http://www.breezesys.com/BreezeBrowser ). The batch file can be found in the PSRemote installation folder (usually C:\Program Files\BreezeSys\PSRemote) and makes use of the command line interface for Photomatix Pro. Please see the batch file for details.
Suggested procedure for auto bracketing:
| 1. | Use a tripod and compose the shot as required |
| 2. | Switch to manual exposure mode and low ISO setting to maximize the quality |
| 3. | Set the required aperture (e.g. use a small aperture like f/16 for good depth of field) |
| 4. | Take a preview shot to determine the correct exposure (this can be judged by looking at the histogram display). It may be necessary to take a number of test shots to get the correct exposure. Adjust the exposure by changing the shutter speed |
| 5. | Use AF lock to set the focus so that it doesn't change between shots |
| 6. | Set the required number of shots and number of stops separating each shot (a 5 shot sequence with 1 stop increments is a good start, more shots may be required if the brightness range in the shot is very large) |
| 7. | Press the "Release" button and PSRemote will automatically take the sequence |
Zooming the Lens
Use the slider control beneath the release and preview buttons to zoom the camera's lens. The zoom range and current focal length of the lens is displayed above the zoom control. Some cameras allow the use of digital zoom and this is displayed in red when it is used.
Deleting Images
Press the Delete key to delete the current picture. If the picture was saved to disk it is deleted from the disk and removed from the display.
Note: Pictures saved to the CF card are not deleted.
Changing Camera Settings
The camera settings can only be changed using the controls in the main window or directly using the camera's controls. Not all controls can be changed in all camera modes (e.g. the shutter speed can only be set in Manual and Tv exposure modes) and so some controls are "grayed out" when they are not applicable or are not supported by that camera model.
Bulb Mode
Bulb mode is not available when the camera is operating in remote mode. This is a limitation of the camera not PSRemote.
AF Lock
Manual control of focus is not available when the camera is in remote mode, but some recent camera models allow the use of AF lock. When AF lock is selected the camera will focus using normal auto-focus and then lock the focus setting. This allows several pictures to be taken using the same focus setting.
Note: Zooming the lens or changing the auto-focus distance setting will release the AF lock.
Live Viewfinder Display
All PowerShot camera models since 2002 that support remote capture allow live display of the viewfinder data on a window on the PC. The live viewfinder display can be enabled by selecting "Live Viewfinder" from the "Camera" window. There are also options for displaying the viewfinder data on the camera's LCD display or sending it to the video out connection. The grid overlay, if selected, will also be displayed in the live viewfinder window.
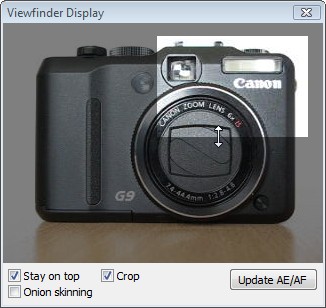
Select the "Stay on top" checkbox to make the live viewfinder window a topmost window which is always visible (the main window controls can still be accessed when the live viewfinder window is displayed).
Select the "Onion skinning" checkbox to enable onion skinning. Onion skinning displays the current live viewfinder data superimposed on the last image taken. This is a useful technique when taking pictures for animation because it allows you to compare the current image with the previous frame. When a picture is taken (not a preview image) the image for the previous frame is updated. It can also be updated by pressing the F5 function key.
Select the "Crop" checkbox to crop a portion of the image and the areas to be cropped out of the image will be grayed out as in the screenshot above. The cropped area can be adjusted using the mouse by moving it to one of the edges, pressing the left button and dragging the edge to the required position. The cropped area can also be moved by pressing the left mouse button when the pointer is inside the area and dragging it to the required position. When the picture is taken only the highlighted region will be saved. Preview images will display the whole image with the cropped area highlighted similar to the live viewfinder display.
Please note: The crop area can only be adjusted when the live viewfinder scaling is set to 1x and cropping can only be applied to JPEG images. It isn't possible to crop images when shooting in raw format.
Live viewfinder display was first introduced with the G2 in 2001. Older models (e.g. the G1 and Pro90IS) and basic models from 2001/2002 (e.g. A40) do not support live viewfinder display on the PC.
Image Orientation
The image orientation can be set using the "View" menu. Some recent cameras have an orientation sensor which detects the camera's orientation and sets the image's orientation accordingly. Select "Use Orientation Sensor" from the "View" menu to use this feature when downloading images to PSRemote and displaying them in the live viewfinder window.
Select "Auto-Rotate" to losslessly rotate JPEG images according to the EXIF orientation value when saving them to the PC. This is useful if the images are going to used by applications which are unable to read the EXIF orientation from the shooting data.
Please note: this option has no effect on images stored on the camera's memory card
Reviewing Previous Images
You may review previous shots by pressing the "<- Prev Image" and "Next Image ->" buttons or by using the left and right cursor keys. The main and preview images displays are updated to display the selected image together with the histogram display. You can delete previously taken shots in the normal way. To help identify which shot is being displayed the status bar shows the filename of the image and its number in the sequence e.g. [3 of 5].
When a picture is taken the display is updated to show the new shot.
Grid Display
To toggle the grid overlay on the preview image type Ctrl+G or select "Display Grid" from the "View" menu. Select "Grid Settings..." from the "View" menu to display the "Grid Settings" dialog, shown below:
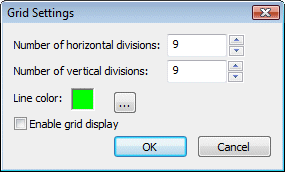
NOTE: The grid display is only displayed on the preview image and doesn't affect images saved to disk.
Blanking the Screen
To avoid extraneous light from the computer display affecting the lighting setup the screen can be blanked when taking a photo. To do this click on the "Camera" menu and select "Blank screen when taking photo". When this option is selected the screen will be automatically blanked when the shutter is released either from the camera or the PC. The screen will be restored after the camera has finished taking the picture. The screen may also be restored by clicking the left mouse button.
Adding Comments
Comments can be automatically added to images as they are taken by entering the comment text in the edit box located above the histogram.
Editing Images and Editor Setup
Right click on the image and select "Edit Image" to open the image in an image editor (or press F3). For this feature to work you need to tell PSRemote how to run the image editor by selecting "Setup Image Editor" from the File menu.
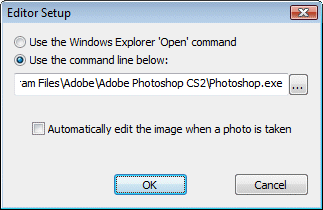
Select the "Use the Windows Explorer 'Open' command" option to use the same editor or viewer as when you open or double-click an image in Windows Explorer.
Select the other option and enter the command line in the edit box to specify a different editor.
Select "Automatically edit image when a photo is taken" to automatically load images into an editor when they are taken. Please take care not to load too many images into your editor as Windows may run low on memory causing the editor or PSRemote to fail.
NOTES:
| 1. | Only images saved to disk can be edited. Preview images cannot be edited. |
| 2. | Most image editors cannot open Canon raw files directly and will display an error message if you try to edit a raw image. |
The Image Preview Window
To display an enlarged preview window select View Image from the Image menu (or press F7). The image preview window can be left on the screen while more pictures are taken to monitor composition or focus in critical areas e.g. the eyes of a model during a portrait session. The preview window is automatically updated when the image in the main window changes.
The image can be scrolled by moving the scroll bars or by clicking the left button on the mouse and dragging the image. If the image preview window is still displayed when a picture is taken it will be updated to show the same area of the new shot. This is very useful for monitoring important areas of the image e.g. a model's eyes when taking portraits.
To avoid a lengthy delay converting raw images the embedded JPEG is displayed when pictures are taken in raw mode. This JPEG is only 640x480 pixels in size.
Flashing Highlight Display
Select "Flashing Highlights" from the "View" menu to display over-exposed areas by highlighting them flashing on and off in black. The method of calculating the highlight values and the threshold at which to start flashing them can be specified by selecting "Highlight Settings..." from the "View" menu.