The clipboard allows users to select one or more images and to share them in a single email. The clipboard option is only available when the layout is set to "Thumbnails and photo" in the "Display Settings".
Images can be added to or removed from the clipboard by doubling tapping on a thumbnail or the main image or the contents of the clipboard. An optional checkbox can be displayed in the top right hand corner of images and tapping on this checkbox will add or remove the image from the clipboard.
To enable the clipboard go to the "Display Settings" tap, set the layout to "Thumbnails and photo" and then click on the "Multiple selections..." button:
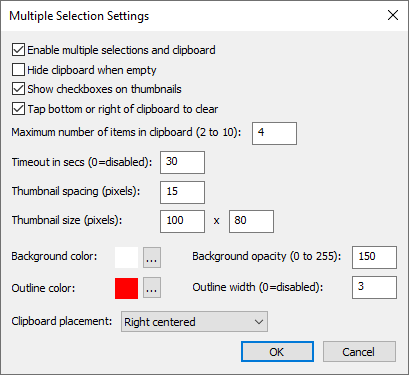
Select "Enable multiple selections and clipboard" to enable the clipboard.
Select "Hide clipboard when empty" to hide the clipboard display when there are no images held in the clipboard.
Select "Show checkboxes on thumbnails" to display a checkbox in the top right hand corner of thumbnails. The checkbox provides a visual indication as to whether the image is held in the clipboard. Tap the checkbox to add the thumbnail to the clipboard or to remove if from the clipboard. Images can also be added or removed by double tapping them.
Select "Tap bottom or right of clipboard" to add a clear button to the right of the clipboard for horizontal layouts or below the clipboard for vertical layouts. When this option is selected users can tap on the clear button to empty the clipboard.
The "Maximum number of items in clipboard" setting specifies how many items can be placed in the clipboard. The default setting is 4.
The clipboard can be automatically cleared if the user doesn't tap the screen by setting the "Timeout in secs" to 1 or more seconds. If this setting is set to 0 the timeout will be disabled.
The clipboard is automatically cleared after emailing a set of photos.
The remaining settings control how the clipboard is displayed. The clipboard is displayed as an overlay in the main image area. The main image will appear behind the clipboard if it fills the main image display area and when the user swipes left or right to select the next or previous image. The maximum size of the main image can be specified in the "Display Settings". By default the main image is resized to fit the main image display area but a maximum size can be set to allow more space for the clipboard display.
The "Thumbnail spacing (pixels)" specifies the space between each thumbnail displayed in the clipboard and the "Thumbnail size (pixels)" settings specify the width and height of each thumbnail.
The background color setting specifies the background color for the clipboard. The "Background opacity (0 to 255)" setting specifies the opacity of the clipboard background in the range 0 (fully transparent) to 255 (fully opaque). Values between 0 and 255 will give a semi transparent background which allows the main image to be seen behind the clipboard.
The "Outline color" and "Outline width" settings specify the color and width of the outline drawn around the clipboard.
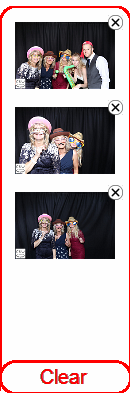
Use the "Clipboard placement:" dropdown list to specify where the clipboard is displayed in the main image area. The right and left settings will display a vertical clipboard to the right or left of the main image area like the one below:
The top and bottom settings will display a horizontal clipboard to the top or bottom of the main image display area.
The appearance of the clipboard and the thumbnail checkboxes can also be customized by placing PNG images in the screen images folder (see General Preferences).