The photo booth mode in DSLR Remote Pro for Windows v2.0 introduces green screen shooting (also known as chroma keying). Green screen photography works by taking photos of the subject in front of a green background and then automatically replacing the background with a background image. The background image can be anything you like such as an exotic location, a cityscape or even a photo of the President of the United States.
DSLR Remote Pro for Windows also supports blue screen shooting. This works in exactly the same way but uses a blue background instead of a green background. To enable blue screen shooting select the "Blue screen mode" checkbox when the green screen settings dialog is displayed.
DSLR Remote Pro for Windows will automatically replace the green background with the chosen background when using live view in photo booth mode and also when using the live view window. This means that the users will see what the final picture will look like with the new background as opposed to the green background that the cameras sees.
A basic green screen setup is shown below:
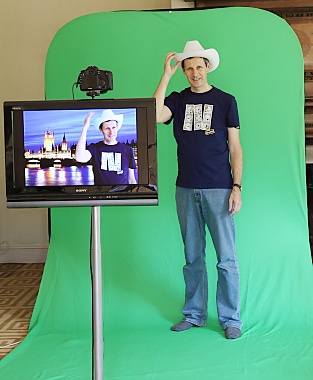
Basic green screen setup with green screened live view images displayed on the monitor
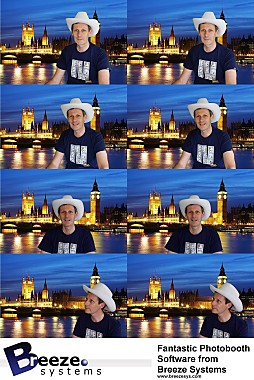
When the images are printed out as a double strip they look like this:
|
For best results the green background should be evenly lit and the subject should be positioned to minimize shadows falling on the background.
Green Screen Shooting in Photo Booth Mode
First copy the JPEG image to be used for the background to the photo booth images folder and name it greenscreen_background.jpg.
Next connect a camera and select full screen photo booth and type Ctrl+G to display the green screen settings:
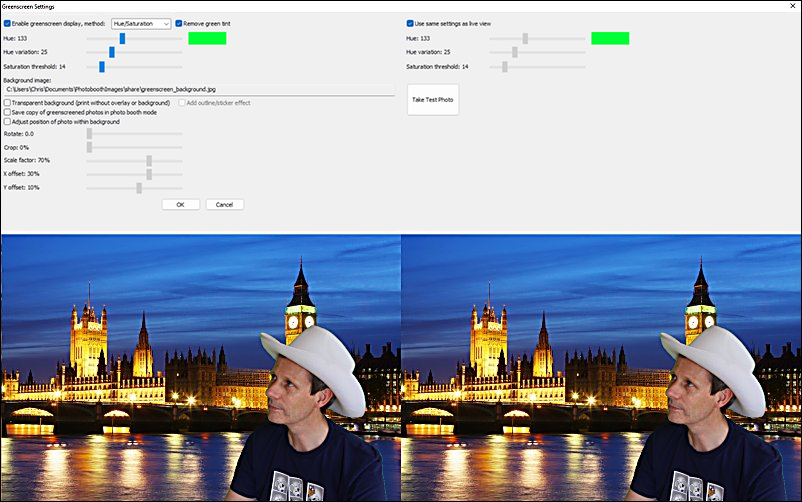
The left hand side of the screen shows the live view display and the right hand side shows a green screened copy of the last photo taken by the camera. Press the "Take Test Photo" button to take a test photo if no photo is displayed on the right.
If continuous lighting is being used the same settings can be used for the live view and the final photos and the "Use same settings as live view" checkbox can be selected. When the "Use same settings as live view" checkbox is selected any adjustments made to the green screen settings for live view will also be applied to the photos.
If flash is being used it is likely that the lighting for live view is not the same as that for used for the actual photos and the "Use same settings as live view" checkbox should be unchecked so that different adjustments can be used for the live view images and the actual photos.
Select the "Enable green screen display" checkbox to enable green screen shooting. Then adjust the sliders so that all of the green screen background is replaced with the background image but the foreground subject is unaffected. Please see the section headed "Adjusting the green screen settings" below for information on how to adjust the settings to get the best results.
Select the "Save copy of greenscreened photos in photo booth mode" option to save a of the photo downloaded from the camera with the green background replaced with the background image. The greenscreened copies are saved the "greenscreen" subfolder of the folder where the images from the camera are saved. The greenscreened copy will be saved as a JPEG image unless the transparent background option is selected in which case it will be saved as a PNG file.
Select the "Transparent background (print without overlay or background)" option to save the photos as a PNG image with a transparent overlay. When this option is selected the images displayed in the live view will be shown against the selected background image but the photos added to the print layout will have a transparent background and the background will be the background defined in the print layout (e.g. a background.jpg image). You can allow users to choose different backgrounds in the print confirmation screen after the photos have been taken. Please see Swapping print backgrounds for details.
An outline or sticker effect can be applied to green screen or AI Background removal photos when the transparent background option is used. To add the outline/sticker effect select the "Transparent background (print without overlay or background" option and then select "Add outline/sticker effect":

The size of the outline is specified as a percentage of the width of the photo. Click on the "..." button to the right of the outline color to select the color of the outline.
By default the photos taken by the camera will fill the green screen background. Select the "Adjust position of photo within background" option if you want to place the photos in just one part of the background.
Use the ""Rotate" slider to rotate and the "Crop" slider to the photo before placing it on the background..
Use the "Scale factor" slider to adjust the size of the photo and the "X offset" and "Y offset" sliders to adjust the position.
In full screen photo booth mode the green screen background and overlay images are loaded from the photo booth images folder. The background image should be named greenscreen_background.jpg and the overlay image should be named greenscreen_overlay.png. Different overlays and backgrounds can be used for each shot by appending the shot number to the filenames e.g.
Shot 1: background filename: greenscreen_background_1.jpg, overlay filename: greenscreen_overlay_1.png
Shot 2: background filename: greenscreen_background_2.jpg, overlay filename: greenscreen_overlay_2.png
Shot 3: background filename: greenscreen_background_3.jpg, overlay filename: greenscreen_overlay_3.png
Shot 4: background filename: greenscreen_background_4.jpg, overlay filename: greenscreen_overlay_4.png
An different overlay and background file can be displayed in the live view by appending _live_view to the filename. This is useful if the background or overlay contains text and the live view is mirrored because it means versions of the background and overlay with no text can be used for live view instead of displaying mirrored text. Example filenames:
Shot 1: live view background and overlay filenames: greenscreen_background_1_live_view.jpg, greenscreen_overlay_1_live_view.png
background and overlay files applied to the prints: greenscreen_background_1.jpg, filename: greenscreen_overlay_1.png
Shot 2: live view background and overlay filenames: greenscreen_background_2_live_view.jpg, greenscreen_overlay_2_live_view.png
background and overlay files applied to the prints: greenscreen_background_2.jpg, filename: greenscreen_overlay_2.png
Shot 3: live view background and overlay filenames: greenscreen_background_3_live_view.jpg, greenscreen_overlay_3_live_view.png
background and overlay files applied to the prints: greenscreen_background_3.jpg, filename: greenscreen_overlay_3.png
Shot 4: live view background and overlay filenames: greenscreen_background_4_live_view.jpg, greenscreen_overlay_4_live_view.png
background and overlay files applied to the prints: greenscreen_background_4.jpg, filename: greenscreen_overlay_4.png
Backgrounds and overlays can also be switched by saving a number of different profiles each using a different photo booth images folder containing different greenscreen_background.jpg and greenscreen_overlay.png images. The user can then select the different backgrounds using the profile shortcut keys. You can also switch green screen backgrounds and overlays by copying the new greenscreen_background.jpg and greenscreen_overlay.png images into the photo booth images folder while the booth is running.
Please note: Green screen should be enabled before saving the settings to file when using profiles to switch backgrounds. If green screen is not enabled when the settings are saved green screen will be disabled when the saved settings are loaded using a profile.
Green Screen Shooting in Normal Live View
To enable green screen shooting in normal live view mode first connect a camera and then select live view from the Camera menu or by typing Ctrl+L. Then type Ctrl+G or right click on the live view display and select "Green screen settings..." to display the green screen setup dialog:
Next select the background image by pressing on the "..." button then click on the "Enable green screen display" checkbox to enable green screen display. Then adjust the sliders so that all of the green screen background is replaced with the background image but the foreground subject is unaffected. Please see the section headed "Adjusting the green screen settings" below for information on how to adjust the settings to get the best results.
Select the "Save copy of greenscreened photos" option to save a greenscreened copy of each photo in the greenscreen subfolder where the photos are downloaded. This option only works with JPEG images and can't be used when shooting raw only (it can be used when shooting raw+JPEG).
Select the "Transparent background (print without overlay or background)" option to save the photos as a PNG image with a transparent overlay. When this option is selected the images displayed in the live view will be shown against the selected background image but the greenscreened copies of the photos will be saved as PNG files with a transparent background.
Please note: The greenscreening is optimized for speed not quality in order to be able to display the greenscreened images in the live view window in realtime. The quality should be good enough for small photos and prints, but if you want large high quality results you may need to use specialist green screen software such as FxHome PhotoKey.
Adjusting the green screen settings
To get the best results you need a non-reflective background which is pure green. Try to keep the lighting of the background as even as possible and avoid shadows cast by the people standing in front of the background. If you are using a cloth background try to avoid creases as these will result in an even green background.
Three different chroma keying methods are available:
| 1. | Hue/Saturation - this method is suitable for for both green screen and blue screen shooting and gives the best results under good lighting conditions |
| 2. | RGB Green screen - this method is only suitable for shooting green screen. It can give better results than the hue/saturation method if the lighting is poor |
| 3. | RGB Blue screen - this method is only suitable for shooting blue screen. |
Which method works best may depend on your lighting setup and background. Under most lighting conditions the "hue/saturation" method should give the better results, particularly if the background isn't pure green.
The "RGB Green screen" and "RGB Blue screen" methods are the same methods as used in versions of DSLR Remote Pro for Windows up to version v3.2.
Adjusting the settings when using the "Hue/Saturation" method
First select "Hue/saturation" from the "Method:" dropdown list at the top of the green screen settings dialog:
Then set the "Hue:" slider to 120 (or 240 if shooting against a blue background), the "Hue variation:" slider to 5 and the "Saturation threshold:" slider to 45
Next adjust the "Hue:" slider until most of the background is replaced. The selected color is displayed to the right of the slider.
Then adjust the "Hue variation" and "Saturation threshold" sliders until all of the green background is replaced. Ask someone to stand in front of the green background to check the settings (or take a test photo when using photo booth mode). If parts of their clothing are being replaced by the background it may mean that the hue variation setting is too high and should be reduced.
The "Saturation threshold" slider sets the minimum saturation level that will be treated as background. Normally the background will be pure green or pure blue and will be highly saturated and the "Saturation threshold" slider can be set to 45 or more. Using a higher value will reduce the chances of dark areas (e.g. black clothing) from being replaced with the green screen background.
Adjusting the settings when using the "RGB Green screen" method
This method is only suitable for shooting against a green background. First select "RGB Green screen" from the "Method:" dropdown list at the top of the green screen settings dialog:
Start by setting the green threshold to 30, the red level to 230 and the blue level to 222. Then move the "Green threshold" slider to the left until most of the background is replaced. Fine tune the settings by moving the "Red level" and "Blue level" sliders to the right. The best settings to use will depend on the lighting conditions and the quality of the green background. If areas of the subject show the background the settings are too strong and should be reduced by moving the red and blue sliders to the left or the green slider to the right.
Adjusting the settings when using the "RGB Blue screen" method
This method is only suitable for shooting against a blue background. First select "RGB Blue screen" from the "Method:" dropdown list at the top of the green screen settings dialog:
Start by setting the blue threshold to 30, the red level to 230 and the green level to 222. Then move the "Blue threshold" slider to the left until most of the background is replaced. Fine tune the settings by moving the "Red level" and "Green level" sliders to the right. The best settings to use will depend on the lighting conditions and the quality of the blue background. If areas of the subject show the background the settings are too strong and should be reduced by moving the red and green sliders to the left or the blue slider to the right.
Green Screen Backgrounds and Overlays in Video Booth Mode
Green screening of the live view images only is also available in video booth mode. This needs to be enabled in the video booth settings dialog before it can be used.
In full screen video booth mode the green screen background and overlay images are loaded from the photo booth images folder. The background image should be named video_greenscreen_background.jpg or greenscreen_background.jpg and the overlay image should be named video_greenscreen_overlay.png or greenscreen_overlay.png. The software will look for video_greenscreen_background.jpg and video_greenscreen_overlay.png first and use these if available. If they are not available it will look forgreenscreen_background and greenscreen_overlay.png images.
Backgrounds and overlays can also be switched by saving a number of different profiles each using a different photo booth images folder containing different greenscreen_background.jpg and greenscreen_overlay.png images. The user can then select the different backgrounds using the profile shortcut keys. You can also switch green screen backgrounds and overlays by copying the new greenscreen_background.jpg and greenscreen_overlay.png images into the photo booth images folder while the booth is running.
Please note: In video booth mode green screening is only applied to the live view images displayed to the user. It is not applied to the movie files downloaded from the camera or during video playback. You will need additional third party software to green screen the movie files after they have been downloaded to the PC (DSLR Remote Pro automatically downloads the movie files to the PC).
Printing the Images
There are two methods to print out the green screened shots:
Method 1: DSLR Remote Pro for Windows takes the photos, performs the green screen removal and prints the images. DSLR Remote Pro for Windows can perform simple green screen removal and print the images without the need for any other software. This is simple to setup and is fine for small photo booth prints under good lighting conditions. When green screen is enabled DSLR Remote Pro for Windows will automatically replace the green background with the background image when printing out the photo booth images unless the photo booth output option is set to "None".
This method doesn't require any software other than DSLR Remote Pro for Windows
Method 2: DSLR Remote Pro for Windows takes the photos and saves them in a folder where another specialist green screen application replaces the background and passes the images to Hotfolder Prints for formatting and printing. This is more complicated to setup than method 1 but by using a specialist green screen application it will give superior results which are more suitable for larger prints.
This method requires DSLR Remote Pro for Windows v2.0 or later plus a green screen application such as Green Screen Wizard Pro Batch and Hotfolder Prints.
When using method 2, green screen printing in DSLR Remote Pro for Windows can be disabled by setting the output option to "None" in the photo booth settings page. DSLR Remote Pro for Windows will run the full screen photo booth complete with green screened live view images and save the photos to the folder specified in preferences e.g. to save the images in the folder C:\Photobooth the preferences should be set to:
DSLR Remote Pro for Windows preference settings to save the images in C:\Photobooth
The green screen app should be setup to monitor the folder where the photos are saved, automatically replace the green background with the selected image and save them in a separate folder. The settings for Green Screen Wizard Pro Batch to monitor photos in C:\Photobooth and save the green screened images in C:\Photobooth\GreenScreen would be:
Green Screen Wizard Pro Settings (click on Tools in the main window to display the settings)
Please see the Green Screen Wizard website for information about Green Screen Wizard Pro Batch and to purchase a copy. Please make sure you purchase the Green Screen Wizard Pro Batch version as this is the only version which can monitor a folder for new photos and automatically replace the green background.
Important: To ensure that what the user sees in DSLR Remote Pro for Windows' live view display and the final printed output is the same the green screen background image should have an aspect ratio of 3:2. If a different aspect ratio is used the alignment of the background image may be different in the live view display and the green screened prints. If the images are to printed on 6"x4" paper at 300 dpi the background image should be a JPEG which is 1800 pixels wide by 1200 pixels high.
The green screen application will have its own settings for optimizing the green screen removal and will need to be setup separately. The settings used in DSLR Remote Pro for Windows' live view display will only affect what the user sees, not the final prints when using a separate app to perform the green screen removal.
Hotfolder Prints should then be setup to monitor the folder where the green screened images are saved so that it can automatically format and print them as required. The Hotfolder Prints preferences screen to monitor C:\Photobooth\GreenScreen for four new images and then automatically format and print them would be: