In Operation
Once everything is setup simply run DSLR Remote Pro for Windows and press Ctrl+F4 to enter full screen mode and display the ready screen. You probably don't want to have a keyboard on show otherwise users will be able to exit the photo booth mode and access your computer. There are a number of methods that can be used to start the photo booth shooting sequence:
| 1. | The simplest option is to use a mouse and set the start option to "Left click to start, right click to toggle B&W mode" or one of the other left click options. Provided the keyboard is hidden away the users won't be able to access your computer but use the left mouse button to start the sequence and the right mouse button to toggle between B&W and color photos. |
| 2. | Alternatively you could use a programmable USB input device which can be setup to send an F4 key press to DSLR Remote Pro for Windows: a) The Powermate from Griffin Technology (http://www.griffintechnology.com/products/powermate/) is an inexpensive and nicely made device which works very well. b) The StealthSwitch (http://www.stealthswitch.com) is a very robust foot switch which simply needs to be plugged in to be used in full screen photo booth mode. No additional drivers need to be installed. The desktop hiding software that comes with the StealthSwitch should be disabled otherwise the photo booth screen will be hidden when the switch is pressed. |
| 3. | For a more professional setup you could use external panel mounted buttons. |
| 4. | Use a touchscreen and one of the left click start options |
If "auto reconnect" is selected from the "Camera" menu the camera can be turned off when not in use and then turned it back on again to automatically restart photo booth operation. When the camera is turned off the camera_not_connected.jpg screen is displayed and when it is turned back on again the ready.jpg screen is displayed.
The keyboard shortcuts Ctrl+1, Ctrl+2, Ctrl+3, Ctrl+4, Ctrl+5, Ctrl+6, Ctrl+7, Ctrl+8 or Ctrl+9 can be used to specify the number of copies of prints when running in full screen photo booth mode. The number pad "add" and "subtract" keys can also be used to increase or decrease the number of copies. A small confirmation message is displayed for approximately 2 seconds in the bottom right corner of the display when the number of copies is changed.
A default profile can be used to reset the photo booth to a known state after each shooting sequence.
If there is no internet connection available at an event you can use the offline email mode to record users' email addresses and send the emails later. Please see this section of the help file for details.
To exit full screen photo booth mode either press the Esc key or hold down the SHIFT key and press the left mouse button.
Lockdown Mode
Lockdown mode protects the photo booth settings with a password and can be used to prevent untrained photo booth attendants from changing the settings.
To enable lockdown mode select "Lockdown mode..." from the View menu:
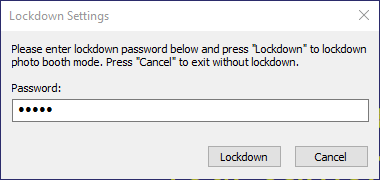
Enter the password and click on the "Lockdown" button. Check it is working by clicking on the "Advanced Settings" button and a password prompt will be displayed.
To disable the lockdown password select "Lockdown mode..." from the View menu and enter the password. If you have forgotten the password it can be reset by exiting DSLR Remote Pro and deleting the following value from the Windows registry:
HKEY_CURRENT_USER\Software\BreezeSystems\DSLRRemotePro\100\PhotoboothLockdown
Alternatively copy the text below into a text file named disable_lockdown.reg and then double click on the file to copy the reset setting to the registry:
Windows Registry Editor Version 5.00
[HKEY_CURRENT_USER\Software\BreezeSystems\DSLRRemotePro\100]
"PhotoboothLockdown"=dword:00000000
If you have forgotten your lockdown password it can be removed by exiting DSLR Remote Pro and deleting the following value from the Windows registry:
HKEY_CURRENT_USER\Software\BreezeSystems\DSLRRemotePro\100\PhotoboothLockdownPassword
The live view can be digitally zoomed in full screen photo booth mode holding down the Ctrl and Alt keys and then pressing cursor left and cursor right keys. It can also be adjusted using touchscreen actions.
The digital zoom range is from 1x to 4x magnification. Digital zoom works by taking a small portion of the photo and magnifying it and is an alternative to zooming the image by turning the zoom ring on the lens. Digital zoom may result in a reduction in image quality and pixellated live view images. It will also increase the time it takes to generate preview images and to prepare the photos for printing. Green screen processing will take considerably longer if digital zoom is used and isn't recommended unless you have a fast computer. The photos taken by the camera are not affected by digital zoom and are always saved showing the full frame. Digital zoom is only applied to the live view images presented to the user and to the printed photos.
Digital zoom can be reset to 1x magnification using the keyboard shortcut Ctrl+Home when in full screen photo booth mode or by running the photo booth setup wizard. Typing Ctrl+Home will also reset live view cropping.
Please note that digital zoom is only available in stills photo booth mode and can't be used for video.
Photos can be cropped in the live view display and the final prints when using stills photo booth mode (but not when using video booth mode). The photos can be cropped horizontally - removing equal amounts from the left and right of the photo - or vertically - removing equal amounts from the top and bottom of the photo. Horizontal cropping can be used to create square photos or to create a portrait aspect ratio when the camera is in landscape orientation. Vertical cropping can be used to create a "letter box" style crop where the photo is short and wide.
There are separate controls for cropping the live view and the photos placed in the print layout:
Cropping live view: Hold the shift key down and adjust the live view cropping using the cursor left and right keys when in full screen photo booth mode. Type Ctrl+Home to disable live view cropping (this will also reset digital zoom). The amount of cropping is displayed in the bottom right corner of the screen together with size of the cropped live view images in pixels. A crop size of 0 means no cropping, a positive crop size indicates horizontal cropping (removing equal amounts from the left and right) and a negative crop size indicates vertical cropping (remove equal amounts from the top and bottom). Use the live view size information to help select the correct amount of cropping e.g. to get a square crop adjust the settings until the width and height are the same. It's worth noting down the live view width and height as this can be used to set the cropping in the print layout.
Cropping photos in the print layout: In the print layout editor the aspect ratio (and hence the cropping) of a photo can be adjusted by holding down the Shift key and dragging the photo's corners. When a photo is selected it will be highlighted in green in the layout panel in the top left corner of the print layout editor window. The size and position of the photo is updated as the corners are dragged and the width and height displays can be used to check the exact cropping. Alternatively click on the "..." button to the right of the setting for the currently selected photo to display a dialog where the width and height can be typed in. To get a square crop simply enter the same setting for the width and the height. To match the live view cropping enter the live view width and height settings.
Once the correct amount of cropping has been applied the photo can be resized keeping the same aspect ratio by releasing the Shift key and dragging its corners.
Repeat the process for each photo on the layout. Alternatively type Ctrl+P to select all the photos then right click on the cropped photo and select "Make photos same size and angle" to crop the remaining photos by the same amount.
For most cameras (except cameras with dual pixel live view AF (e.g. Canon EOS 70D, Canon EOS 77D, Canon EOS 80D, Canon EOS 800D/Rebel T7i, Canon EOS 200D/Rebel SL2, Canon EOS 7D Mark II) it is better to use manual focus than auto focus. This is because if the camera is set to auto focus and is unable to lock focus it will not take the photo. We recommend using manual focus to avoid this problem.
The simplest way to set the camera to manual focus is to set the AF/MF switch on the lens to the MF position. When setting up the booth you can focus by turning the focus ring on the lens and checking the focus on the live view display on the PC screen.
Recent Canon DSLRs (mid range and above) and mirrorless models have dual pixel phase detect auto focus with face detect in live view. This makes it practical to use continuous auto focus in live view and get reliable, accurate autofocus.
Please see the section on photo photo booth camera settings for more information on using auto focus.
Testing without a camera
If no camera is connected photo booth can be tested using a simulated camera with a simulated live view display. When testing in normal photo booth mode or in video booth mode the software will display the normal countdown and then use the sample photos that are in the "Samples" subfolder of the main installation folder (normally C:\Program Files (x86)\BreezeSys\DSLR Remote Pro\Samples). If you would prefer to use your own sample images simply create a folder named "Photobooth Samples" in your Documents folder and copy sample JPEG photos and MP4 movies there.
The simulated live view display shows green land (to allow green screen testing) with a blue sky (to allow blue screen testing) with a stylized figure in front and the sun and a cloud moving in the background to show that live view is active:
The stylized figure can be replaced with the image of your choice by creating a PNG file named simulated_evf_landscape.png (for when the camera is in landscape orientation) and a PNG file named simulated_evf_portrait.png (for when the camera is in portrait orientation). The simulated_evf_landscape.png file should be 960 x 640 pixels in size and the simulated_evf_portrait.png file should be 640 x 960 pixels. The PNG files should contain an alpha channel containing transparency if you want the land, sky etc. to be visible in the background. The simulated_evf_landscape.png and simulated_evf_portrait.png files should be saved in the installation folder (normally C:\Program Files (x86)\BreezeSys\DSLR Remote Pro).
The last print layout can be reprinted by typing Ctrl+R in full screen photo booth mode. Alternatively select the output option to also save a JPEG copy and then use a browser or image editor to select and print the required layout.
Reprint Selection Screen
A reprint selection screen is available from the ready screen which allows users (or the photo booth operator) to quickly select a set of photos to be reprinted. The reprint selection screen can be displayed by typing Ctrl+Alt+P or by using the "Display reprint screen" touchscreen action. This will display a screen showing thumbnails of the JPEG copies of prints stored in the prints subfolder. The user can select one or more photos and the number of copies to be reprinted using the touchscreen or by using the cursor keys or mouse if no touchscreen is available. After selecting the photos they can be printed by pressing the Enter key or typing A or by clicking on the printer icon in the center bottom of the screen. The user can also cancel the reprint selection screen and return to the ready screen by typing Esc or X or by clicking on the cancel icon at the right bottom of the screen. The reprint selection screen will also cancel automatically if a timeout occurs. Clicking in the bottom left corner of the screen deselects all selected photos when using the ReprintMultiSelect option.
The reprint selection screen can be customized by clicking on the "Reprint screen settings..." button in the "Photobooth Settings" dialog and the "Reprint Selection Screen Settings" dialog will be displayed:
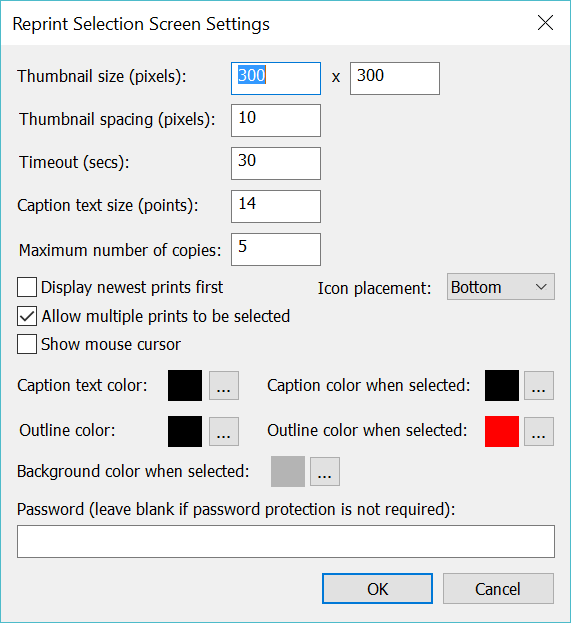
The bottom area of the reprint selection screen defaults to the Windows default background color with a printer icon and a red cross to cancel the screen. The icons can be replaced by putting PNG images named Printer-icon.png and Cancel-icon.png in your photo booth images folder. Alternatively you can use create screen image named reprint.jpg in your photo booth images folder (please note that only the bottom portion of the reprint.jpg screen will be visible).
The "Thumbnail size" setting specifies the width and height of the thumbnails and the "Thumbnail spacing" setting specifies the spacing between the thumbnails. These settings are in pixels.
The "Caption text size" specifies the size of the text used for the caption beneath each thumbnail.
The "Timeout" settings specifies how long it takes the screen to timeout and close when there is no user input.
The "Maximum number of copies" specifies the maximum number of copies the user is allowed to select. If this is set to more than 1 the currently selected number of copies will be displayed together with a - and a + sign for decreasing or increasing the number of copies to print. If a reprint.jpg screen is in the current photo booth images folder this will be displayed instead of the - and + signs.
When "Display newest prints first" is selected the thumbnails will be sorted by their file creation timestamp with the most recently created thumbnails displayed first. When this option is not selected the order will be reversed and the oldest thumbnails will be displayed first.
By default the print icons appear at the bottom of the screen. Select "Top" in the "Icon placement" dropdown list to place the icons at the top of the screen.
Select "Allow multiple prints to be selected" if you want users to be able to select more than one print. When this is selected users can select a thumbnail by tapping on it and deselect it by tapping on it a second time.
When "Allow multiple prints to be selected" is not selected only one thumbnail can be selected at a time. If another thumbnail is tapped it will be selected and the original thumbnail deselected.
Select the "Show mouse cursor" option to display the mouse cursor to make it easier to select reprints when using a mouse.
Use the "Caption text color" and "Caption color when selected" settings to set the color used to display the captions. Click on the "..." buttons to change the colors.
The thumbnails are displayed on a white background and if the thumbnails themselves have a white background it can be difficult to see them properly. By default a thin black outline is displayed around the thumbnails to make them easier to see. Use the "Outline color" setting to change the color. A different color can be used for the outline when a thumbnail is selected to help highlight it.
Use the "Background color when selected" setting to specify the color of the background used to highlight thumbnails that have been selected.
Enter a password in the password field to protect access to the reprint selection screen. Leave the password field empty if password protection is not required.
Reprinting after an Event
If the output option was set to "Print and save JPEG copy" or "JPEG copy only" when the photos were taken a JPEG copy of the printed output will be saved in the prints subfolder. The JPEG copies of the printed output can be reprinted after an event by selecting "Print selected photo booth photos..." from the File menu and then selecting one or more JPEGs for printing.
If a JPEG copy of the printed output is not available or you want to reprint the photos using a different layout you can do it as follows:
| 1. | Setup the printer and photo booth print layout as required |
| 2. | Use Windows Explorer to drag and drop the first set of photos into the DSLR Remote Pro main window |
| 3. | Type Shift+Ctrl+R or select "Reprint photos" from the File menu and the photos will be printed |
| 4. | Repeat steps 2 and 3 to as required |
Where Photos, Videos and GIFs are Saved
Photos and videos taken by the camera are downloaded to the PC and saved in the download folder. The location of the download folder is set in File->Preferences:
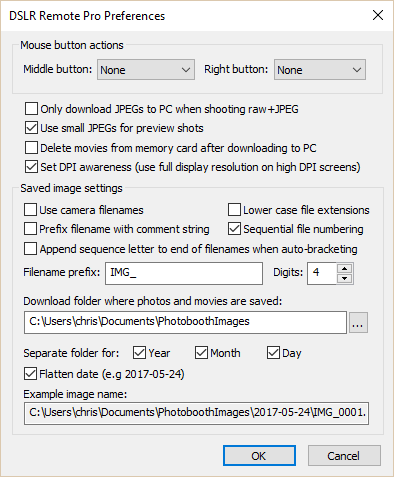
The settings shown above will save photos and videos in a separate subfolder of C:\Users\chris\Documents\PhotoboothImages for each date.
e.g. photos and videos captured on July 6, 2017 are saved in:C:\Users\chris\Documents\PhotoboothImages\2017-07-06
The XML shooting information file (see below) is also saved in the download folder.
If the output is set to "Print and Save JPEG copy" or "Jpeg copy only" the JPEG copy of the printed output will be saved in a subfolder of the download folder named "prints"
e.g. the JPEG copy of prints from photos taken on July 6, 2017 are saved in:
C:\Users\chris\Documents\PhotoboothImages\2017-07-06\prints
If one of the GIF animation options is selected the animated GIFs are saved in a subfolder of the download folder named "GIF"
e.g. GIFs created on July 6, 2017 are saved in:
C:\Users\chris\Documents\PhotoboothImages\2017-07-06\GIF
A quick method of showing where the photos are being saved is to exit full screen photo booth mode and take a photo by pressing the shutter release on the camera or by pressing the "Release (F8)" button in the main DSLR Remote Pro window. When the photo is taken it is automatically downloaded to the PC and saved on the hard disk in the download folder. The full pathname (i.e. download folder name and image filename) will be displayed in the status line at the bottom of the main DSLR Remote Pro window:
After each set of shots an XML file containing information about the set of photos is written to the folder where the photos are downloaded from the camera. The XML file has the same filename as the first shot in the sequence (but with a .XML file extension). An example XML shooting information file is shown below:
<?xml version="1.0" ?>
<breeze_systems_photobooth version="3.5">
<photo_information>
<date>2016/01/26</date>
<time>16:37:19</time>
<user_data>sales@breezesys.com</user_data>
<survey_data>
<survey1_chkbox1 id="over18">1</survey1_chkbox1>
<survey1_chkbox2 id="agree">1</survey1_chkbox2>
<survey1_chkbox3 id="share">0</survey1_chkbox3>
<survey2_text1 id="name">Chris Breeze</survey2_text1>
<survey2_chkbox1 id="test">0</survey2_chkbox1>
</survey_data>
<prints>1</prints>
<photobooth_images_folder>C:\Photobooth\PhotoboothImages</photobooth_images_folder>
<digital_zoom>100</digital_zoom>
<camera_orientation>0</camera_orientation>
<bw_mode>0</bw_mode>
<photos>
<photo image="1">20160126_163719_1.JPG</photo>
<photo image="2">20160126_163719_2.JPG</photo>
<photo image="3">20160126_163719_3.JPG</photo>
<photo image="4">20160126_163719_4.JPG</photo>
<output>prints\20160126_163719.jpg</output>
<gif_file>GIF\20160126_163719.GIF</gif_file>
</photos>
</photo_information>
</breeze_systems_photobooth>
The <date> and <time> tags contain the date and time of the first shot in the sequence. Please note that the date and time will only be correct if the camera's clock is set correctly. The camera's clock can be automatically synchronized with the PC's time when it connects to the PC by selecting the automatic synchronization option in the camera settings dialog.
The <user_data> tag contains the text entered by the user if the touchscreen keyboard option is used.
The <survey_data> tag contains information entered by the user if optional user survey screens are defined.
The <prints> tag contains the number of prints requested (this is 0 if the user rejects the photos in the print confirmation window)
The <photobooth_images_folder> tag contains the full pathname of the photo booth images folder.
The <digital_zoom> tag contains the amount of digital zoom expressed as a percentage of the frame i.e. 100 means no digital zoom
the <camera_orientation> tag contains the camera orientation expressed in degrees measured clockwise from the horizontal
the <bw_mode> tag contains color/B&W/monochrome tinting information, 0=color, 1=B&W, 2=monochrome tinting
The <photo> tags contain the filenames of the photos taken in the shooting sequence.
The <output> tag contains the relative pathname of the JPEG copy of the printed output (if selected).
The <gif_file> tag contains the relative pathname of the animated GIF (if selected).
The writing of the XML shooting information file can be suppressed by setting the following value in the Windows registry to 1:
HKEY_CURRENT_USER\Software\BreezeSystems\DSLRRemotePro\100\PhotoboothSuppressXml
Please note: if PhotoboothSuppressXml is set any information entered using the optional user survey screens will not be saved and will be lost.
This setting can be changed exiting DSLR Remote Pro and then running the Configure.exe utility in the installation folder.
Each time photos are sent to the printer the photo booth print counted is decremented by the number of copies being printed until it reaches 0. The value of the print counter is saved in the Windows registry as the following DWORD setting:
HKEY_CURRENT_USER\Software\BreezeSystems\DSLRRemotePro\100\PhotoboothPrintCounter
This setting can be displayed or edited in the event info dialog described in the next section. It can be accessed using the token {localPrintCounter}.
Please note: this counter is not the same as the number of prints remaining on a roll of media in the printer. Some printers can display the number of prints remaining via the printer driver or by running a separate print monitoring utility.
Event information can be defined and used in filenames, captions and the messages used when sharing photos. The information is saved in the Windows registry so that it may be shared with other applications and is read from the Windows registry before it is used so that it can use information supplied by other applications. The "Photo Booth Event Info" dialog can be displayed by selecting "Event info..." from the File menu or by pressing the "Event info..." photo booth shortcut button (if defined):
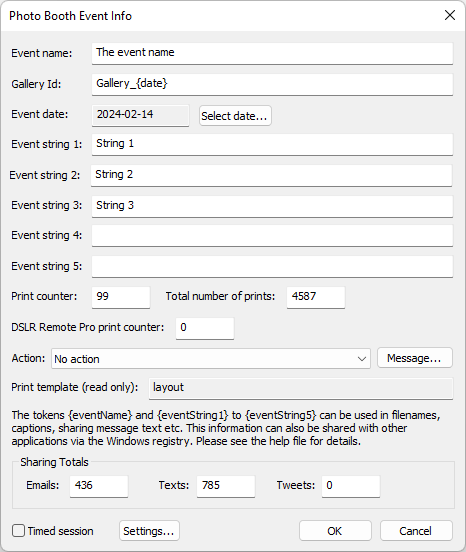
The event info can be used in filenames (e.g. the filename and download folder of photos downloaded from the camera), caption text in print layouts or in the message text used when sharing photos by using the tokens below. The information is also saved in the Windows registry using the registry key: HKEY_CURRENT_USER\Software\BreezeSystems\Event Info.
Please note: Do not use the characters \ / : * ? " | < > in the event info if it is going to be used to define filenames. Windows does not allow these characters to be used in filenames and this may prevent the files from being saved.
Item |
Token |
Registry value |
Event name |
{eventName} |
HKEY_CURRENT_USER\Software\BreezeSystems\Event Info\EventName |
Event date |
{eventDate} |
HKEY_CURRENT_USER\Software\BreezeSystems\Event Info\EventDate |
Event string 1 |
{eventString1} |
HKEY_CURRENT_USER\Software\BreezeSystems\Event Info\EventString1 |
Event string 2 |
{eventString2} |
HKEY_CURRENT_USER\Software\BreezeSystems\Event Info\EventString2 |
Event string 3 |
{eventString3} |
HKEY_CURRENT_USER\Software\BreezeSystems\Event Info\EventString3 |
Event string 4 |
{eventString4} |
HKEY_CURRENT_USER\Software\BreezeSystems\Event Info\EventString4 |
Event string 5 |
{eventString5} |
HKEY_CURRENT_USER\Software\BreezeSystems\Event Info\EventString5 |
Print counter |
{eventPrintCounter} |
HKEY_CURRENT_USER\Software\BreezeSystems\Event Info\PrintCounter |
Print total |
{eventPrintTotal} |
HKEY_CURRENT_USER\Software\BreezeSystems\Event Info\PrintTotal |
DSLR Remote Pro print counter |
{localPrintCounter} |
HKEY_CURRENT_USER\Software\BreezeSystems\DSLRRemotePro\100\PhotoboothPrintCounter |
Print template name |
{printTemplateName} |
HKEY_CURRENT_USER\Software\BreezeSystems\Event Info\PrintTemplateName |
The print template name is displayed in the "Photo Booth Event Info" dialog for information purposes only and cannot be edited in the dialog. This setting is updated automatically when a print layout is loaded in the print layout editor.
The event name and event date are used to generate an id to identify an event. The id is calculated by taking the MD5 checksum of the event name + event date. The event id is stored in the XML summary file and the email and text XML files. It is also available for including in email and text messages and QR code using the token {eventId}.
The gallery id is used to help identify which gallery photos should be added to when using online gallery systems such as Event Kite. The gallery id token, {eventKiteGalleryId}, can added to email messages or used to define QR codes. You can also use the Event Kite session id token, {eventKiteSessionId}, to identify a set of photos.
Three print counters are available:
| 1. | "Print counter" - this is a print counter shared via the Windows registry with other apps (e.g. Breeze Kiosk) and is decremented each time any app prints a photo |
| 2. | "Print total" - this is a print counter shared via the Windows registry with other apps (e.g. Breeze Kiosk) and is incremented each time any app prints a photo |
| 3. | "DSLR Remote Pro print counter" - this is a private print counter only used by DSLR Remote Pro. The counter is decremented each time a photo is printed |
Use the action dropdown list to specify what action to take when the "Print counter" or "DSLR Remote Pro print counter" reaches zero. The options are:
"None": take no action and allow printing as normal
"Display error when print counter reaches 0": display an error message and disable printing when the shared "Print counter" reaches zero
"Display error when DSLR Remote Pro print counter reaches 0": display an error message and disable printing when the "DSLR Remote Pro print counter" reaches zero
The action dropdown also controls how the {printQuotaUsed} token works:
"None": {printQuotaUsed} always returns 0 (i.e. it is disabled and the print quota is never used up)
"Display error when print counter reaches 0": {printQuotaUsed} returns 1 when the print counter reaches 0 else returns 0
"Display error when DSLR Remote Pro print counter reaches 0": {printQuotaUsed} returns 1 when the DSLR Remote Pro print counter reaches 0 else returns 0
Click on the "Message..." button to edit the error message that is displayed to the user when the print counter reaches zero.
Example: to limit an event to 200 prints first set the print counter to 200 then set the "Action:" dropdown list to "Display error when printer counter reaches 0". Next click on the "Message..." button to edit the message that is displayed to users when the print counter reaches zero.
Each time a print is output the counter is decremented and when in reaches zero the error message will be displayed if users try to print additional photos.
Tip: To create a setup which uses a different profile when the DSLR Remote Pro print counter reaches 0 set the default profile to something like this:
C:\Profiles\{if,{localPrintCounter},print_and_share.xml,share_only.xml}
Alternatively you could use the {printQuota} token instead by setting the "Action" dropdown "Display error when print counter reaches 0" or "Display error when DSLR Remote Pro print counter reaches 0" and setting the default profile to something like this:
C:\Profiles\{if,{printQuotaUsed},share_only.xml,print_and_share.xml}
The event info can also be manually added to the XML files used to setup a photo booth. Please see the section on using profiles to setup a photo booth for details.
Select "Timed session" in the "Photo Booth Event Info Dialog" and click on the settings button to set up a session which has a start time and an end time:
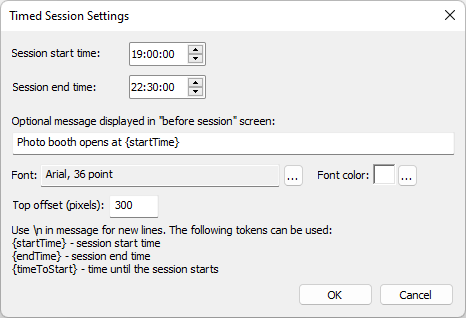
Set the start time to the time the photo booth session should start and the session end time to the time the session should end.
When the photo booth is running before the start time it will display the before_session.jpg screen. When the time reaches the start time the photo booth will automatically switch to the ready screen. When the session end time is reached the photo booth will automatically switch to the after_session.jpg screen.
An optional message can be displayed in the before_session.jpg screen. This can be used to display information such as when the photo booth opens or a countdown timer showing when it opens. Click on the "..." button to the right of the "Font" text box to adjust the font type and size. Click on the "..." button to the right of the "Font color" preview to change the color. Use the "Top offset (pixels)" setting to position the message relative to the top of the screen. The message will be center justified.
The message can be made up of more than one line of text by adding \n to start a new line. The following tokens can be used in the message:
{startTime} - this is replaced with the start time e.g. 19:00
{endTime} - this is replaced with the end time e.g. 22:30
{timeToStart} - this is replaced with the time until the photo booth opens e.g. 2:34:52
Example: to display the photo booth opening time with a countdown in you could set the message to:
Photo booth is open from {startTime} to {endTime}\nOpens in {timeToStart}...
An optional video can be displayed in the before_session.jpg and after_session.jpg screens. The video should be given the same name as the screen e.g. before_session.mp4 or before_session.mov. Add _loop to the end of the filename to play the video in a continuous loop e.g. before_session_loop.mp4. Please see the section on screens displayed to the user for more information.
The optional message in the before_session.jpg screen will appear in front of the before session video.
Touchscreen actions can be defined to start a session early when the before_session.jpg screen is displayed or to open the photo booth for another 10 minutes when the after_session.jpg screen is displayed. The "Exit fullscreen photobooth" touchscreen action can also be used to exit photo booth mode. All of these touchscreen actions can be password protected using the exit action password which can be set in the "Touchscreen Settings" dialog.
Sharing Totals
The sharing totals shown at the bottom of the "Photo Booth Event Info" keep a count of the total number of emails, texts and tweets sent by the photo booth. These counters are incremented each time a photo is shared. The counters can be reset by entering new values and pressing "OK".
The counters are saved to the Windows registry when they are updated so that they can be monitored by other applications if required.
Counter |
Registry value |
Emails |
HKEY_CURRENT_USER\Software\BreezeSystems\DSLRRemotePro\100\EmailCounter |
Texts |
HKEY_CURRENT_USER\Software\BreezeSystems\DSLRRemotePro\100\TextCounter |
Tweets |
HKEY_CURRENT_USER\Software\BreezeSystems\DSLRRemotePro\100\TweetCounter |