Flip Book Photobooth can be used for green screen or blue screen shooting. The subjects are photographed in front of a green (or blue) background and this is automatically replaced with a new background. The new background can be a single, fixed image or a movie made up of a series of still images to give an animated background.
Background Images
A single static background can be defined by a single JPEG image named greenscreen_background.jpg saved in the folder containing the screen and layout images. Alternatively an animated background can be used by creating a green screen background image for each frame in the clip e.g. if the clip contains 28 frames the background images should be named greenscreen_background 001.jpg, greenscreen_background 002.jpg, greenscreen_background 003.jpg etc.
Inexpensive tools such as Apple's QuickTime Pro Player can be used to create the background images from a movie file. To do this load the movie into QuickTime Pro then select "Export..." from the "File" menu. Select the folder in which to save the images and set the file name to greenscreen_background. The "Save exported file as:" window should look something like this:

Apple Quick Time Pro "Save exported file as:" dialog
Next set the "Export:" option to "Movie to Image Sequence" and click on the "Options..." button:
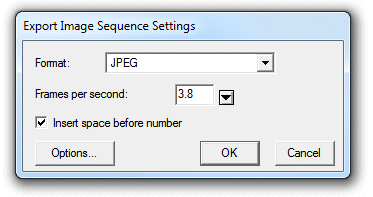
Apple Quick Time Pro "Export Image Sequence Settings" dialog
Set the "Format:" to JPEG and type in the number of frames per second to use. If you want the animation to play at normal speed the frames per second should be set to the same frame rate as the flip book clip (this is displayed in the main Flip Book Photobooth window). The animation can be played in slow motion by setting frames per second to a higher value than the frame rate of the flip book clip (or high speed by setting it to a lower value). Click on "OK" and then "Save" to save the movie as a series of JPEG images.
For best performance the green screen background images should be the same size as the live view images from the camera. If the green screen background images are a different size from live view images from the camera the software will need to resize them which could cause delays or reduced image quality. Please see the Remote Live View Display page on the Breeze Systems' website for a list of the live view image sizes for different Canon camera models. The background images can be cropped and resized using an image editor or you could use the proofs tool in our BreezeBrowser Pro software.
Optional Overlay
An optional static overlay can be added to the live view and the green screened images by placing a PNG file named live_view_overlay.png in the folder containing the screen and layout images. The overlay image should be a 24-bit PNG file an 8-bit alpha channel containing transparency information. It should be in landscape orientation with an aspect ratio of 3:2 e.g. 1056x704 pixels in size. If the aspect ratio of the overlay image isn't the same as the live view images it will be stretched to fit and may appear distorted.
Live view settings
The green screen setup dialog can be selected by typing Ctrl+G when the live view window is displayed:
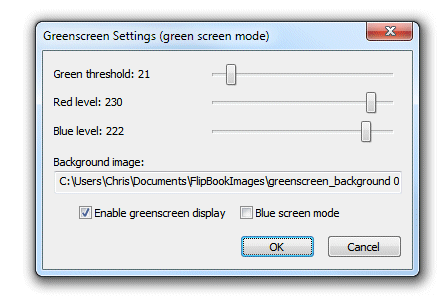
The green screen background should be saved in the folder containing the screen and layout images and its path will be displayed in the "Background image:" field. Click on the checkbox to enable green screen display then adjust the sliders so that all of the green screen background is replaced with the background image but the foreground subject is unaffected. The easiest way to do this is to move the "Green threshold" slider to the left until most of the background is replaced and then fine tune the settings by moving the "Red level" and "Blue level" sliders to the right. The best settings to use will depend on the lighting conditions and the quality of the green background. If areas of the subject show the background the settings are too strong and should be reduced by moving the red and blue sliders to the left of the green slider to the right.
For best results the green background should be evenly lit and the subject should be positioned to minimize shadows falling on the background.
Select the "Blue screen mode" if you are using a blue background instead of a green one.
Allowing users to choose different green screen backgrounds
The green screen background is defined by the green screen JPEG images stored in the current screen images folder. Green screen backgrounds can then be selected by changing the screen images folder using profiles. For example four different green screen backgrounds could be defined by creating four screen images folders:
C:\Users\Chris\Documents\FlipBookImages\greenscreen1
C:\Users\Chris\Documents\FlipBookImages\greenscreen2
C:\Users\Chris\Documents\FlipBookImages\greenscreen3
C:\Users\Chris\Documents\FlipBookImages\greenscreen4
Each screen folder should have contain different green screen background images and you should also create a different ready.jpg screen in each so that the user knows which background has been selected.
Then save four different sets of settings, each with a different screen images folder:
C:\Users\Chris\Documents\FlipBookImages\bg1.xml - with the screen image folder set to C:\Users\Chris\Documents\FlipBookImages\greenscreen1
C:\Users\Chris\Documents\FlipBookImages\bg2.xml - with the screen image folder set to C:\Users\Chris\Documents\FlipBookImages\greenscreen2
C:\Users\Chris\Documents\FlipBookImages\bg3.xml - with the screen image folder set to C:\Users\Chris\Documents\FlipBookImages\greenscreen3
C:\Users\Chris\Documents\FlipBookImages\bg4.xml - with the screen image folder set to C:\Users\Chris\Documents\FlipBookImages\greenscreen4
Finally assign profiles 1 to 4 to the saved settings:
Profile 1: set to load C:\Users\Chris\Documents\FlipBookImages\bg1.xml
Profile 2: set to load C:\Users\Chris\Documents\FlipBookImages\bg2.xml
Profile 3: set to load C:\Users\Chris\Documents\FlipBookImages\bg3.xml
Profile 4: set to load C:\Users\Chris\Documents\FlipBookImages\bg4.xml
When the photo booth is running the different profiles (and hence green screen backgrounds) can be selected using the following keyboard shortcuts:
Shift+Ctrl+1 - select profile 1
Shift+Ctrl+2 - select profile 2
Shift+Ctrl+3 - select profile 3
Shift+Ctrl+4 - select profile 4
Shift+Ctrl+N - select next profile
Shift+Ctrl+P - select previous profile
These keyboard shortcuts could also be selected using an arcade button interfaced to the computer using a StealthSwitch 3 (please see this page for details). You could use four buttons, one for each background generating key presses Shift+Ctrl+1, Shift+Ctrl+2, Shift+Ctrl+3 and Shift+Ctrl+4, and then press the appropriate button the select the different backgrounds directly. Alternatively you could use a single button generating Shift+Ctrl+N which can be pressed repeatedly to step through the different backgrounds.