Users can email photos directly from the photo booth if it has an internet connection and either a touchscreen or a keyboard to enter their email address. If an internet connection is not available at an event the email addresses can be saved and the emails sent later by selecting the offline email mode.
The simplest way to set this up is to use the photo booth setup wizard and then adjust the settings if required. After running the photo booth setup wizard the email settings can editing using the dialog below. This dialog can be opened by opening the "Photobooth Settings" dialog (File->Photobooth Settings... or Ctrl+S) then opening the "Output Settings" dialog clicking on the "Settings..." button to the right of the output options and then clicking on the email photo "Settings..." button.
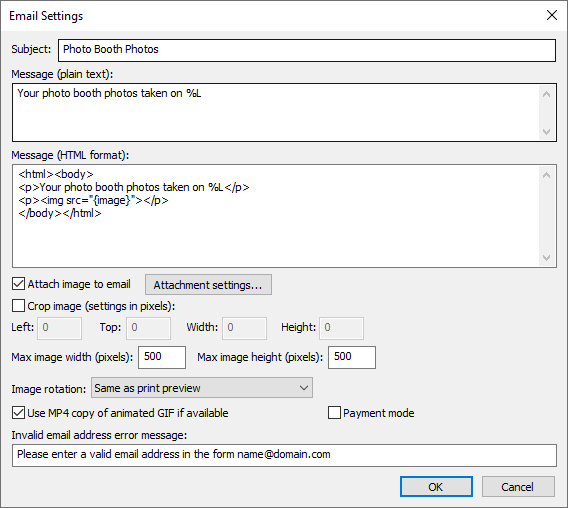
The "Subject:" text box defines the text in the subject line of the email.
The body text of the message can be specified in plain text or in HTML format to provide more control over its appearance. When using the HTML format the token {image} represents a link to the attachment of the photo to be emailed and can be used with HTML <img> tag e.g. <img src="{image}"> to display the photo in the email message. This can be combined with other tokens e.g. the following line could be used to embed a photo in the HTML message or display a message saying the video is attached to the email:
<p>{if,{isMovie},Your video is attached,<img src="{image}">}</p>
This evaluates to <p>Your video is attached</p> if the file is a movie file and to <p><img src="{image}"></p> if it is a JPEG or an animated GIF.
Please note: for backwards compatibility with older versions of DSLR Remote Pro the token [image] can be used instead of {image}. Please use one of the tokens listed in the Email Attachments section for new events.
JPEG images and animated GIFs will be embedded in the HTML message if it contains the a token referencing the image (e.g. {print_layout}) otherwise they will be attached to the email. Videos are always sent as attachments because most email clients don't support HTML 5 and cannot display embedded movie files.
Tokens for the date and time can be included in the email subject and message text fields and will be replaced with the date or time the photos were taken when they are uploaded e.g.
%L will be replaced with the long date representation for your computer's locale e.g. Wednesday, January 08, 2014
%l will be replaced with the long date and time representation for your computer's locale e.g. Wednesday, January 08, 2014 20:23:56
{sharingMessage} is replaced with contents of the second text entry field (if defined) in the touchscreen keyboard used for entering the user's email address. This allows the user to enter an optional message when emailing photos.
Please see the tokens section for a list of available tokens.
Select the "Attach image to email" option to send the photo, GIF or MP4 with the email as an attachment (this is the default option). If this option is disabled the image won't be attached to the email and you need to provide a link to a website where users can view their photos. For example you might use an FTP client to automatically upload the photos to your website and then provide a link to the photo in the email by replacing the line:
<p><img src="{image}"></p>
with something like this:
<p><img src="http://mywebsite.com/viewer.php?id={filename}"></p>
When sending photos the photo that is emailed is based on the JPEG copy of the printed output. You can crop, resize and rotate the image before it is emailed to the user.
To crop the image first check the "Crop image:" checkbox and then specify the left offset and top offset in pixels for the top left corner of the cropped image. Then specify the width and height of the image in pixels. For example if the photo booth is setup to print a double strip of 4 images on 6"x4" paper you may wish to crop the image so that only a single strip is emailed to the user. If the printer is set to a resolution of 300 dpi the image will be 1200 pixels wide (4" x 300 dpi) by 1800 pixles high (6" x 300 DPI) and so to crop it into a single strip you need to set left=0, top=0, width=600 and height=1800.
You can also specify a maximum size for the image being uploaded using the "Max width (pixels):" and "Max height (pixels):" settings. The JPEG copy of the printed output will be resized so that it is no bigger than these settings before it is emailed. Keeping these values relatively small, e.g. 500 x 500 pixels, will reduce the time it takes to send the email.
Depending on you printer page settings the JPEG copy of the printed output may not be saved in the correct orientation. If this is the case it can be rotated using the "Image rotation:" dropdown list. If you are also using print preview (the "Confirm before printing" option in the "Photobooth Settings" dialog) this can be set to "Same as print preview" and it will use the same rotation settings as the print preview.
Please note that the image is cropped first, then resized and finally rotated before being emailed to the user.
Select the "Use MP4 copy of animated GIF if available" option to enable the uploading of the MP4 copy of animated GIFs. Please see the animated GIF section for details of how to create animated GIFs.
GIFs and MP4 files will be sent without being resized or cropped.
Select "Payment mode" to enable the payment screens when emailing from the sharing screen. When payment mode is enabled and the user selects email from the sharing screen and enters a valid email address a payment screen named email_payment.jpg is displayed. This is displayed until a timeout occurs or a "payment accepted" or "payment cancelled" touchscreen command is received. If the payment is accepted the photos are emailed and the email_success.jpg screen is displayed. If the timeout occurs or the payment is cancelled the email_payment_cancelled.jpg screen is displayed for a few seconds before returning to the share screen. Please see the Payment Options section for more information.
Click on the "Attachment settings..." button to display the "Email Attachment Settings" dialog to specify additional email attachments:
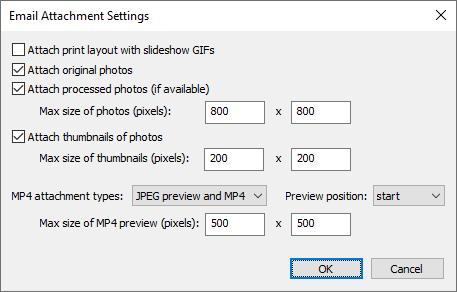
Select "Attach print layout with slideshow GIFs" to add an attachment for the JPEG copy of the print layout when emailing slideshow GIFs (or their MP4 copies). The size and cropping information in the email settings dialog is saved with the attachment information.
Select "Attach original photos" to add attachment information for the individual photos taken in stills photo booth mode. Select "Attach processed photos (if available)" to also include copies of the photos after they have been processed. Use the "Max size of photos (pixels)" settings to specify the maximum width and height of the photos.
Select "Attach thumbnails of photos" to add attachment information for thumbnails of the individual photos taken in stills photo booth mode. Use the "Max size of thumbnails (pixels)" settings to specify the maximum width and height of the thumbnails.
Select the types of attachments to be included when emailing MP4 videos. The options are: "MP4 only" which attaches the MP4 file to the email, "JPEG preview only" which extracts a preview image from the MP4 movie and attaches it to the email, "MP4 and JPEG preview" which attaches both the MP4 file and the JPEG preview to the email. Use the "Max size of MP4 preview (pixels)" settings to specify the maximum width and height of the JPEG preview extracted from the MP4 file.
Attachments for JPEG images (including preview created from MP4 videos) and GIF images can be embedded in HTML emails using the following tokens:
{print_layout} - the JPEG copy of the print layout
{photo<n>} - original individual photos e.g. {photo1}, {photo2} etc.
{thumbnail<n>} - individual thumbnails e.g. {thumbnail1}, {thumbnail2} etc.
{gif} - slideshow GIF or boomerang GIF
{video_preview} - JPEG preview of the video
When "Attach processed photos (if available)" is selected the token used for embedding the photos in the HTML email text will depend on whether "Attach original photos" is also selected. If "Attach original photos" is selected the token for the processed photos is {processed<n>} otherwise it is {photo<n>}.
To embed the print layout in the email message body you need to add something like this to the HTML message text:
<img src="{print_layout}">
To embed the first photo in the email message body you need select "Attach original photos" and to add something like this to the HTML message text:
<img src="{photo1}">
To embed the first processed photo in the email message body you need select "Attach processed photos (if available)" and to add something like this to the HTML message text:
<img src="{photo1}">
or <img src="{processed1}"> if "Attach original photos2 is also selected.
To embed a thumbnail of the first photo in the email message body you need select "Attach thumbnails of photos" and to add something like this to the HTML message text:
<img src="{thumbnail1}">
You can also the the {image} token followed by the attachment number e.g. {image} or {image1} for the first attachment, {image2} for the second attachment e.g.
<p>Attachment 1: <img src="{image1}"></p>
<p>Attachment 2: <img src="{image2}"></p>
If there is no corresponding token for the attachment in the HTML email text or if the attachment is a MP4 movie file it will be attached to the email and won't be embedded in the email text.
The email server settings also need to be setup so that the program can email the photos. The "Email Server Settings" dialog can be opened by selecting "Email Server Settings..." from the File menu or by clicking on the "Email server settings..." button in the "Output Settings" dialog. The "Email Server Settings" dialog shown below will be displayed:
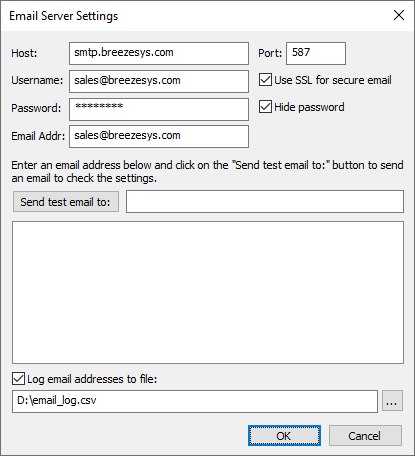
To send an email you need to specify the host name and port number of your email server. Most email servers also require a username and a password to prevent unauthorized users from sending spam emails. For additional security select the "Use SSL for secure email" option to send the email using SSL. The port number should normally be set to 465 or 587 when using SSL secure email or 25 otherwise (please check the port numbers used by your ISP).
Set the "Email addr:" to the sender's email address. To include the name of the sender with the email address enter it as the name followed by the email address enclosed in angle brackets e.g. "Acme Photo Booth <photobooth@acme.com>". Most free email services require the sender's email address to the be the same as that of the email account specified by the username and password.
The settings can be verified by sending a test email by entering the destination email address and then clicking on the "Send test email to:" button. The email status and any error messages will be displayed in the status area at the bottom of the dialog.
Select the "Log email addresses to file:" checkbox to log the email addresses to a CSV file. Then either type in the filename of the log file in the editbox or click on the "..." to open a file browser. The log file contains a line for each email containing the following comma separated values: the date in the format YYYYMMDD, the time in the format HHMMSS, the email address, the status (1=success, 0=failure) and the filename of the image file e.g.
20140114,174842,test@gmail.com,1,C:\Users\Chris\Documents\PhotoboothImages\2014-01-14\prints\140114_174826.jpg
In spring 2020 Google withdrew support for standard SMTP emails and replaced it with a more secure service linked to your Google account. DSLR Remote Pro v3.15 has received app approval from Google which allows it to send emails using this new secure method. To use GMail to send emails you need to authorize it with your Google account. To do this first set the "Host" to GMail and then click on the "GMail authenticate..." button. This will open a web browser window guiding you through the acceptance process. If the PC has already been authenticated pressing the "GmaiL authenticate..." button will refresh the GMail access token and display its status.
If you decide to stop allowing DSLR Remote Pro to send emails using GMail you can revoke its access by logging in to your Google account and going to the Security settings and "Third-party apps with account access". You should see an entry for Breeze Booth which you can click on to review its access. If you decide to remove access this will prevent all copies of DSLR Remote Pro from sending emails using GMail and you will need to re-authenticate them if you to use GMail on them again.
DSLR Remote Pro only has permission to send emails on your behalf using GMail. It is not able to read, modify or delete your emails and does not have access to any other Google services you may use.
Switching to a different GMail account: The GMail email account used to send the emails can be changed by signing into the Google account settings for the current account using a web browser and removing access for Breeze Booth in the security settings. Then re-authenticate in DSLR Remote Pro and select the new account.
Please note: Google limit the number of emails that can be sent from a GMail account to 500 emails in a 24 hour period which may not be enough if you are running several photo booths. If this is a problem please consider using a dedicated email service such as sendgrid.com.
In Operation
Breeze Hub is free and is included included with the Breeze Booth for iPad Event Editor which can be downloaded from https://www.breezesys.com/support
When the photo booth is run and the photos have been taken the print preview screen will be displayed first (if "Confirm before printing" is selected) and then when the user selects "Print" the sharing screen (share.jpg) will be displayed. If the user selects "Cancel" in the print preview screen the sharing screen won't be displayed and the booth will return to the ready screen (ready.jpg). If the "Confirm before printing" option is not selected the sharing screen will be displayed after taking the photos.
When the sharing screen (share.jpg) the user has the option to email the photo by touching the email button on the touchscreen or by typing E if they are using a normal keyboard. The sharing screen can be exited by touching the "Cancel" button on the touchscreen or by typing X or Esc on a normal keyboard. The sharing screen will also exit automatically if the user does nothing and the screen timeout occurs. The sharing screen timeout can be specified in the "Output Settings" dialog.
When the user selects email photo the touchscreen keyboard will be displayed allowing them to enter the email address. The user can enter the email address by tapping on the touchscreen keyboard or by typing it in using a normal keyboard. The user can then either tap on the "Cancel" button (or type Esc) to cancel the email or tap on the "Send email" button (or press the keyboard Enter key) to start the upload. The touchscreen keyboard will cancel automatically if the user doesn't tap the touchscreen or type anything and the keyboard timeout occurs. The keyboard timeout can be specified in the "Touchscreen Settings" dialog which can be displayed from the "Photobooth Settings" dialog.
The "To" email address is read from the first email text field defined in the touchscreen keyboard. If additional email text fields are found they are added as CC addresses. Please see touchscreen keyboard page for more information and an example of how to add a CC text field to the email keyboard.
When the user has entered their email address and selected "Send email" the email upload screen (email_photo.jpg) will be displayed and the photo will be placed in the email queue and the email success screen (email_success.jpg) will be displayed for a few seconds and then the screen will return to the sharing screen.
The sharing screen can also be displayed from the ready screen using the keyboard shortcut Shift+Ctrl+S or the "Display sharing screen" touchscreen action.
From DSLR Remote Pro v3.16 onwards emails are sent in the background and users do not need to wait in the sharing screen for each email to be sent. When the users enters their email address an XML copy of the email is saved and is added to the email queue to be sent in the background. The XML copy of the email is saved in the same folder as the photos being emailed and is given a filename prefix of email_YYYMMDD_hhmmss_. When an email is sent the status is saved to the XML email file.
Email "Offline Mode" and sending emails after an event
If no internet connection is available at an event you can disable the sending of emails and send them later when an internet connection is available. To do this you select the email "Offline email mode" option in the "Output Settings" dialog.
The emails can be sent when an internet connection is available by selecting "Send emails and MMS/SMS messages..." from the "File" menu in the main window:
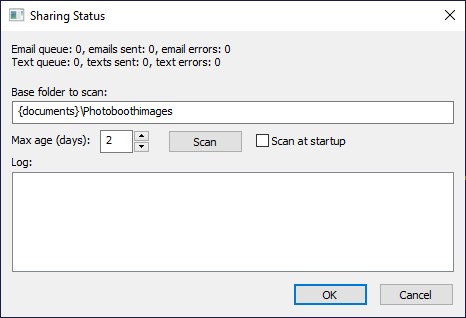
The first two lines in the "Sharing Status" dialog show the status of the email and text message queues. This will display all emails and texts queued since the app was run. If you exit DSLR Remote Pro and restart it the queues will be empty.
Enter the base folder where the photos are stored (e.g. {documents}\PhotoboothImages) and press the "Scan" button to add unsent email and text messages to the sharing queue. This will scan the base folder and all its subfolders looking for email and text XML files that have not been sent. If it finds messages that have not been sent it will ask whether you would like to add them to the sharing queue.
You can limit the age of the messages included in the scan by setting the "Max age (days)" setting. This is useful if you have old events in your photo booth images folder and don't want old messages to be sent.
Select the "Scan at startup" option to automatically scan for unsent messages each time DSLR Remote Pro is run.
The offline mode setting is not saved in the XML settings files when using profiles, but the setting can be changed when loading profiles by adding one of the following lines to the XML settings file:
Enable offline mode:
<photoboothEmailOfflineModeSetting>1</photoboothEmailOfflineModeSetting>
Disable offline mode:
<photoboothEmailOfflineModeSetting>0</photoboothEmailOfflineModeSetting>
MMS messages can be sent in the US and Canada using a web-based service called Twilio (www.twilio.com). In other countries the message can be sent as an SMS message with a link to the photo. Most cellphones should recognize the link as a link to a web server and open a web browser on the user's cellphone to view the photo. Please note that the image link in an SMS will only be valid for 7 days.
To use this service you need an account with Twilio and enter your Twilio account details in the MMS setting dialog. Twilio charge for each MMS or SMS message sent using their service. Please see their website for pricing information.
The maximum image file size that can be sent is 1 MB, but Twilio may resize the image file to conform to the cellphone service provider's size requirements.
When the user taps the MMS icon in the sharing screen a touchscreen keyboard will displayed to allow the user to enter their cellphone number. Please see the touchscreen keyboard section for information on how to customize its layout and appearance.
The MMS settings need to be setup so that the program can send the texts via Twilio. The "MMS Settings" dialog can be opened by clicking on the "SMS/MMS settings..." button in the "Output Settings" dialog. The "MMS Settings" dialog shown below will be displayed:
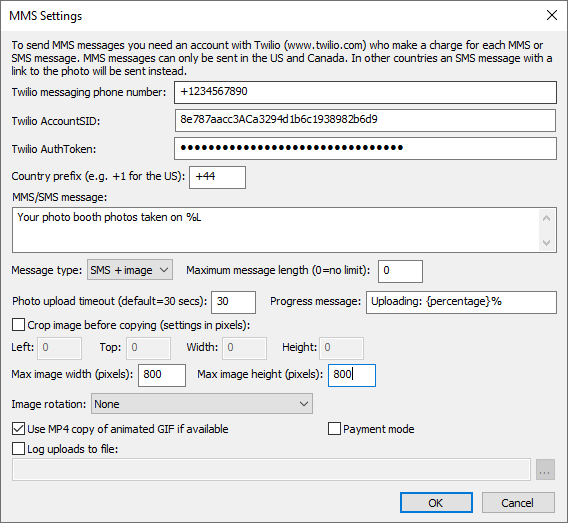
Enter your Twilio message phone number, AccountSID and AuthToken in the "MMS Settings" dialog. You can find your Twilio message phone number, AccountSID and AuthToken by logging into your Twilio account.
Set the country prefix to your country prefix e.g. +1 for the US and Canada, +44 for the UK, +49 for Germany etc. When users enter their cellphone numbers they can either enter the number with their country prefix e.g. +1234567890 or without it e.g. 23456789 and the country prefix will be added automatically before sending the text.
Select the message type from the "Message type:" dropdown list. The available options are:
| 1. | MMS - send the message as an MMS with the image attached to the message. Currently Twilio only supports MMS messaging in the US and Canada. If this option is used in a country which doesn't support MMS messaging through Twilio the message will be sent as an SMS + image. |
| 2. | SMS - send the message as an SMS. You will need to include a link to a website in the message text so that the user can view their photos e.g. http://mywebsite.com/photos/{fullFilename} |
| 3. | SMS + image - send the message as an SMS with a link to the photo. The photo will only be available for viewing for 7 days. Use the {url} token to include the URL to the image in the text message. If the {url} token is not included in the message the URL will be appended to the end of the message. |
Photos sent using the "MMS" and "SMS + image" options must be no more than 1MB in size after resizing and cropping. An error message will be displayed if the 1MB file size limited is exceeded. Twilio may resize the photo to conform with the cellphone service operator's MMS size limits.
Photos sent using the "SMS + image" option will be hosted on the Breeze Systems' website for 7 days.
You can specify a maximum message length to ensure the 160 character SMS message length is not exceeded. In some countries SMS messages of more than 160 characters may be sent as multiple SMS messages and will cost more. In other countries the SMS message will be truncated to 160 characters.
You can crop, resize and rotate the photos before they are sent to the user.
To crop the image first check the "Crop image:" checkbox and then specify the left offset and top offset in pixels for the top left corner of the cropped image. Then specify the width and height of the image in pixels. For example if the photos are from a photo booth which is setup to print a double strip of 4 images on 6"x4" paper you may wish to crop the image so that only a single strip is emailed to the user. If the printer is set to a resolution of 300 dpi the image will be 1200 pixels wide (4" x 300 dpi) by 1800 pixels high (6" x 300 DPI) and so to crop it into a single strip you need to set left=0, top=0, width=600 and height=1800.
You can also specify a maximum size for the image being uploaded using the "Max width (pixels):" and "Max height (pixels):" settings. The JPEG copy of the printed output will be resized so that it is no bigger than these settings before it is emailed. Keeping these values relatively small, e.g. 500 x 500 pixels, will reduce the time it takes to send the email.
If required, the photo can be rotated using the "Image rotation:" dropdown list.
Please note that the image is cropped first, then resized and finally rotated before being sent to the user.
Select the "Use MP4 copy of animated GIF if available" option to enable the uploading of the MP4 copy of animated GIFs. Please see the animated GIF section for details of how to create animated GIFs.
GIFs and MP4 files will be sent without being resized or cropped.
You can specify a timeout for uploading the photo to prevent a slow or broken internet connection from jamming the photo booth.
From DSLR Remote Pro v3.16 onwards texts are sent in the background and users do not need to wait in the sharing screen for each text to be sent. When the users enters their phone number an XML copy of the text is saved and is added to the text sharing queue to be sent in the background. The XML copy of the text is saved in the same folder as the photos being texted and is given a filename prefix of text_YYYMMDD_hhmmss_. When a text is sent the status is saved to the text XML file.
Select "Payment mode" to enable the payment screens when texting from the sharing screen. When payment mode is enabled and the user selects text from the sharing screen and enters a valid phone number a payment screen named mms_payment.jpg is displayed. This is displayed until a timeout occurs or a "payment accepted" or "payment cancelled" touchscreen command is received. If the payment is accepted the photos are texted and the mms_success.jpg screen is displayed. If the timeout occurs or the payment is cancelled the mms_payment_cancelled.jpg screen is displayed for a few seconds before returning to the share screen. Please see the Payment Options section for more information.
By default the screens displayed when sending an MMS or SMS will have a simple status message shown on a black background. This can be overridden by placing the following JPEG screen images in the screen images folder:
mms.jpg - screen displayed when sending an MMS
mms_success.jpg - screen displayed after an MMS has been sent successfully
mms_as_sms.jpg - screen displayed in if MMS isn't supported and SMS is being used instead
mms_error.jpg - screen displayed if there is an error when sending an MMS
MMS/SMS "Offline Mode" and sending texts after an event
If no internet connection is available at an event you can disable the sending of texts and send them later when an internet connection is available. To do this you select the email "MMS/SMS Offline mode" option in the "Output Settings" dialog.
The texts can be sent when an internet connection is available by selecting "Send emails and MMS/SMS messages..." from the "File" menu in the main window:
Please see the section on sending offline emails for details.
Posting photos to the user's Twitter account (tweeting)
Users can post photos to their personal Twitter account directly from the photo booth if it has an internet connection and either a touchscreen or a keyboard to enter their Twitter login information. The simplest way to set this up is to use the photo booth setup wizard and then adjust the settings if required. After running the photo booth setup wizard the Twitter settings can editing using the dialog below. This dialog can be opened by opening the "Photobooth Settings" dialog (File->Photobooth Settings... or Ctrl+S) then opening the "Output Settings" dialog clicking on the "Settings..." button to the right of the output options and then clicking on the Twitter "Settings..." button.
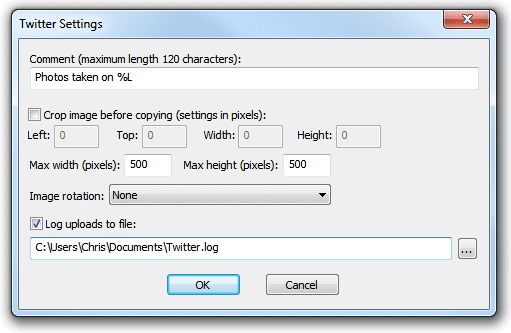
The comment setting specifies text that will be used in the tweet. Twitter limits messages to 140 characters but approximately 20 characters are required for the URL when posting photos and so the maximum usable message size is 120 characters. Tokens for the date and time can be included in text and will be replaced with the date or time the photos were taken when they are uploaded e.g.
%L will be replaced with the long date representation for your computer's locale e.g. Wednesday, June 08, 2015
%l will be replaced with the long date and time representation for your computer's locale e.g. Wednesday, June 08, 2015 20:23:56
Please see the tokens section for a list of available tokens.
The photo that is tweeted is based on the JPEG copy of the printed output. You can crop, resize and rotate the image before it is tweeted.
To crop the image first check the "Crop image:" checkbox and then specify the left offset and top offset in pixels for the top left corner of the cropped image. Then specify the width and height of the image in pixels. For example if the photo booth is setup to print a double strip of 4 images on 6"x4" paper you may wish to crop the image uploaded to Twitter so that only a single strip is sent. If the printer is set to a resolution of 300 dpi the image will be 1200 pixels wide (4" x 300 dpi) by 1800 pixles high (6" x 300 DPI) and so to crop it into a single strip you need to set left=0, top=0, width=600 and height=1800.
You can also specify a maximum size for the image being uploaded using the "Max width (pixels):" and "Max height (pixels):" settings. The JPEG copy of the printed output will be resized so that it is no bigger than these settings before it is tweeted. Keeping these values relatively small, e.g. 500 x 500 pixels, will reduce the time it takes to upload the file.
Depending on you printer page settings the JPEG copy of the printed output may not be saved in the correct orientation. If this is the case it can be rotated using the "Image rotation:" dropdown list. If you are also using print preview (the "Confirm before printing" option in the "Photobooth Settings" dialog) this can be set to "Same as print preview" and it will use the same rotation settings as the print preview.
Please note that the image is cropped first, then resized and finally rotated before being tweeted.
Select the "Log uploads to file:" checkbox to log tweets to a CSV file. Then either type in the filename of the log file in the editbox or click on the "..." to open a file browser. The log file contains a line for each tweet attempt containing the following comma separated values: the date in the format YYYYMMDD, the time in the format HHMMSS, the Twitter username prefixed with TWITTER_USERNAME: and with @ characters replaced by _ , the status (1=success, 0=failure) and the filename of the image file e.g.
20151214,174842,TWITTER_USERNAME:test_gmail.com,1,C:\Users\Chris\Documents\PhotoboothImages\2015-12-14\prints\151214_174826.jpg
Please note: The log file only contains the date/time, username, filename and whether the upload was successful. The user's password is NOT recorded and therefore the log file cannot be used to tweet the photos after the event.
In Operation
When the photo booth is run and the photos have been taken the print preview screen will be displayed first (if "Confirm before printing" is selected) and then when the user selects "Print" the sharing screen (share.jpg) will be displayed. If the user selects "Cancel" in the print preview screen the sharing screen won't be displayed and the booth will return to the ready screen (ready.jpg). If the "Confirm before printing" option is not selected the sharing screen will be displayed after taking the photos.
When the sharing screen (share.jpg) the user has the option to tweet the photo by touching the Twitter button on the touchscreen or by typing T if they are using a normal keyboard. The sharing screen can be exited by touching the "Cancel" button on the touchscreen or by typing X or Esc on a normal keyboard. The sharing screen will also exit automatically if the user does nothing and the screen timeout occurs. The sharing screen timeout can be specified in the "Output Settings" dialog.
When the user selects the Twitter option the touchscreen keyboard will be displayed allowing them to enter their Twitter user name and password. The user can enter their user name and password by tapping on the touchscreen keyboard or by typing them in using a normal keyboard. The user can then either tap on the "Cancel" button (or type Esc) to cancel the upload or tap on the "Upload photo" button (or press the keyboard Enter key) to start the upload. The touchscreen keyboard will cancel automatically if the user doesn't tap the touchscreen or type anything and the keyboard timeout occurs. The keyboard timeout can be specified in the "Touchscreen Settings" dialog which can be displayed from the "Photobooth Settings" dialog.
When the user has entered their Twitter user name and password and selected "Upload photo" the Twitter login screen (twitter_login.jpg) will be displayed together with a small web browser window showing the Twitter login page. The user must tap the "Ok" button or press the Enter key on the keyboard to login to Twitter and give the application to tweet the photo.
After the user has logged in and authorized the PhotoboothUploader app the upload will start and the Twitter upload screen (twitter_upload.jpg) will be displayed. If the upload is successful the Twitter success screen (twitter_success.jpg) will be displayed for a few seconds and then the screen will return to the sharing screen. If there is an error (e.g. the internet connection was lost) the Twitter error screen (twitter_error.jpg) will be displayed for a few seconds and then the screen will return to the sharing screen.
If there is a timeout waiting for the user to login and authorize the PhotoBoothUploader app the upload will be aborted and the timeout screen (fb_timeout.jpg) will be displayed for a few seconds and then the screen will return to the sharing screen.
The sharing screen can also be displayed from the ready screen using the keyboard shortcut Shift+Ctrl+S or the "Display sharing screen" touchscreen action.
If you have problems with the Windows Taskbar appearing when uploading photos to Twitter you can run the HideWindowsTaskbar.exe utility to hide the Windows taskbar. HideWindowsTaskbar.exe will automatically hide the Windows taskbar when DSLR Remote Pro is running in full screen photo booth mode. HideWindowsTaskbar.exe can be found in the DSLR Remote Pro installation folder (usually C:\Program Files (x86)\BreezeSys\DSLR Remote Pro on 64-bit Windows).
Please note: The user's Twitter username and password are private and are not saved by the photo booth software. There is no offline option for Twitter tweets because users need to enter both their username and password to allow posting to their Twitter account and no system should ever keep a record of users' passwords.
Notes on using a normal keyboard for Twitter tweets, sending texts and emailing photos
The Twitter tweet, texting and email photo options are designed to be used with a touchscreen, but can also be operated using a normal keyboard. Please note that if you give users access to a keyboard you need to prevent them from causing problems by exiting out of the photo booth program (e.g. by typing Ctrl+Alt+Delete, Ctrl+tab or pressing the Windows key). One way to do this is to take a basic USB keyboard and either wedge or glue the Ctrl, Alt, Win etc. keys so that they can't be pressed.
The following keys can be used to navigate the print preview, sharing screens:
Print preview:
Type A to print the photos
Type X or Esc to cancel printing
Sharing screen:
Type E to email the photos
Type M enter user message
Type P to print the photos
Type S to send an SMS or MMS text message
Type T to tweet the photos on Twitter
Type X or Esc to exit the sharing screen and return to the ready screen
Touchscreen keyboard:
Type in the user name and password using the normal keyboard keys
Type Tab to switch between the username and password input
Type Enter to start logging in to Twitter after entering the username and password
Type Esc to exit and return to the sharing screen
Twitter login and PhotoBoothUploader app authorization screens:
Type Enter to login to Twitter and Enter again to authorize the PhotoBoothUploader app
It is the responsibility of the photo booth operator to ensure the third-party services you use are appropriate for your events and the jurisdiction you are working in.
In the notes below "image" refers to JPEG photos, animated GIFs or movie files.
No guest data captured by Breeze Systems
Emails are sent using the email service setup by the photo booth operator.
If you choose to save the email details (i.e. date, time, guest's email address, image filename and any other inputs defined on the touchscreen keyboard) they are recorded on the photo booth PC.
No guest data captured by Breeze Systems
If you choose to save the Twitter upload details (i.e. date, time, guest's Twitter login id, image filename and any other inputs defined on the touchscreen keyboard) they are recorded on the photo booth PC. The guest's password is not recorded.
Text
MMS and SMS+image options: the image is hosted on the Breeze Systems' website for 7 days and is then deleted automatically. The URLs of the images are anonymous and secure making it extremely difficult for unauthorized viewing of images. These images are stored on the Breeze Systems web site solely to allow MMS messages to be sent via Twilio or guests to view their individual images upon receipt of an SMS text message. They are not used for any other purpose and are deleted automatically after 7 days.
If you choose to save the text details (i.e. date, time, guest's phone number, image filename and any other inputs defined on the touchscreen keyboard) they are recorded on the photo booth PC.
Uploading photos to your personal or business Facebook page
There are a number of free tools for automatically uploading photos to your personal or business Facebook page or to other social networking or photo sharing sites:
| 1. | Dropbox - Dropbox is a free service for synchronizing files across multiple computers and devices. When a file is copied into the Dropbox folder on your computer it is automatically uploaded to online storage in the Cloud. If a photo is copied to a subfolder in the Photos Dropbox folder it will automatically create an online gallery which can be viewed using a web browser. Dropbox comes with 2 GB of free online storage which can be increased for a monthly fee. Please visit the Dropbox website for more details. |
| 2. | IFTTT + Dropbox/Box/Google Drive- IFTTT (If This Then That) is a free web based automation tool that works in conjunction with free online storage services such as Dropbox, Box and Google Drive. It uses "recipes" to perform actions when files are added to your online storage. It can link to many services including Facebook (to access your personal Facebook page), Facebook pages (to access a business Facebook page), Flickr, YouTube and Twitter. The recipes are run every 15 minutes and can upload a maximum of 15 photos each update. Please visit the IFTTT website for more details |
All of the above services work by monitoring a folder on you PC and automatically uploading the photos to the Cloud or directly to a Facebook album. The output options in DSLR Remote Pro can be used to automatically crop and resize the prints from the photo booth and copy the image to the folder being monitored for uploading to the Cloud and/or Facebook. The output settings dialog can be displayed by setting the output option in the photo booth settings to "Print and save JPEG copy" or "JPEG copy only" and pressing the "Settings..." button:
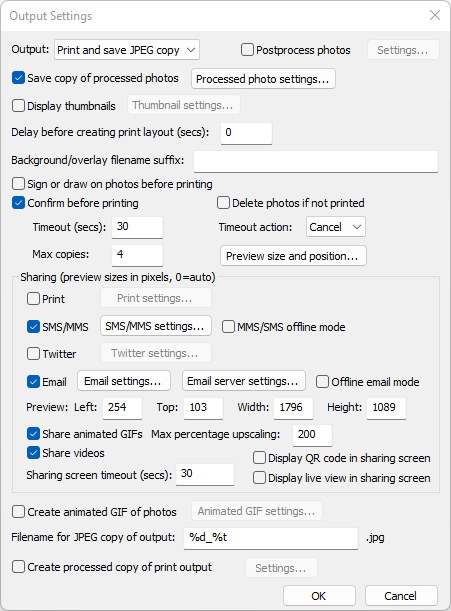
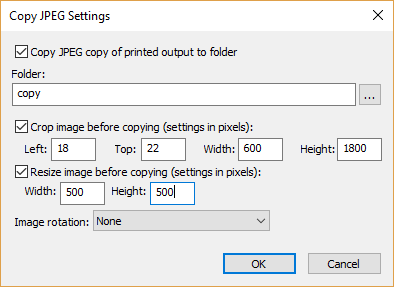
Select the "Copy JPEG to folder:" option and enter the name of the folder where the JPEG copy of the printed output should be copied to. This should be the folder that is being monitored by your the online storage service. The JPEG copy of the printed output is formatted for sending to a printer and may be larger than you want for uploading to Facebook. For example a typical double strip of 4 images printed at 300 DPI on 4"x6" paper will be 1200 x 1800 pixels in size and will show two strips of 4 photos side by side. You may want to limit the size for faster uploading and viewing on guests' cell phones etc. and to crop the image so that it only shows a single strip of 4 photos. You can do this by clicking on the "Settings..." button to the right of the "Copy JPEG copy of printed output" button to display the "Copy JPEG Settings" dialog and using the "Crop image before copying" and "Resize image before copying" options as shown below:
If you need more control over the layout...
Please take a look at our Hotfolder Prints software if you need more control over how the photos are formatted before being uploaded to Twitter and other social networking sites. Hotfolder Prints allows you to create a completely new layout optimized for uploading and to add logos or other information that doesn't appear in the printed strips. Hotfolder Prints can also email photos to users (using the email address entered using the touchscreen keyboard) and run a slideshow which is automatically updated as new photos are taken.
Summary Online Storage Services
The free IFTTT web automation tools can be used in conjunction with the following free Cloud based online storage services:
| • | Dropbox: 2 GB of free online storage, more available for a monthly fee |
| • | Box: 5 GB of free online storage, more available for a monthly fee |
| • | Google Drive: 5 GB of free online storage, more available for a monthly fee |
Please note the information above was correct at the time of writing but may have changed since. Please check the relevant websites for the latest information about the various services described on this page.