AI background removal uses AI (artificial intelligence) to automatically remove the background from a photo or video (aka "green screen without the green screen").
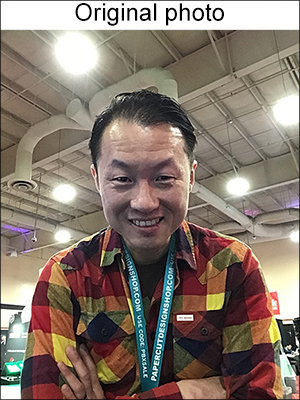
The example photo shown below was taken during Photo Booth Expo 2020 and shows how effective AI background removal can be at removing a distracting background:


Booth for iPad v3.1 onwards supports built-in AI background removal or the use of web based subscription services for AI background removal.
There is no additional cost to use built-in background removal and it can be applied to live view images, photos, burst GIFs and videos. The web services for AI background removal require a separate subscription and background removal can only be applied to individual photos. Currently two such services are available in Breeze Booth for iPad: remove.bg and AI Background Remove.
You can enable web based AI background removal for an event in the General Settings screen:
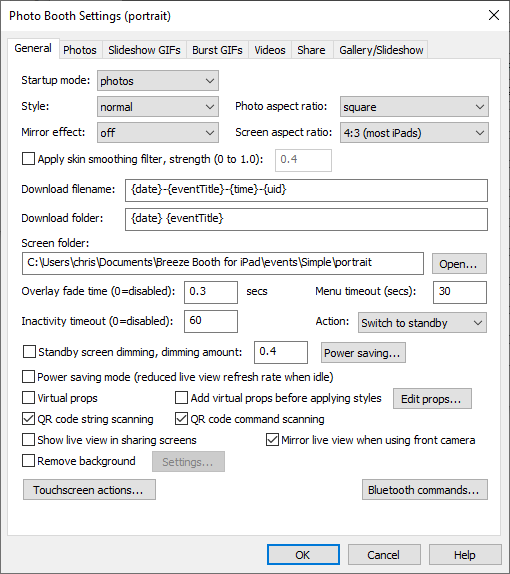
Select "Remove background" and then click on the "Settings..." button to adjust the settings:
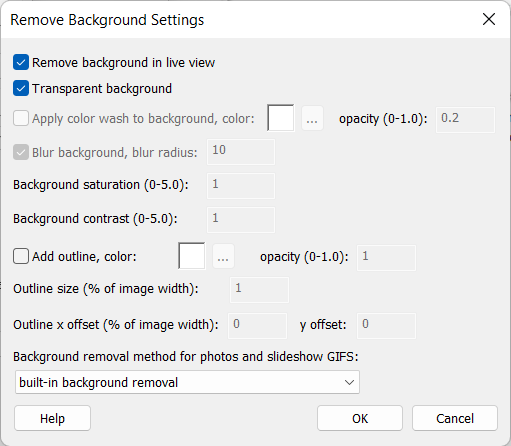
Select "Remove background in live view" to apply AI background removal to live view images. This uses the built-in AI background removal to remove the background in real time.
Please note: a fast recent device such as the 2022 iPad Pro M2, 2021 iPad Pro M1, 2022 iPad Air M1, 2022 iPad 10.9" or 2022 iPhone SE is recommended otherwise the live view refresh rate may be slow.
Select "Transparent background" to make the removed background transparent.
When this option is selected a background image can be added to the print layout, one or more background images added to slideshow GIFs and burst GIFs or a background video added to videos.
When taking photos the background is removed the photo is added to the print layout with transparent areas from where the background has been removed. The guests can be placed within a scene by adding the scene in the print background image (background.jpg). Please see Print Layout Editor for details. The background image will be visible in the transparent areas of the photo.
When creating slideshow GIFs the photo is added to the GIF with transparent areas where the background has been removed. The guests can be placed within a scene by adding the scene in the GIF background image or images (slideshow_gif_background.jpg or slideshow_gif_background_1.jpg, slideshow_gif_background_2.jpg etc.). Please see GIF Layout Editor for details. The background image will be visible in the transparent areas of the photo.
In photo mode a background image can be added to live view images and to the photos in the print layout and slideshow GIFs. To do this place a JPEG image named aibg_background.jpg or aibg_background<n>.jpg in the screens folder. To add a different background image to each photo in the print layout name the files aibg_background1.jpg for the first photo, aibg_background2.jpg for the second photo etc. An overlay can also be added by placing a PNG image named aibg_overlay.png or aibg_overlay<n>.png in the screens folder.
When creating burst GIFs each frame is added to the GIF with transparent areas where the background has been removed. The guests can be placed within a scene by adding the scene in the GIF background image or images (gif_background.jpg or gif_background_1.jpg, gif_background_2.jpg etc.). Please see GIF Layout Editor for details. The background images will be visible in the transparent areas of each frame.
A single background image can be added to live view images and to the animated GIF by placing a JPEG image named gif_aibg_background.jpg in the screens folder. A single overlay image can also be added by placing a PNG image named gif_aibg_overlay.png in the screens folder.
Important: To use AI background removal with burst GIFs you need to select "Remove background in live view" and "built-in background removal" in the remove background settings dialog.
When capturing videos a video can be played in the background which will be visible in the transparent areas where the background has been removed from each frame. Please see Video Settings for details.
A single background image can be added to live view images when capturing videos by placing a JPEG image named video_aibg_background.jpg in the screens folder. This background image is added to the live view display but not to the final video.
Please note: removing the background from a video requires a lot of processing power and a fast recent device such as the 2022 iPad Pro M2, 2021 iPad Pro M1, 2022 iPad Air M1, 2022 iPad 10.9" or 2022 iPhone SE is recommended.
Modifying the Background
When the "Transparent background" option is not selected the background is kept and can be modified e.g. blurred, tinted or desaturated to B&W.
Please note: This option is only available when using built-in background removal.
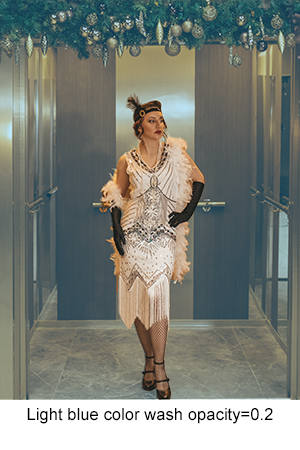
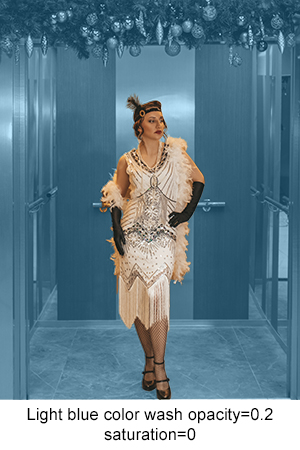
Select "Apply color wash to background" to apply a color layer to the background areas. Choose the color by clicking on the "..." button to the right of the color preview and then select the opacity. The opacity setting controls the opacity of the color layer that is placed over the background. Set the opacity to 1 (fully opaque) to replace the background with a solid color. Set the opacity to a lower value, e.g. 0.2, to make the color layer semi-transparent to apply a color tint to the background.
The color wash effect works best if the background is desaturated to B&W by setting the background saturation to 0.
The background can be blurred by selecting "Blur background". The amount of blurring is controlled using the "blur radius" setting. The default setting for the blur radius is 10. Increase the blur radius to increase the amount of blurring or reduce it to reduce the amount of blurring.

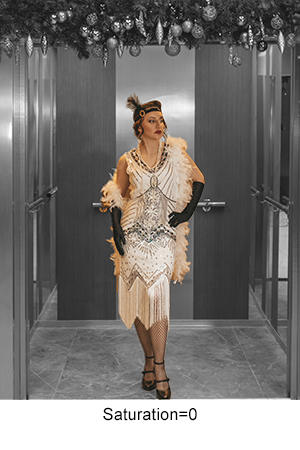
The "Background saturation" setting can be used to change the saturation of the background areas. Setting this to 0 will desaturate the colors completely and make the background B&W. Setting the saturation to 1 will leave the colors unchanged. Setting the saturation to more than 1 will increase the saturation of the background colors and make them more vivid.
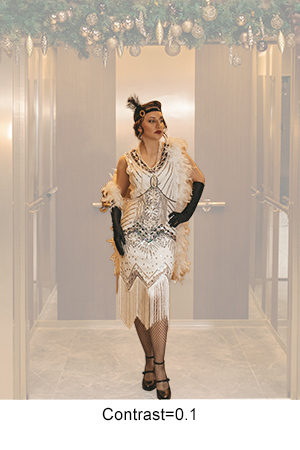
The "Background contrast" setting can be used to change the contrast of the background areas. Setting this to values less than 1 will reduce the contrast of the background. Setting the contrast to 1 will leave the contrast unchanged.
Adding an outline or dropshadow
A scrapbooking style outline or a dropshadow effect can be added by selecting "Add outline" in the "Remove Background Settings". The color, size and opacity of the outline is configurable. The outline size is specified as a percentage of the width of the photo (this is so it has the same proportions for different sized images). A good starting point is use the default settings of a white outline with a size of 1% and opacity of 1 (fully opaque).

Adding a white outline (photo shot against a plain backdrop)
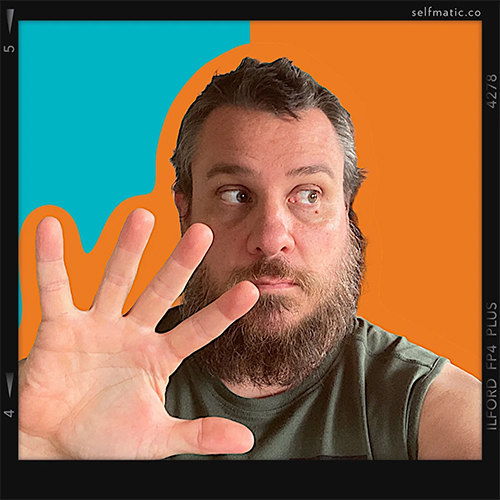
Orange outline with a virtual background which is half blue and half orange
A dropshadow effect can be obtained by setting the color to black, the size to 0.1% and the opacity to 0.5 (semi-transparent). Then apply an x offset of 2% and a y offset of 2%. This effect looks best when used with a flat backdrop or background image.
Adding an optional overlay or background
In photo mode an optional overlay image can be added to live view images and to the photos in the print layout. To do this place a PNG image named aibg_overlay.png or aibg_overlay<n>.png in the screens folder. To add a different overlay image to each photo in the print layout name the files aibg_overlay1.png for the first photo, aibg_overlay.png for the second photo etc.
When the transparent background option is selected an optional background image can be added to live view images and to the photos in the print layout. To do this place a JPEG image named aibg_background.jpg or aibg_background<n>.jpg in the screens folder. To add a different background image to each photo in the print layout name the files aibg_background1.jpg for the first photo, aibg_background.jpg for the second photo etc.
In burst GIF mode a single overlay image can be added to live view images and the animated GIF by placing a JPEG image named gif_aibg_overlay.png in the screens folder.
An optional overlay image can be added to live view images when capturing videos by placing a PNG image named video_aibg_overlay.png in the screens folder. This overlay image is added to the live view display but not to the final video.
Allowing Guests to choose different backgrounds
Method 1: Using the ready screen string
The ready screen string can be set using touchscreen actions in the ready screens. Its value can be used to select which ready screen is displayed and which background is used with AI background removal. The ready screen string defaults to "rdy1" and can be set to a value between "rdy1" and "rdy10" using touchscreen actions.
Start by creating a different ready screen overlay for each selected background e.g. ready_rdy1_overlay.png, ready_rdy2_overlay.png, ready_rdy3_overlay.png. In each ready overlay add graphics to show the available backgrounds with background 1 highlighted in ready_rdy1_overlay.png, background 2 highlighted in ready_rdy2_overlay.png and background 3 highlighted in ready_rdy3_overlay.png. Use the touchscreen editor to add the touchscreen action "readyString1" over the graphics for background 1, "readyString2" over the graphics for background 2 and "readyString3" over the graphics for background 3. When the user taps the graphics for one of the backgrounds the touchscreen action for that background will set the ready screen string and cause the appropriate ready screen overlay to be displayed e.g. tapping the graphics for background 2 will apply the touchscreen action "readyScreen2" which will set the ready screen string to "rdy2" and update the screen to display ready_rdy2_overlay.png.
Create a JPEG image for each selected background using the value in the ready screen string:
For photos name the backgrounds aibg_background_rdy1.jpg for background 1, aibg_background_rdy2.jpg for background 2, aibg_background_rdy3.jpg for background 3 etc. The corresponding ready overlay screens are named ready_rdy1_overlay.png for background 1, ready_rdy2_overlay.png for background 2, ready_rdy3_overlay.png for background 3 etc.
For burst GIFs name the backgrounds gif_aibg_background_rdy1.jpg for background 1, gif_aibg_background_rdy2.jpg for background 2, gif_aibg_background_rdy3.jpg for background 3 etc. The corresponding ready overlay screens are named gif_ready_rdy1_overlay.png for background 1, gif_ready_rdy2_overlay.png for background 2, gif_ready_rdy3_overlay.png for background 3 etc.
For videos name the backgrounds video_aibg_background_rdy1.jpg for background 1, video_aibg_background_rdy2.jpg for background 2, video_aibg_background_rdy3.jpg for background 3 etc. The corresponding ready overlay screens are named video_ready_rdy1_overlay.png for background 1, video_ready_rdy2_overlay.png for background 2, video_ready_rdy3_overlay.png for background 3 etc.
Method 2: Using a survey
A survey screen can be displayed when the users taps the start button and the output from the survey can be accessed using tokens in the filename overlay/prefix for photos, burst GIFs and videos. The survey can be used select different countdown and capture screens to display different backgrounds behind the live view images and applied to the print layout in photo mode, the backgrounds in burst GIF mode and the background image or video in video mode. Please see the Overlay/Background Filename Suffix section for more details.
Method 3: Using profiles
Profiles provide a way to switch to a different folder for the screen images and can be used to select different screen images and backgrounds. e.g. to use profiles to select backgrounds in photo mode start by creating a simple event with AI background removal enabled. Edit the ready_background.jpg background image and the 1.jpg countdown image to show background 1. Edit the print layout background image, background.jpg, to show background 1. Then clone the profile to profile 2 and edit the ready and countdown screens to show background 2 and change the print background image to show background 2. In the ready screen for profile 1 add a touchscreen action to select profile 2 and in the ready screen for profile 2 add a touchscreen action to select profile 1. The user will then be able to select background 2 by tapping the profile 2 touchscreen action when profile 1 is displayed or select background 1 by tapping the profile 1 touchscreen action when profile 2 is displayed.
These examples can be downloaded to Breeze Booth for iPad by scanning the QR code below using the iPad's camera:
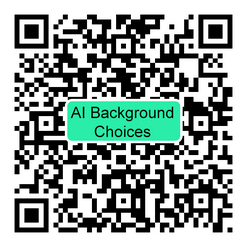
A zip file containing these examples can be downloaded to your PC and loaded into the event editor from: https://bb4ipad.com/sync/aibg_choices.zip
Web based AI Background Removal Services
Web based AI background removal services provide the highest quality when removing the background from photos and slideshow GIFs but require an internet connection and a subscription to one of the services listed below. To select web based AI background removal first select "Transparent background" then set the "Background removal method" to "web service - preview size (< 0.25M pixels)" or "web service - full size".
If the "Remove background in live view" option is selected with web based background removal the live view images will use the built-in background removal and the web based background removal will be applied to the individual photos.
Please note: The web based AI background removal services are provided by other companies who charge for their services. These companies have no connection with Breeze Systems and Breeze Systems is not responsible for the content of their websites. In order to these services you need set up an account with them and log into your account to obtain an API key which should be copied to the "Background removal key" in Breeze Booth for iPad's App Settings screen.
remove.bg and AI Background Remove are web based service and so you will need a reliable internet connection in order to use them at an event.
remove.bg
At the time of writing remove.bg provides 50 free preview credits per month and options for buying "Pay as you go" or subscription based credits. You can use the 50 free preview credits for testing without having to enter any payment details.
Once you have created an account with remove.bg you need to copy the API key into the app settings screen.
You can check that the API key has been entered correctly and check the number of credits you have remaining by tapping "Check background removal API key and credits" in the app settings screen.
The preview option limits the size of the image to no more than 250,000 pixels e.g. 600x416 pixels. This option is available using the 50 free credits each month or using paid for credits: each preview uses up 1/4 of a paid credit. It has the advantage that it is faster than full size option because a smaller image needs to be uploaded to remove.bg and a smaller image is returned.
The full size option allows images of up to 25 megapixels and is only available using credits purchased by "Pay as you go" or a subscription. Each full size background removal uses up one credit.
AI Background Remove
AI Background Remove provides a subscription service which may be less expensive for small to medium operators than remove.bg.
Once you have created an account for AI Background Remove you need to copy your purchase Id and license key into the app settings screen separated by : and with a prefix of aibg:
e.g. if your purchase Id is ABC1234 and your license key is XYZ987654321 you need to enter aibg:ABC1234:XYZ987654321 in the "Background removal key:2 in the App Settings.
You can check that the API key has been entered correctly and check the number of credits you have remaining by tapping "Check background removal API key and credits" in the app settings screen.
Please note: AI Background Remove charge a flat fee of 1 credit per photo and so there is little benefit in selecting the preview option.