Tap on the "Photos" tab in the "Photo Booth Settings" dialog to edit the settings used when capturing still images in photo booth mode:
First set the number of photos to be taken in the sequence to between 1 and 10.
The "Number of prints" setting sets the number of copies to be printed unless it is overridden in the confirm printing screen. The "Max number of prints" setting specifies the maximum number of copies that the user can select in the confirm printing screen.
Set the "Countdown first photo" to the duration in seconds to use for the countdown before taking the first photo. Set the "Countdown remaining photo" to the duration in seconds to use for the countdown before taking the remaining photos.
Please note: These settings are ignored if an animated GIF or video animation is used for the countdown. When an animation is used for the countdown the duration of the countdown will be determined by the length of the animation.
An optional preview photo can be displayed after taking each photo. The "Photo preview time" specifies how long the preview should be displayed in seconds. Set this to 0 to disable the preview photo.
Use the "JPEG quality" setting to specify the JPEG image quality when saving photos. A setting of 1 will give the maximum quality and largest file size. Setting it to a smaller value will use more compression and result in smaller file sizes but with some loss in quality.
Normally live view images are displayed in the stills ready screen but this can be disabled (e.g. for a menu screen) by selecting "Hide live view in ready screen.
Select "Save individual photos" to save a JPEG copy of each photo taken during the shooting sequence.
Select "Save copy of processed photos" to save a JPEG copy of each photo taken by the camera after applying any effects such as styles or virtual props. The processed photos can be adjusted by clicking on the "Settings..." button:
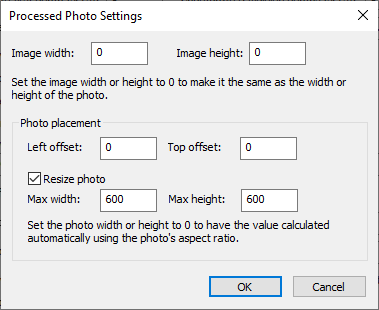
Set the image width and height to the size of the processed image to be saved. Alternatively set the image width and height to 0 to make them the same as the resized photo.
Select resize photo and specify the maximum width and height for the photo. The photo will be resized so that it is no larger than the maximum width and height settings e.g. if the photo is 800x600 pixels in size and the maximum width is set to 400 and the maximum height is set to 400 the photo will be resized to 400x300 pixels.
If the maximum width or height is set to 0 the value will be calculated automatically using the photo's aspect ratio e.g. if the photo is 800x600 pixels in size and the maximum width is set to 200 and the maximum height is set to 0 the photo will be resized to 200x150 pixels. Or if the maximum width is set to 0 and the maximum height is set to 450 the photo will be resized to 600x450 pixels.
Use the photo placement settings to resize the photo and specify where it is placed in the image.
A background image can be applied by adding a JPEG image named processed_photo_background.jpg. When placing the processed photo within a larger image or when using AI background removal . The background will be visible behind the photo in the areas that have been removed when using AI background removal or when the image area is larger than the photo.
An overlay for branding can be applied to the processed photo by adding a PNG image named processed_photo_overlay.png to the screen folder.
Different background and overlay images can be used for each photo by naming them processed_photo_background<n>.jpg and processed_photo_overlay<n>.png respectively, where <n> is 1 for the first photo, 2 for the second etc.
If the background or overlay images are larger than the processed image size they will be resized to fit. If they are smaller than the processed image size they will be centered within the processed image.
Select "Sharpen photos in print layout" to sharpen each photo before adding it to the print layout. The "Unsharp mask intensity" and "Unsharp mask radius" settings control the type and amount of sharpening. (More information about sharpening can be found by searching the internet for "Unsharp mask").
The "Countdown text" specifies how the countdown text should be formatted during the countdown before taking each photo. It can use the following tokens:
{photoboothImage} - the number of the photo in the sequence e.g. 1 for the first, 2 for the second etc.
{photoboothNumImages} - the total number of photos in the shooting sequence
{secsToNextPhoto} - the number of seconds remaining in the countdown before taking the next photo
Use the "Countdown text color" setting to specify the color of the countdown text.
Please note: This setting is ignored if an animated GIF or video animation is used for the countdown.
The "Overlay/background filename suffix" provides a way of dynamically selecting different overlays and backgrounds for prints. Normally the filename for the background image used for prints is background.jpg and the overlay is overlay.png but this can be modified to dynamically select different overlay and background images using information such as the time, user responses to surveys or random numbers. The suffix is also applied to backgrounds and overlays added to slideshow GIFs.
Please see Print Layout Editor and GIF Layout Editor for information on how to use this setting.
The overlay/background suffix can also be used to select the countdown and preview screens. One use for this is when using a survey to select different backgrounds when using AI background removal.
The overlay blend mode can be selected using the overlay blend mode dropdown list. This controls how the optional print overlay image, overlay.png, is blended with the print layout.
The following blend modes are available:
normal, lighten,darken, overlay, screen, hard light,soft light, multiply, difference, exclusion, color dodge, color burn, hue, saturation, color, luminosity:
A detailed description of each blend mode is beyond the scope of this help file. Please see this wikipedia article for more information about blend modes: https://en.wikipedia.org/wiki/Blend_modes. Alternatively use an image editor such as Photoshop that supports levels and blend modes to see the effect of different blend modes on overlays applied to photos.
The "Printer Id" setting is used to provide additional information about printing in the photo booth XML summary file written at the end of the sequence. This information can be used by printing utilities such as Breeze Hub to select different printers or printer settings e.g. the printer id could be set to 6x4 to indicate printing on 6" x 4" paper and 6x20 for printing on panoramic 6" x 20" paper.
Select "Display print preview" to display the print layout in the confirm printing screen after taking the photos. The confirm printing screen gives the user the option to accept or reject the photos or to select the number of copies to print.
Set the timeout to the number of seconds the confirm printing screen should be displayed before it is closed automatically. Set "Accept prints after timeout" to automatically accept the prints if the timeout occurs otherwise they will be cancelled and the photo booth will return to the ready screen.
Us the "# Prints font color" to specify the color of the number of print copies indicator displayed in the confirm printing screen. Please note that the size and position of the text is determined by the size and position of the increase/decrease copies touchscreen actions. The size is set to the height of the touchscreen actions and the position is set to be mid way between the two actions.
Select "Print payment mode" to enable payment mode when printing from the print confirmation screen or the gallery. When print payment mode is selected and the user taps the "stillsPrintsAccept" touchscreen action the print payment screen will be displayed until a payment is made or the payment is cancelled or the payment timeout occurs. Define a "stillsPrintsAcceptWithoutPrinting" touchscreen action if you want the user to be able to accept the photos without printing them.
Please see "Payment Systems" section for more information about accepting payments.
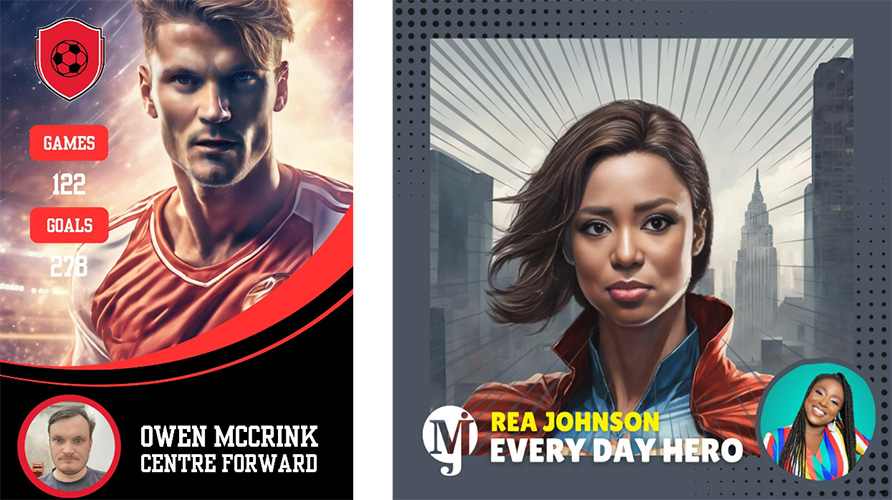
Select "Enable post processing" to allow photos to be post processed by web based services such as Breeze Fx to modify photos before they are added to the print layout. The post processing can be used to add AI image processing or to perform other actions such as running a Photoshop droplet on the photo.
Enter the URL to post process the photo e.g. https://yoursite.com/postprocess.php. The image is sent to the URL together with the any survey inputs and other data as a multi-part form using an HTTP POST. The image will be sent as JPEG data unless AI background removal with a transparent background is selected in which case it will be sent as a PNG image. The image data returned from the web server can be accepted as either and JPEG image or a PNG image.
The image data sent to server can be resized before sending by setting the "Max image size (pixels)". The image will be resized to fit within a square bounding box specified by the max image size. Set the max image size to 0 to disable the resizing.
Here are some examples of AI face swapping using Breeze Fx:
Click on "Edit print layout..." to display the print layout editor.