This section gives detailed information about the various photobooth settings. If you want to get started as quickly as possible you can use the photobooth setup wizard to set everything up and then come back to this page later to find out more about tweaking the various settings.
Setting up the page layout
To setup photobooth operation select "Photobooth Settings..." from the File menu and the dialog below will be displayed:

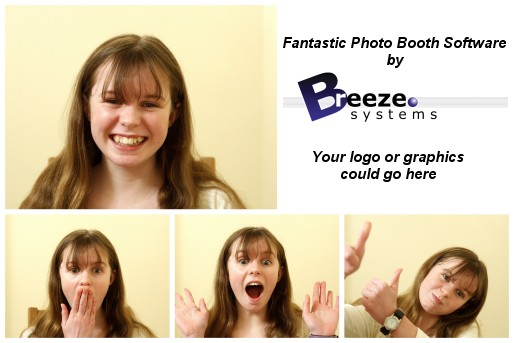
First select the number of images to be taken and how they are arranged. This could be a single image on one sheet of paper (1 image, 1 row, 1 column), a passport style strip of images (e.g. 4 images, 4 rows, 1 column), 2x2 grid of 4 images as shown above or any other arrangement of up to 20 images arranged in a grid. Alternatively select "Custom layout" and click on the "Settings..." button next to the checkbox to position each image manually on the page (this is described in more detail later).
Using live view for long periods of time drains battery power and can cause the camera's sensor to heat up. Most camera models will automatically cancel live view after 30 minutes to prevent overheating. Fullscreen photobooth mode has an inactivity timer which will automatically cancel and restart live view after 25 minutes to prevent the camera from canceling it. Alternatively full screen photobooth mode can automatically cancel live view and display the welcome.jpg screen image if the photobooth is not used for a preset time. Live view can also be canceled manually by pressing the F6 function key. Press the F6 function key to reactivate live view and return to ready.jpg screen when the welcome.jpg screen is displayed. The inactivity timeout can be enabled by setting the "Inactivity in secs" value to the required number of seconds e.g. 120.
Next select the delay before taking each photo and how long the shot just taken is displayed on screen when shooting in fullscreen photobooth mode (this can be disabled by setting the time to 0). After taking each photo a preview can be displayed on the screen for a specified number of seconds (set this to 0 to disable the preview). The delay before taking the first photo can be set to a different value than that for the remaining photos. This is useful when using a touchscreen as it means a longer delay can be set before the first photo to give people time to move back from the touchscreen.
When the "Minimum duration in seconds before closing 'processing' screen is set to 0 the 'processing' screen will be close as soon as the data has been sent to the printer. The 'processing' screen can be displayed for longer by adjusting this value. This is useful if you want to keep displaying a message such as "Thank you! Your photos are being printed, please leave the booth now" for longer than it takes to print the images.
The countdown text is displayed before shooting each image and is updated every seconds. The following tokens can be used:
@imageNumber@ - the shot number in the photobooth sequence
@numberOfImages@ - the number of images in the photobooth seconds
@secsToNextPhoto@ - the number of seconds until the next photo in the sequence is taken
Select "Enable live view for fullscreen photobooth shooting" to display live view images in the fullscreen photobooth shooting mode. The live view image can be mirrored so that the user sees the image the same way round as when looking in a mirror. Use the height setting to resize the live view image up to its (camera dependent maximum setting). The live view image can be displayed in portrait orientation by selecting one of the portrait orientations from the View menu in the main window.
Select the "Auto standby" option to have the booth automatically switch to standby mode at startup and after each set of photos. This option is useful because it automatically disables live view when the booth is not in use which will avoid problems with the camera's sensor overheating. In standby mode the booth displays the welcome.jpg screen image. You can switch back to ready mode by typing F6 (toggle between standby and ready modes) or Ctrl+Alt+F6 (switch from standby to ready mode) or by using the "Toggle standby mode" or "Switch from standby to ready" touchscreen actions.
By default the live view images are displayed centered at the top of the screen with the count down text beneath. The position of the live view images can be adjusted using the "Left offset" and "Top offset" settings. These specify the offset in pixels from the left and top of the screen respectively. If the left offset is set to -1 the live view display will be centered horizontally on the screen.
If the count down text offset is set to 0 the count down text is automatically displayed centered in the spare space above or below the live view images (depending on whether there is more space above or below the live view images). Please make sure there is enough space for the count down text when setting the live view size and position.
Alternatively the countdown text can be manually positioned on the screen by setting the offset to a non-zero value. This value is the number of pixels the text is offset from the top of the screen. If required, the countdown text can be positioned so that it overlays the live view images.
The live view display can be cropped if required by selecting fullscreen photobooth mode and holding down the Shift key and using the cursor left and right keys to increase or decrease the cropping. Cropping removes equal amounts from the left and right of the live view image when displaying live view images in landscape orientation and from the top and bottom when using portrait orientation. When adjusting the live view cropping a status message showing the amount of cropping is shown briefly in the bottom right hand corner of the screen.
Normally the live view display, if enabled, is shown before each image in the sequence is taken. When the "Only display Live View images for the first shot in the sequence" option is selected live view images are only displayed to the user before taking the first shot of the sequence and are hidden during the rest of the sequence. If the "Only display live view in ready screen" option is selected the live view is shown in the ready screen and is hidden when the user starts the shooting sequence.
The live view display can be disabled during printing by selecting the "Disable live view when printing" checkbox. Disabling the live view during printing and displaying a suitable message in the 'processing' screen is a good way of encouraging people to leave the booth after the photos have been taken. For example you could disable live view during printing, set the minimum duration before closing the 'processing' screen to 15 secs and display the message "Thank you! Your photos are being printed and will be ready outside shortly, please leave the booth now" by editing the 'processing screen (processing.jpg).
Bright live view/AF mode
Recent Nikon cameras may display dark live view images in photobooth mode when using aperture priority or manual exposure modes. This is because they stop down the lens to the selected aperture in live view and there may not be enough light to provide bright images. The "Bright live view/AF mode" option avoids this problem by selecting the lens's maximum aperture in live view and only switching to the selected aperture when actually taking the photos. This may cause a slightly longer than usual delay at the end of the countdown before taking the photo.
A side effect of bright live view/AF mode is that the camera will attempt to auto focus before taking each photo. Auto focus can be useful if people are likely to stand at different distances from the camera but it can also cause problems if the auto focus can't focus properly. Please note that if the camera's auto focus system is unable to focus properly the camera will not take the photo and an error message asking you to stand farther from the camera will be displayed for 5 secs before retaking the photo. Please set the camera to manual focus if you do not wish to use auto focus. The camera's AF mode should be set to AF-A or AF-S in order to use AF. If it is set to AF-C the camera will take the photo immediately without attempting to auto focus.
Clicker mode allows users or a photographer to choose when to take each photo rather than the standard operation where the software automatically takes the photos at preset intervals. When clicker mode is selected the software will wait until each photo is taken either by typing Ctrl+Z on the keyboard or a by using a wireless remote (e.g. a wireless presenter) connected to the PC. The wireless remote should be set up to send Ctrl+Z. The shooting sequence in clicker mode is:
| 1. | The ready.jpg screen and live view displayed as normal until the start button is pressed (e.g. by pressing F4) |
| 2. | When the start button is pressed the 1.jpg screen will be displayed with no countdown text and the software will wait until a photo is taken by typing Ctrl+Z on the computer. |
| 3. | After each photo is taken a preview is displayed on the screen if enabled in the photobooth settings and then the screen for the next photo is displayed e.g. 2.jpg |
| 4. | After the last photo has been taken the processing.jpg screen will be displayed and the photos printed as normal |
Please note: Unlike the Canon version of our photobooth software (DSLR Remote Pro for Windows) it isn't possible to take photos in clicker mode by pressing the shutter release on the camera. This is because Nikon disable all the camera controls on their cameras when live view is active and the camera is tethered to a computer.
Click on the "Settings..." button to the right of the output options to display the output settings dialog which allows you to configure the print preview and how JPEG copies of the printed output are handled:
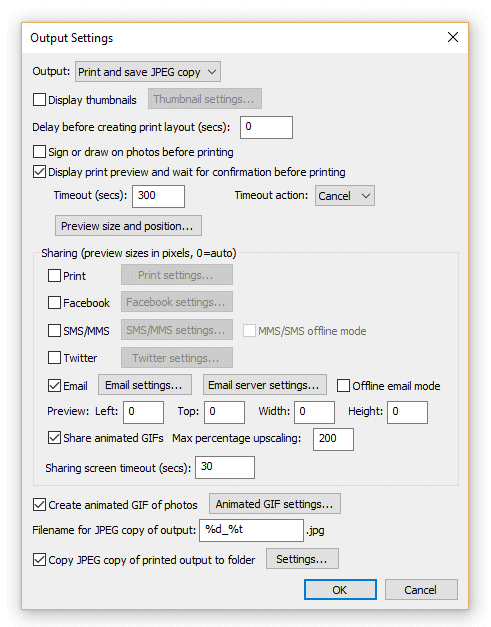
The "Output:" drop down list allows you to specify whether photos are printed only, printed with a JPEG copy of the layout saved in "prints" sub folder, a JPEG copy of the layout is saved in the "prints" sub folder without printing or no output action is taken. (This is the same as the "Output:" drop down list displayed in the main photobooth settings dialog).
Select "Display thumbnails" to display a small thumbnail of each photo. The thumbnails can be arranged vertically down one side of the screen or horizontally across the top or bottom of the screen. Click on the "Settings..." button to
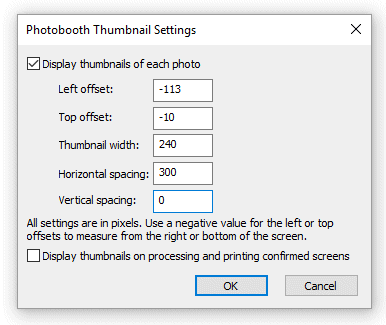
The left offset specifies the distance in pixels of the first thumbnail from the left edge of the screen. If a negative value is specified the distance will be measured from the right edge of the screen e.g. and value of -1 will place the first thumbnail on the right of the screen. The top offset specifies the distance in pixels of the first thumbnail from the top edge of the screen. If a negative value is specified the distance will be measured from the bottom edge of the screen e.g. and value of -1 will place the first thumbnail on the bottom of the screen.
The thumbnail width specifies the width of the thumbnail in pixels (the height of the image will be calculated automatically using the aspect ratio of the photo).
The horizontal and vertical spacings specify the positions of the remaining thumbnails relative to the first thumbnail. The settings in the screenshot above will place four thumbnails 240 pixels wide across the bottom of the screen and will be centered horizontally if the screen resolution is 1366 x 768.
The default setting is to only display thumbnails during the photo booth countdowns when taking the photos and not to show them at the end of the shooting sequence on the processing or printing confirmed screens. Select the "Display thumbnails on processing and printing confirmed screens" if you also want the thumbnails to be displayed at the end of the shooting sequence when the processing or printing confirmed screens are displayed.
The "Delay before creating print layout (secs):" setting is normally set to 0 so that photos are printed as soon as possible. This setting is useful if the photos need to be modified by another program (e.g. by running a Photoshop droplet to edit the photos or using a green screen program to create high quality green screen photos) before they are printed by NKRemote. Please see the section on "Modifying Photos Before Printing" for information on how to use this option.
Select the "Sign or draw on photos before printing" option if you want to allow users to draw on the print layout before it is printed. This option is useful for letting users sign their photos when running a magic mirror photo booth with a touchscreen. Please see the section on "Signing or Drawing on the Prints" for more information on using this setting.
Select "Display print preview and wait for confirmation before printing" in the "Output Settings" dialog if you want to be able to decide whether to print the images or not (this is the same as the "Confirm before printing" checkbox displayed in the main photo booth settings dialog). When this option is selected the print layout will be displayed on the screen with "Print" and "Cancel" buttons in the top left hand corner. Users should click on the "Print" button (or press the Enter key or A key) to print the images or click on the "Cancel" button (or press the Esc or key or X key) to continue without printing. Users can also press the P key (or tap on the "Confirm printing (no JPEG copy)" touchscreen action) to print without copying the JPEG copy of the printed output to a separate folder. This is useful if you want to offer users the choice of printing only or printing and copying the output to a separate folder (e.g. copying to a folder on another computer running Breeze Kiosk).
If the touchscreen input mode is selected and touchscreen actions for confirm or cancel printing are defined the "Print" and "Cancel" buttons will not be displayed. The touchscreen sensitive areas can be displayed using the confirm_printing.jpg screen image.
If a confirm_printing.jpg screen image is in the photo booth images folder this will be used for the background to the print confirmation window to allow instructions or touchscreen buttons to be displayed.
If a printing_confirmed.jpg screen image is in the photo booth images folder this will be displayed if the user selects printing. This allows the processing.jpg screen to show a message like "Processing, please wait..." and the printing_confirmed.jpg to display a message like "Thank you, please leave the booth now. Your photos are being printed outside."
Please note that if the "Sign or draw on photos before printing" option is selected the drawing screen can be used to accept or reject the photos and to select the number of copies to print. In most cases the print confirmation screen is not required if the "Sign or draw on photos before printing" option is used.
Click on the "Preview size and position..." to specify how the print preview image should be displayed:
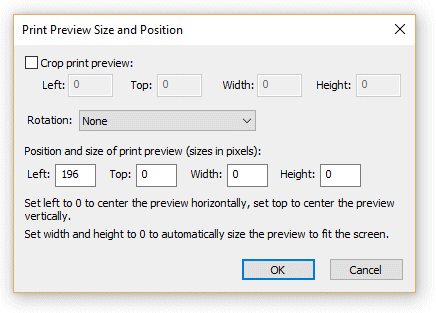
The print preview can be cropped by enabling "Crop print preview" and specifying the top left corner and the width and height of the cropped area (these settings are in pixels). This is useful when printing double strips where two 2"x6" strips are printed on a single sheet of 4"x6" paper and automatically cut into two 2"x6" strips by the printer. The print preview would normally show the whole 4"x6" print with the two strips side by side, but by cropping the print preview just one strip can be displayed. For example a typical dyesub printer prints at 300 dpi giving a print size of 1200x1800 pixels when printing 4"x6" media in portrait orientation. This can be cropped so that only the left half of the strip is displayed in the print preview by setting left=0, top=0, width=600, height=1800.
The print preview can be rotated by 90 degrees CW, 90 degrees CCW or 180 degrees using the rotation setting. Normally this can be set to "None". If the print preview is displayed on its side it probably means that the page orientation is set incorrectly in the printer settings. The rotation setting can be used to compensate for this, but it would be better to change the page orientation setting in the printer settings and update the print layout.
The size and position of the print preview can be set print preview offset, width and height settings. If these are all set to zero the print preview will be sized to fill the window and will be centered on the screen. The print preview can be moved on the screen, e.g. to make space for the print confirmation buttons, using the left and top offset settings. For example to leave a space 200 pixels wide on the left of the screen set the print preview left offset to 200. If the print preview width and height settings are set to 0 the print preview will be resized to fill the rest of the screen. Set the print preview width and height settings to values other than 0 to specify the size of the print preview image.
Use the "Timeout (secs):" to specify a timeout for how long the print preview should be displayed (the default timeout is 300 secs). Set the timeout action dropdown list to the action that should be performed when the timeout occurs (the default setting is to cancel the print).
Use the sharing options to enable the sharing of photos by uploading to the user's own Facebook page, Tweeting, texting (MMS or SMS) or by sending photos email. Please see the section on uploading to social networks for information on how to set this up.
Select the "Share animated GIFs" to enable the sharing of animated GIFs by email, Facebook, Twitter or texting. When sharing animated GIFs on Facebook the GIFs are hosted on www.giphy.com
Please note: When sharing animated GIFs please note that the files can be large and so it is best to keep the image size small to avoid excessively large files for sharing. This can result in the animated GIF appearing very small in the sharing screen. The preview can be made large by increasing the "Max percentage upscaling setting" e.g. set this to 200 to display the animated GIF 2x normal size or 300 for 3x normal size.
Select the "Printing" option to give users the option to print photos in the sharing screen. Users can print the photos by typing P or by using the "Sharing: Print photos" touchscreen action. Photos can be printed if the output is set to "Print and save JPEG copy" or "JPEG copy only". The share_printing.jpg screen is displayed for a minimum of 5 seconds each time the user selects printing from the sharing screen. The number of prints that can be made from the sharing screen can be limited by clicking on the "Settings..." button:
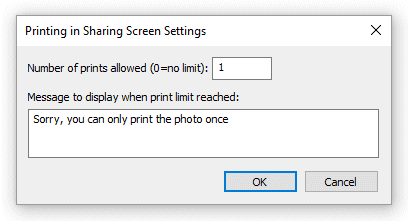
Set the "Number of prints allowed" to the maximum number of prints allowed or to 0 if there is not limit. Then enter the message that is displayed if the user tries to print more copies than is allowed.
If the user prints the photos one or more times from the sharing screen the photos additional copies won't be printed if the output is set to "Print and save JPEG copy". If the user doesn't print the photos from the sharing screen and the output is set to "Print and save JPEG copy" the photos will be printed when the sharing screen is closed using the currently selected number of print copies.
By default the sharing screen shows a print preview image centered on the screen with a height of no more than 2/3 the height of the screen. This setting can be overridden by setting the preview left, top, right and bottom settings to non-zero values. The left value is the offset in pixels from the left edge of the screen. The top value is the offset in pixels from the top edge of the screen. The width and height values specify the maximum width of the preview image in pixels.
Select the "Create animated GIF of photos" option to created an animated GIF of the photos taken with an optional overlay and title page.
Please see the Animated GIF section for details on how to set up animated GIFs in stills photo booth mode and in video mode.
When the output option is set to "Print and save JPEG copy" or "JPEG copy only" the filename of the JPEG copy of the printed output can be specified using the "Filename for JPEG copy of output:" edit box. This value can use tokens to specify values which are determined at run time e.g. %d represents the date and %t the time. Please see the section on tokens for a list of available tokens. The JPEG copy of the printed output is an exact copy of what is sent to the printer and can be used for reprints after an event.
An optional second copy of the printed output can be saved in a different folder by selecting the "Copy JPEG copy of printed output to folder:" option. Click on the "Settings..." button to display the "Copy JPEG Settings" dialog:

You can specify the folder where the additional copy of the printed output is saved using the "Folder:" edit box. If this is left empty the JPEG will be saved in a sub folder named "copy". You can also enter the full pathname of the folder where the images should be copied to (e.g. "C:\Print copies") or the name of a different sub folder (e.g. "Backup"). The folder name can also use tokens to specify values which are determined at run time. The second copy of the print output can also be cropped, resized and rotated before it is saved.
Photobooth Start options
The following start options are available:
"Keyboard only (ignore mouse or touchscreen clicks)" |
This is the default setting where the photobooth sequence can be started using the normal keyboard shortcuts e.g. F4 |
"Left click anywhere to start" |
This setting allows a mouse or a touchscreen to start the photobooth sequence. The user simply needs to click the left mouse button or press anywhere on the display if using a touchscreen |
"Left click to start, right click to toggle B&W mode" |
This setting allows a standard mouse to be used to start the sequence (left click) or to toggle between B&W and color modes (right click) |
"Left click top left to start" |
This setting is designed for touchscreens and requires the user to click in the top left fifth of the screen to start the sequence. The ready.jpg image should be edited to show the user where to touch the screen to start the sequence. |
"Left click top left to start color sequence, bottom left for B&W" |
This setting is designed for touchscreens and requires the user to click in the top left fifth of the screen to start the sequence in color and the bottom left fifth to start it in black and white. The ready.jpg image should be edited to show the user which areas to touch to start the sequence. |
"Touchscreen" |
This setting allows up to 10 areas on a touchscreen to be given different actions (described in more detail below) |
Up to 18 areas can be defined on a touchscreen to control different photo booth settings such as starting the sequence, switching between color and B&W, selecting the number of print copies etc. First select the "Touchscreen" option in the "Start options" dropdown list and then click on the "Settings..." button to display the touchscreen settings dialog:
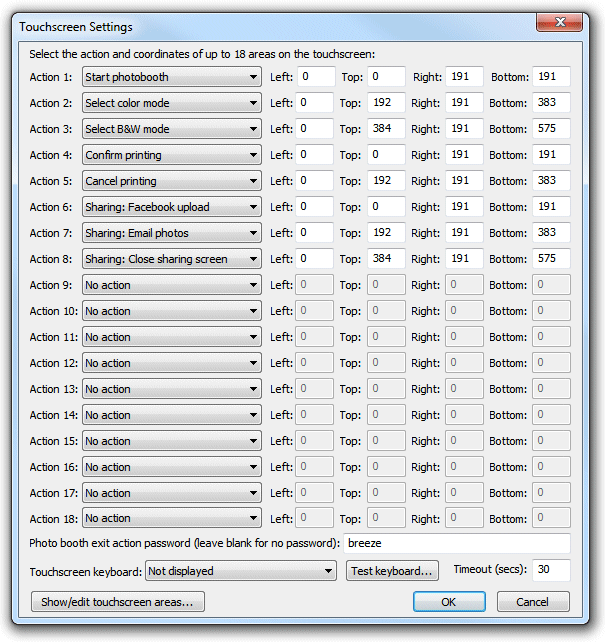
Select the action using the dropdown lists on the left and the area on the touchscreen that activates the action using the corresponding "Left", "Top", "Right" and "Bottom" edit boxes. The values entered in the edit boxes are the screen coordinates in pixels with the origin in the top left corner. The example in the screenshot above defines three sensitive areas on the touchscreen:
| 1. | A square area 300x300 pixels in the top left corner of the screen which starts the photobooth sequence (action is set to "Start") |
| 2. | A smaller rectangular area 300x150 pixels in size located below the first area which selects B&W mode |
| 3. | A second area similar to item 2 which selects color mode |
Touchscreen actions can also be viewed or edited interactively using a mouse by clicking on the "Show/edit touchscreen areas..." button. When the touchscreen action editor is first opened it will display the ready.jpg screen and the touchscreen actions for as boxes with white outlines and green text indicating the action. The action can be moved by clicking in the box and moving the mouse with the left button held down. The size of the box can be adjusted by dragging the corners with the left mouse button held down. Touchscreen actions can be deleted by right clicking on the action and selecting "Delete action" from the menu. New actions added by right clicking the mouse and selecting the "Add action...". Different screens can be displayed by right clicking the mouse and selecting the required screen.
Exit the touchscreen action editor by pressing the escape key or by right clicking the mouse and selecting "Exit" from the menu. If the touchsrceen actions have been modified a confirmation dialog will be displayed asking you if you want to save the changes.
Please note: the touchscreen action editor only edits the positions of the touchscreen actions. It doesn't edit the JPEG screen images which display the graphics for the touchscreen buttons - to do this you need to use an image editor such as Photoshop Elements.
An optional password can be used to protect the "Exit fullscreen photobooth" action by entering the password in the "Photo booth exit action password" field. Many photo booth operators define a secret touchscreen action on the screen to exit photo booth mode which can cause problems if users find it because it will allow them to break out of full screen photo booth mode. Using a password to protect this should prevent problems if users manage to find the secret exit photo booth mode touchscreen action.
An optional touchscreen keyboard can be displayed at the start or end of the photo booth shooting sequence to allow users to enter information such as their email address. This information is stored in the XML file saved after each shooting sequence. Use the dropdown list to select when the touchscreen keyboard should be displayed and the "Test keyboard..." button to test it. The "Timeout (secs):" value allows a timeout for the keyboard to be specified. If the user does not touch the touchscreen before the timeout the touchscreen keyboard will be automatically closed.
Please see the section describing the touchscreen keyboard for more details.
Saving settings for future reference and using profiles
Settings can be saved to file for future reference by pressing the "Save..." button and reloaded by pressing the "Load..." button. This is makes it possible to define a number of different layouts which can be selected before entering fullscreen photobooth mode. Please note that layout depends on the size of the page which is affected by the printer settings. The values saved for one setup may not produce the same results if a different printer is used or the page or resolution settings have changed.
The image download directory specified in preferences is not saved with the photobooth settings, but you can use the tokens {photoboothDir} and {photoboothSubdir} to specify a different output directory for each profile.
{photoboothDir} gives the full path of the photobooth images folder e.g. C:\Photobooth\Layouts\MyLayout
{photoboothSubdir} gives the name of the photobooth subfolder e.g. if the photobooth images folder is C:\Photobooth\Layouts\MyLayout then {photoboothSubdir} would become MyLayout
For example:
strips_profile: outputs standard photobooth strips to the default printer and uses C:\Photobooth\Layouts\strips as its photobooth images dir
cubes_profile: takes four photos with the output set to 'none' and uses C:\Photobooth\Layouts\cubes as its photobooth images dir. Its output directory is then monitored by the Hot Folder Prints utility which formats the images as a photo cube and sends them to a different printer.
To make this work the download directory in preferences could be set to C:\Photobooth\Output\{photoboothSubdir}. This would save images from the strips_profile to C:\Photobooth\Output\strips and the cubes_profile to C:\Photobooth\Output\cubes. The Hot Folder Prints utility could then be setup to monitor the C:\Photobooth\Output\cubes folder for images and print them out automatically when the required number of images are available.
Profiles allow you to use a keyboard shortcut (or touchscreen action) to automatically switch between different sets of saved settings. To assign a profile to a keyboard shortcut click on the "Profiles..." button at the bottom of the photobooth settings dialog to display the following dialog:
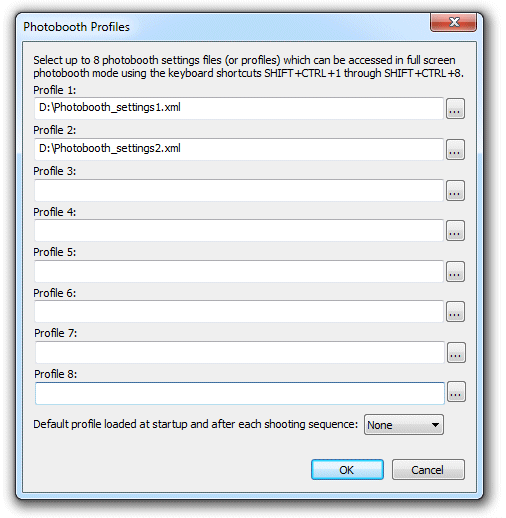
Then click on "..." button for the appropriate profile and select a previously saved set of photobooth settings. In the screenshot above profile 1 (keyboard shortcut SHIFT+CTRL+1) loads the settings file photobooth_settings1.xml and profile 2 (keyboard shortcut SHIFT+CTRL+2) loads the settings file photobooth_settings2.xml. Profiles can be used to allow users to selects different sets of photobooth settings e.g. profile 1 might be a traditional layout of two columns of four images and profile 2 might be a custom layout with one large image and several smaller ones. Profiles can be selected using the touchscreen actions (described above) allowing a user to easily switch between different settings.
The tokens {photoboothDir} and {photoboothSubDir} can be used to specify the pathname of the profile file to be loaded. The tokens are replaced with the value of current photobooth images folder and provide a way to use more than 8 profiles.
The default profile setting can be used to ensure the photobooth starts up in a known state and is reset to a known state at the end of each photobooth shooting sequence e.g. setting the photobooth to stills mode, color photos and one set of prints.
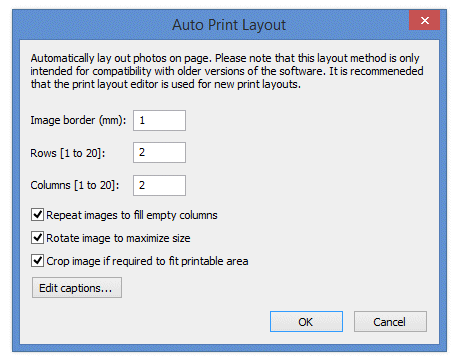
The recommended method for creating a print layout is to use the print layout editor and one of the preset print layouts. The automatic print layout method described below as been retained for compatibility with older versions of NKRemote. The automatic print layout option is used if the "Custom layout" checkbox is not selected and the options can be accessed by clicking on the "Print layout.." button:
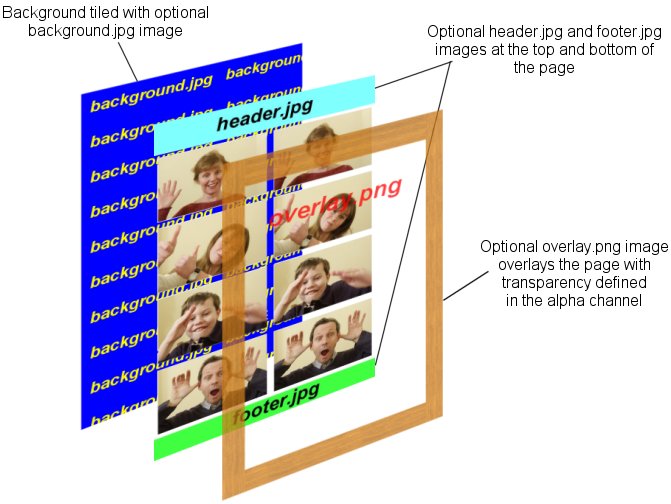
The print can have an optional background with a header and or footer image. When NKRemote prepares the image for printing it looks for the following files in the photo booth images folder:
background.jpg - optional image which is tiled to fill the background of the printed page
header.jpg - optional image which is centered and placed at the top of the page
footer.jpg - optional image which is centered and placed at the bottom of the page
left.jpg - optional image which is centered vertically and placed on the left of the page between the header and footer
right.jpg - optional image which is centered vertically and placed on the right of the page between the header and footer
middle.jpg - optional image which is centered vertically and placed between each column of images
overlay.png - optional image which is overlays the page and uses transparency information stored in the alpha channel
The images are then arranged in a grid which fills the printable area of the page less any space taken up by a header or footer image. If the "Rotate image to maximize size" checkbox is selected the images are rotated through 90 degrees if this would give a larger image. e.g. if the printable area for the image within the grid is 80mm high and 50mm wide and the image was shot in landscape orientation it would be rotated by 90 degrees to better fill the printable area.
If the number of images matches the number of rows the images can be repeated in each column by selecting "Repeat images to fill empty columns". This is useful when printing strips of images on paper from a dye sublimation printer e.g. two copies of 4x1 strips on a sheet of 8x6 paper.
The easiest way to see how this all fits together is to run NKRemote and take some test shots. First setup the printer settings by selecting "Printer Setup..." from the File menu and then set basic photobooth settings using the setup dialog. The take a test sequence by pressing Shift+F4 or selecting "Photobooth Test Shot" from the File menu. This will take a sequence of images and create a test page which is saved as photobooth_test_shot.jpg. Load this image into an image editor (or BreezeBrowser Pro) to view the layout. Then make any changes to the background.jpg, header.jpg, footer.jpg or overlay.png images and the photobooth settings and take more test shots until you're happy with the layout.
Some example layouts using four shots arranged in two columns of four:
|
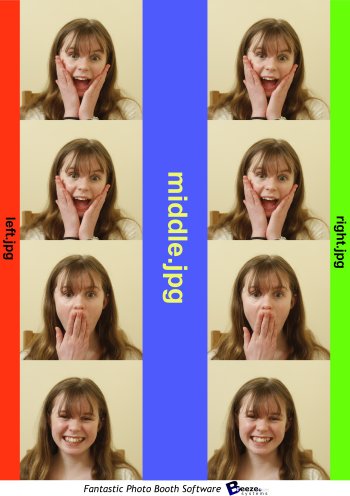
With left.jpg down the left border, middle.jpg placed between the columns, right.jpg down the right border and footer.jpg at the bottom
|
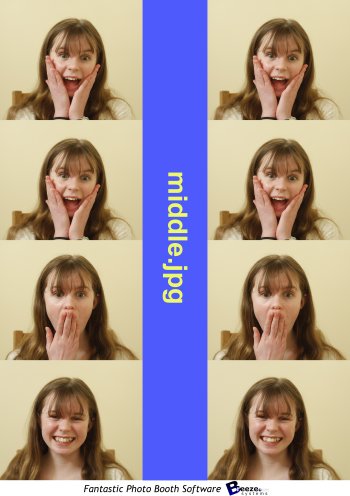
Same layout as the first example but with no left.jpg or right.jpg images defining the left and right borders
|
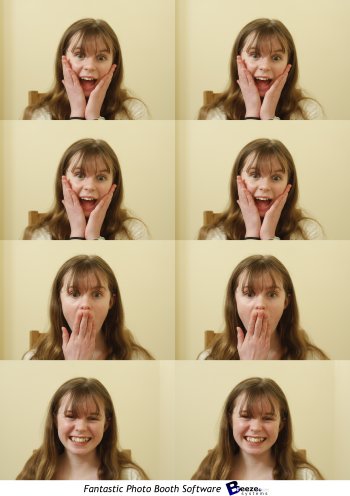
Same layout as the previous example but with no middle.jpg image placed between the columns
|
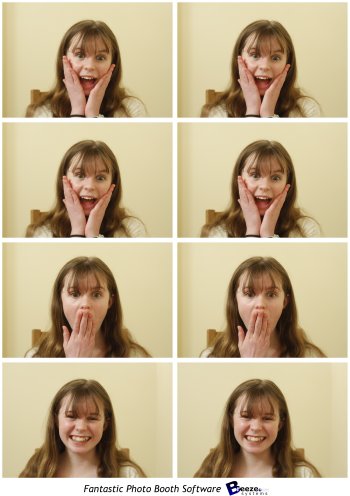
Same layout as the previous example but with a 2mm border around each image
|
A custom layout where the size and position of each photo is specified individually
The images can be sharpened by selecting the "Sharpen images" checkbox and specifying a sharpening amount in the range 0 to 100. The amount of sharpening required depends on personal taste, the camera and the printer. A value of around 75 is a good starting point.
If the "Crop image if required to fit the printable area" checkbox is selected the image will be cropped to fill the printable area within the grid. e.g. if the printable area within the grid is square equal portions of the left and right of the image will be cropped to make it square.
Photos can be printed in color, pure black and white or toned black and white by selecting the appropriate option from the dropdown list headed "Print photos:". You can also switch between these options when the software is running in fullscreen photobooth mode by using the following keyboard shortcuts: Ctrl+C to select color, Ctrl+B to select black and white, Ctrl+T to select toning, Ctrl+W to toggle between color and B&W and W to cycle through color, B&W and toning.
When the "toned" option is selected the hue and saturation settings can be adjusted when the software is running in fullscreen photobooth mode by using the following keyboard shortcuts: Ctrl+cursor left/Ctrl+right to adjust the hue and Ctrl+cursor up/Ctrl+down to adjust the saturation. A status message showing the current settings is briefly displayed in the bottom right hand corner of the display when adjusting the hue and saturation in fullscreen photobooth mode. Setting the B&W toning hue to 200 and the saturation to 40 is a good starting point for sepia toned prints.
Captions
Up to 12 captions can be added by selecting the "Edit captions..." button:
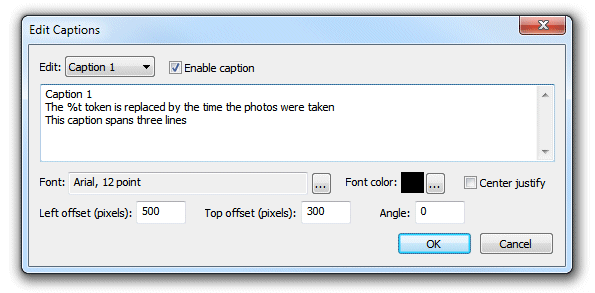
To enable a caption select it from the "Edit:" drop down list. Then check the "Enable caption" checkbox to enable the caption or uncheck it to disable the caption.
Each caption can occupy more than one line if required and is left justified by default. Select the "Center justify" checkbox to center justify multiple lines. The size, font, color and rotation (in degrees clockwise) of the caption text can also be specified. The font size is calculated using the printer resolution and so a 72 point font should give text one inch high (one 'point' is 1/72 of an inch). The caption is printed in the selected font color with a transparent background. Tokens can be used in the caption text to insert values such as %d for the date and %t for the time the sequence started, {comment} for the comments entered in the main screen and {filename} for the filename used for the JPEG copy of the print layout. Please see the section on tokens for a list of tokens available.
Enter the position for the captions as offsets in pixels from the top and the left of the page.
Applying effects to images before printing
You can use the editor command to run a command or script on each image after it has been downloaded. This could be used to run a Photoshop droplet to modify the image. You may need to add a delay to allow time for the droplet to finish before the images are printed. This can be done by setting the following DWORD value in the Windows registry:
HKEY_CURRENT_USER\Software\BreezeSystems\NKRemote\100\PhotoboothDelayBeforePrintingInSecs
The delay can be cut short by typing Ctrl+Z. This is useful if a script is used to post process the images because the delay can be minimized if the script sends Ctrl+Z after processing the images.
Please see the section on "Modifying Photos Before Printing" for more details.
If full screen mode is selected (by pressing F11 or Ctrl+F4 to enter full screen mode and display the ready image) a series of images can be displayed to the user to show them what's happening and to advertise the photobooth. These images are held in the same folder as the background, header and footer images and are as follows:
ready.jpg - image displayed when NKRemote is ready to take the next set of photos
1.jpg, 2.jpg etc. - image displayed before taking the first, second, third etc. images together with the text specified in the setting dialog
taking.jpg - image displayed for approximately 1 sec before taking each shot
processing.jpg - image displayed after taking the photos while NKRemote formats and sends the page to the printer
camera_not_connected.jpg - image displayed when the camera is turned off or disconnected
welcome.jpg - image displayed when the inactivity timer has canceled live view or standby mode has been selected by pressing F6
confirm_printing.jpg - optional background image when displaying print confirmation screen
printing_confirmed.jpg - optional image displayed if user selects printing from the print confirmation screen
keyboard_input_ok.jpg - image displayed if user selects 'ok' from the on screen keyboard after the photos have been taken
keyboard_input_cancel.jpg - image displayed if user selects 'cancel' from the on screen keyboard after the photos have been taken
These images can be JPEGs containing any information you like and are displayed centered on the display with a black background. The images 1.jpg, 2.jpg etc are displayed together with the text defined in the settings dialog which can be used to give a count down timer before each picture. The text is displayed centered on the screen below the live view display, if applicable, as white text on a transparent background. The following tokens can be used in the text:
@imageNumber@ - the number of the image in the sequence starting from 1
@numberOfImages@ - the number of images in the sequence
@secsToNextPhoto@ - the number of seconds until the next photo is taken
The images displayed to the user should be the same size or bigger than the computer's display. If the images are too small they will be expanded to fit with a black border and a small warning message will be displayed in the bottom left corner showing the image size and the display size.
When using live view in photobooth mode the live view images will not be updated while the camera is actually taking each picture. This will cause the live view display to freeze for a couple of seconds and can confuse some users as it shows the live view just before the picture is taken and this will be slightly different from the actual photo. To avoid this problem the live view display will be blanked out when the photo is taken if you define a release.jpg image.
It is also possible to display different screens depending on whether color, black and white or monochrome toned mode is selected and the number of print copies. This provides a way of giving feedback to the user when different settings have been selected.
The way it works is to check for a suffix after the filename for the appropriate screen image in the form <screen>_<b|c|t><1..9>.jpg where <screen> is the name of the screen image e.g. "ready", <b|c|t> is the color mode: "b" for black and white, "c" for color or "t" for monochrome toned and <1..9> is the number of print copies e.g. "1" is one copy is selected.
For example when the ready.jpg image is to be displayed, the color mode is set to black and white and the number of print copies is set to 2 the software will look for a suitable screen image in the following order:
ready_b2.jpg - i.e. "ready" + black and white + 2 copies selected or if this isn't found it looks for:
ready_b.jpg - i.e. "ready" + black and white or if this isn't found it looks for:
ready_2.jpg - i.e. "ready" + 2 copies selected or if this isn't found it looks for:
ready.jpg
So to have screens to indicate the color mode and the number of print copies from 1 to 3 you need the following "ready" screens: ready_c1.jpg, ready_c2.jpg, ready_c3.jpg, ready_b1.jpg, ready_b2.jpg, ready_b3.jpg.
When a setting is changed, e.g. the color mode is set to black and white, the screen image is updated automatically to show the user the current status.
Using movie files to animate screens
Movie files can be displayed on the screens by placing a movie file in MP4 or QuickTime MOV format in the photobooth images folder and giving it the same name as the screen image. For example, to play an MP4 movie file when the ready.jpg screen is displayed the movie file should be named ready.mp4. Movie files can't overlap the live view display and so if live view is active the movie will be displayed in the area below the live view.
Append "_loop" to the filename , e.g. ready_loop.mp4, if you want the movie to automatically restart from the beginning and play continuously.
By default movie files are displayed centered on the screen unless live view is active in which case they are displayed below the live view. Movie files can also be positioned manually by appending the offsets from the left and top of the screen to the filename in the form _{LeftOffset}+{TopOffset} e.g. to position the ready.mp4 movie 200 pixels from the left of the screen and 100 pixels from the top the file should be named ready_200+100.mp4 (or ready_loop_200+100.mp4 if you want it to play continuously). If the movie is larger than the screen it will be automatically scaled to fit the screen.
When a movie is displayed on the countdown screen (e.g. by naming it 1.mp4) it replaces the normal countdown text and is only played once. Approximately 1 second before the end of the movie the taking.jpg screen is displayed and then the photo is taken when the movie reaches the end. There is a sample movie file called countdown.mp4 in the folder where NKRemote is installed. To use this simply copy it to your photobooth images folder and rename it to 1.mp4, 2.mp4 etc.
Important: The delay before taking each photo must be set to 2 secs or more otherwise the countdown movie will not be displayed.
If the MP4 movie file does not play correctly (e.g. portrait orientation MP4 files created using the h.264 CODEC not filling the screen) please try transcoding it to use a different CODEC such as MPEG. This can be done using free tools such as HandBrake.
Audio Prompts
Audio prompts can be added by placing a WAV sound file in the photobooth images folder and giving it the same name as prompt screen. For example to play a sound when the photobooth is ready copy a WAV file named ready.wav into the photobooth images folder and it will be played when the ready.jpg image is displayed. You can also play an audio file when the touchscreen keyboard is displayed by naming it keyboard.wav and placing it in the photobooth images folder.
Note: There is no need to use a WAV file if you are already using a movie file (see above) because movie files can contain both pictures and sound.
The easiest way to see how this works is to try it out. To do this run NKRemote then press Ctrl+F4 to display the ready screen. Then F4 to start the photobooth shooting sequence.
A typical 4 picture sequence would be:
At startup: "ready.jpg" image displayed on screen and "ready.wav" played once (if present)
Sequence started: "1.jpg" image displayed on screen together with countdown text and "1.wav" played once (if present)
Approx 1 sec before taking picture #1: "taking.jpg" image displayed on screen and "taking.wav" played once (if present)
After taking picture #1: preview image displayed for the required number of seconds (if enabled in the settings) then "2.jpg" image displayed on screen together with countdown text and "2.wav" played once (if present)
Approx 1 sec before taking picture #2: "taking.jpg" image displayed on screen and "taking.wav" played once (if present)
After taking picture #2: preview image displayed for the required number of seconds (if enabled in the settings) then "3.jpg" image displayed on screen together with countdown text and "3.wav" played once (if present)
Approx 1 sec before taking picture #3: "taking.jpg" image displayed on screen and "taking.wav" played once (if present)
After taking picture #3: preview image displayed for the required number of seconds (if enabled in the settings) then "4.jpg" image displayed on screen together with countdown text and "4.wav" played once (if present)
Approx 1 sec before taking picture #4: "taking.jpg" image displayed on screen and "taking.wav" played once (if present)
After taking picture #4: preview image displayed for the required number of seconds (if enabled in the settings) then "processing.jpg" image displayed on screen and "processing.wav" played once (if present). During this time the images are formatted ready for output and either saved to file or sent to the printer queue. When this has finished the screen goes back to the "ready.jpg" image and the ready.wav sound file is played ready for the next sequence.
It is also possible to display different screens depending on whether color, black and white or monochrome toned mode is selected and the number of print copies. This makes it possible to show the user which settings have been selected and could be used as part of a touchscreen menu system. The way it works is to check for a suffix after the filename for the appropriate screen image in the form <screen>_<b|c|t><1..9>.jpg where <screen> is the name of the screen image e.g. "ready", <b|c|t> is the color mode: "b" for black and white, "c" for color or "t" for monochrome toned and <1..9> is the number of print copies e.g. "1" is one copy is selected.
For example when the ready.jpg image is to be displayed, the color mode is set to black and white and the number of print copies is set to 2 the software will look for a suitable screen image in the following order:
ready_b2.jpg - i.e. "ready" + black and white + 2 copies selected or if this isn't found it looks for:
ready_b.jpg - i.e. "ready" + black and white or if this isn't found it looks for:
ready_2.jpg - i.e. "ready" + 2 copies selected or if this isn't found it looks for:
ready.jpg
So to have screens to indicate the color mode and the number of print copies from 1 to 3 you need the following "ready" screens: ready_c1.jpg, ready_c2.jpg, ready_c3.jpg, ready_b1.jpg, ready_b2.jpg, ready_b3.jpg.
When a setting is changed, e.g. the color mode is set to black and white, the screen image is updated automatically to show the user the current status.
External commands can be used to customize the way the photobooth works e.g. by emailing images or turning lights on and off. There are three different ways external commands can be run when shooting in full screen photobooth mode:
| 1. | After each photo is downloaded |
| 2. | When the photobooth screen changes during the photobooth shooting sequence |
| 3. | When the XML summary file is written after the photobooth output has been printed or saved |
Running commands after downloading each photo
You can use the editor command to run a command or script on each image after it has been downloaded. This could be used to run a Photoshop droplet to modify the image. You may need to add a delay to allow time for the droplet to finish before the images are printed. This can be done by setting the following value in the Windows registry:
HKEY_CURRENT_USER\Software\BreezeSystems\NKRemote\100\PhotoboothDelayBeforePrintingInSecs
Running commands when the photobooth screen changes
This allows a command to be run each time the photobooth screen changes during the photobooth shooting sequence. The full pathname of the screen image is passed as a command line argument to the command e.g. C:\Program Files\BreezeSys\NKRemote\PhotoboothImages\ready.jpg. To enable this two values need to be stored in the Windows registry: PhotoboothStatusCmdEnable and PhotoboothStatusCmd (see below for details).
Running a command when the XML summary file is written
This allows a command to be run after the photobooth output has been saved or printed and the XML summary file has been written. The full pathname of the XML summary file is passed as a command line argument to the command. To enable this two values need to be stored in the Windows registry: PhotoboothStatusCmdEnable and PhotoboothStatusCmdXML (see below for details).
Windows registry settings
To enable the photobooth screen change or XML summary file commands the following REG_DWORD value in the Windows registry should be set to 1:
HKEY_CURRENT_USER\Software\BreezeSystems\NKRemote\100\PhotoboothStatusCmdEnable
The photobooth screen change command is defined using the following REG_SZ value:
HKEY_CURRENT_USER\Software\BreezeSystems\NKRemote\100\PhotoboothStatusCmd
The XML summary file command is defined using the following REG_SZ value:
HKEY_CURRENT_USER\Software\BreezeSystems\NKRemote\100\PhotoboothStatusCmdXML
Enter an empty string or delete the registry value for PhotoboothStatusCmd or PhotoboothStatusCmdXML if you want to run one command but not the other. The values can be edited using the Windows regedit utility or by creating a registry file like the one below, giving it a .reg file extension and then double clicking on the file in Windows Explorer to copy the settings to the registry:
Windows Registry Editor Version 5.00
[HKEY_CURRENT_USER\Software\BreezeSystems\NKRemote\100]
"PhotoboothStatusCmdEnable"=dword:00000001
"PhotoboothStatusCmd"="C:\\Program Files\\BreezeSys\\NKRemote\\PhotoboothImages\\status.exe"
"PhotoboothStatusCmdXML"="C:\\Program Files\\BreezeSys\\NKRemote\\PhotoboothImages\\statusXML.exe"