This note provides guidance for moving a photo booth running DSLR Remote Pro to a new computer.
- The transfer is much easier if both old and new screens are the same size (in pixels).
- If your booth was set up by a third party such as a booth vendor or previous owner, you may need their help to understand the way the program has been customized before you can duplicate the setup on a new machine.
- The new computer must have an Intel processor. ARM processors are not supported.
As well as installing DSLR Remote Pro and printer drivers on the new computer, you need to copy across your program (registry) settings and assets (screen designs, print layouts etc & any profiles).
DSLR Remote Pro’s flexibility allows it to be set up in many ways; it is not practical to cover every option here.
Most users will need to:-
- Install DSLR Remote Pro and any printer drivers on the new computer
- Deactivate DSLR Remote Pro from the old computer
- Register and activate DSLR Remote Pro on the new computer
- Copy the program (registry) and other settings into DSLR Remote Pro on the new computer
- Move your existing events to the new computer and adjust them if necessary
- Test everything thoroughly before your next event
You may also need to copy across profile information, event data (event name, event strings etc) and background removal data.
Make sure you are clear what you need to transfer
- Deactivating DLSR Remote Pro from the old machine and activating it on the replacement
- Which version of DSLR Remote Pro and any printer driver to use
- DSLR Remote Pro Program folder content (if customized)
- Registry settings
- Event folder path names
- Changes in screen size
- DropBox accounts (if used)
Deactivate the DSLR Remote Pro license from the old computer
Unless you are running a very old version of the program ( predating v3.0) DSLR Remote Pro must be deactivated before moving the license to a replacement computer, even if you plan to clone the hard disk.
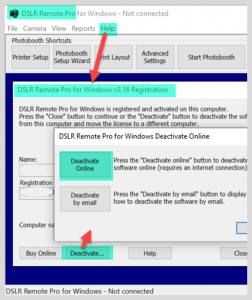
If the program is activated when it is copied to a new machine, it may stop working without warning.
Which version to use
- The version of DSLR Remote Pro on the new machine must be the same or newer than the version on the old machine
- Download and install the version you need from here
DSLR Remote Pro Program folders
DSLR Remote Pro program folders are usually stored at C:\Program Files (x86)\BreezeSys\DSLR Remote Pro when the app is downloaded.
Most users do not change the content of these folders. When you download and install DSLR Remote Pro on the new computer, they are created automatically.
If you have made changes to the DSLR Remote Pro program folders, you may want to make the same changes to the new program folders.
Don’t confuse Program folders with PhotoboothImage folders containing your screen backgrounds etc, which are usually stored in C:\Users\…\Documents\PhotoboothImages (See below)
Registry settings
Breeze Windows apps save program settings in a Windows registry file. Data saved in the registry includes the location of the PhotoboothImages folder, email and Twilio account details, passwords and other data which controls the behaviour of the program.
DSLR Remote Pro’s registry export tool writes these registry settings to a .reg file. This can be copied back into DSLR Remote Pro on the same or a different computer.
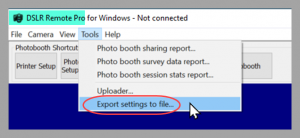
Breeze DSLR Remote Pro Registry Export tool
To copy registry settings back into DSLR Remote Pro on the same or a different PC, double click on the registry settings file in Windows Explorer.
Important
- The .reg file contains sensitive information such as email passwords and Twilio account details – keep it secure.
- Doubling clicking on the .reg file to copy the settings back to the Windows registry will overwrite the current settings and cannot be undone.
- Program settings saved in the DSLR Remote Pro .reg file do not include the following items, which need to be copied separately
- event data such as event strings
- background removal account details/settings
- screen images and other files in the photo booth images folder
PhotoboothImages and other event folders
DSLR Remote Pro stores your assets (screen designs, profiles etc) outside the program. They need to be copied to the new computer to run your existing designs.
Screen assets including backgrounds, overlays, GIFs etc are kept in PhotoboothImages folders
This guide assumes that
- All assets (screens, profiles etc) are stored in Documents/PhotoboothImages folder
- The program uses absolute paths* on both machines.
- The same absolute paths can be used on the new computer
*The absolute path name of a PhotoboothImages folder might be
C:\Users\sue\Documents\PhotoboothImages\Standard Wedding Event
More technical users can and do move copies of DSLR Remote Pro which use relative paths, but this is beyond the scope of this guide.
To make sure you have the same folder names on the new computer
- Use the same user name (when logging into the computer) on both machines
- Use the same letter for relevant disk drives
- Dropbox users should use the same Dropbox account on both machines
Copy your Documents/PhotoboothImages folder (and all subfolders) to the new computer.
Screen sizes
The move will be much simpler if the new screen is the same size in pixels as the old screen.
Surface Pro users : please note that newer models may have higher resolution screens (more pixels) than older models.
Unless screens on old and new booths are the same size
- Screen backgrounds and overlays need to be resized
- Touch screen actions need adjusting to fit the new screen
- MP4 and GIF images may need to be resized
‘Same size’ generally means same size in pixels.
What happens when the new booth’s screen is not the same size as the old screen?
- Moving to higher resolution screen : old screen image are seen towards top & left of new screen
- Moving to a lower resolution screen: some of right and lower parts of old screen designs don’t appear
- New screen has a different aspect ratio: combination of above
What to do when the new and old screens are different sizes
- Replace assets ( backgrounds, overlays etc) with new versions which are the correct size for the new screen
- Edit touch screen actions to match your new screens
- If you have a simple screen design, it may be faster to generate a fresh set of screens (complete with actions) by running the Photobooth Setup Wizard on the new computer. More
Learn how to adjust touch screen actions here
DropBox account (when used)
DropBox users should use the same Dropbox account on both machines
Printer drivers
Take care to install the correct printer driver on new machine.
If your printer appears ‘different’ from your old computer to Windows, it may not be recognised as the same printer. If this happens different printer profiles may no longer work. You may need to reset the printer in each profile.
Those not using profiles should
- Open Printer Setup and update the printer settings if needed
- Open the Print Layout Editor, check the template looks correct and update the layout if necessary
Profile users need to load each profile in turn. For each profile
- Open the Print Layout Editor
- Check the Printer Setup
- Make any adjustments needed to printer settings and/or print template
- Save the updated profile
© Breeze Systems 2022