Before guests send any emails you need to add your email account details to the program.
This tutorial explains how to add email account details to
Most screenshots below use DSLR Remote Pro 3.15.4.
Adding email account details to Kiosk, Webcam Photobooth, and Hub is very similar. You can find screenshots from each of these apps at the end of this tutorial.
Where to add your email account details
Before guests send any emails you need to set up the email server settings.
Start the program, and go to the Email Server Settings sreen
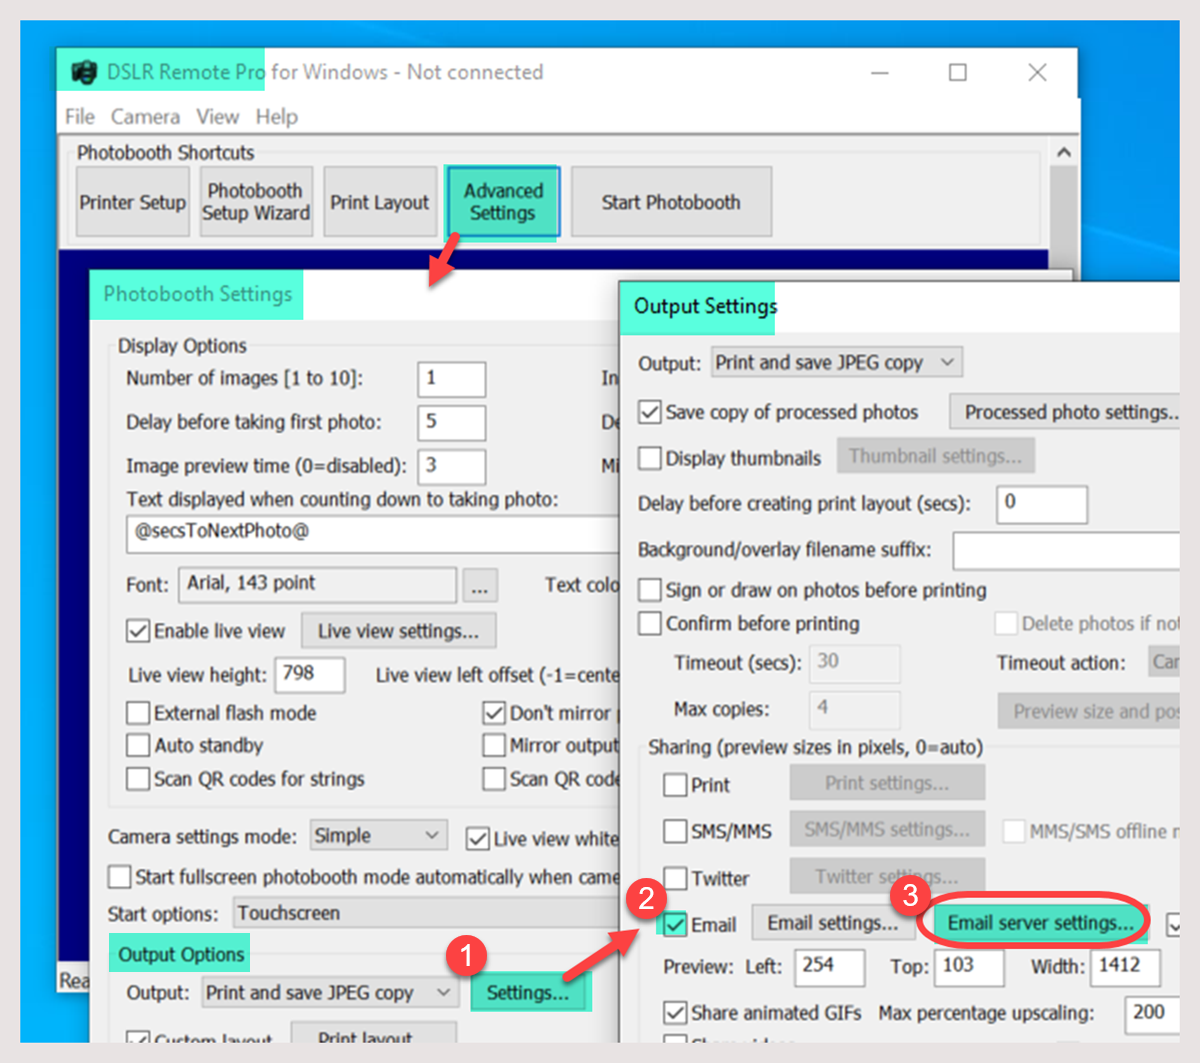
DSLR Remote Pro 3.15.4: Go to the Output Options Settings (1) and check Email (2). You can then select Email Server Settings.. button (3)
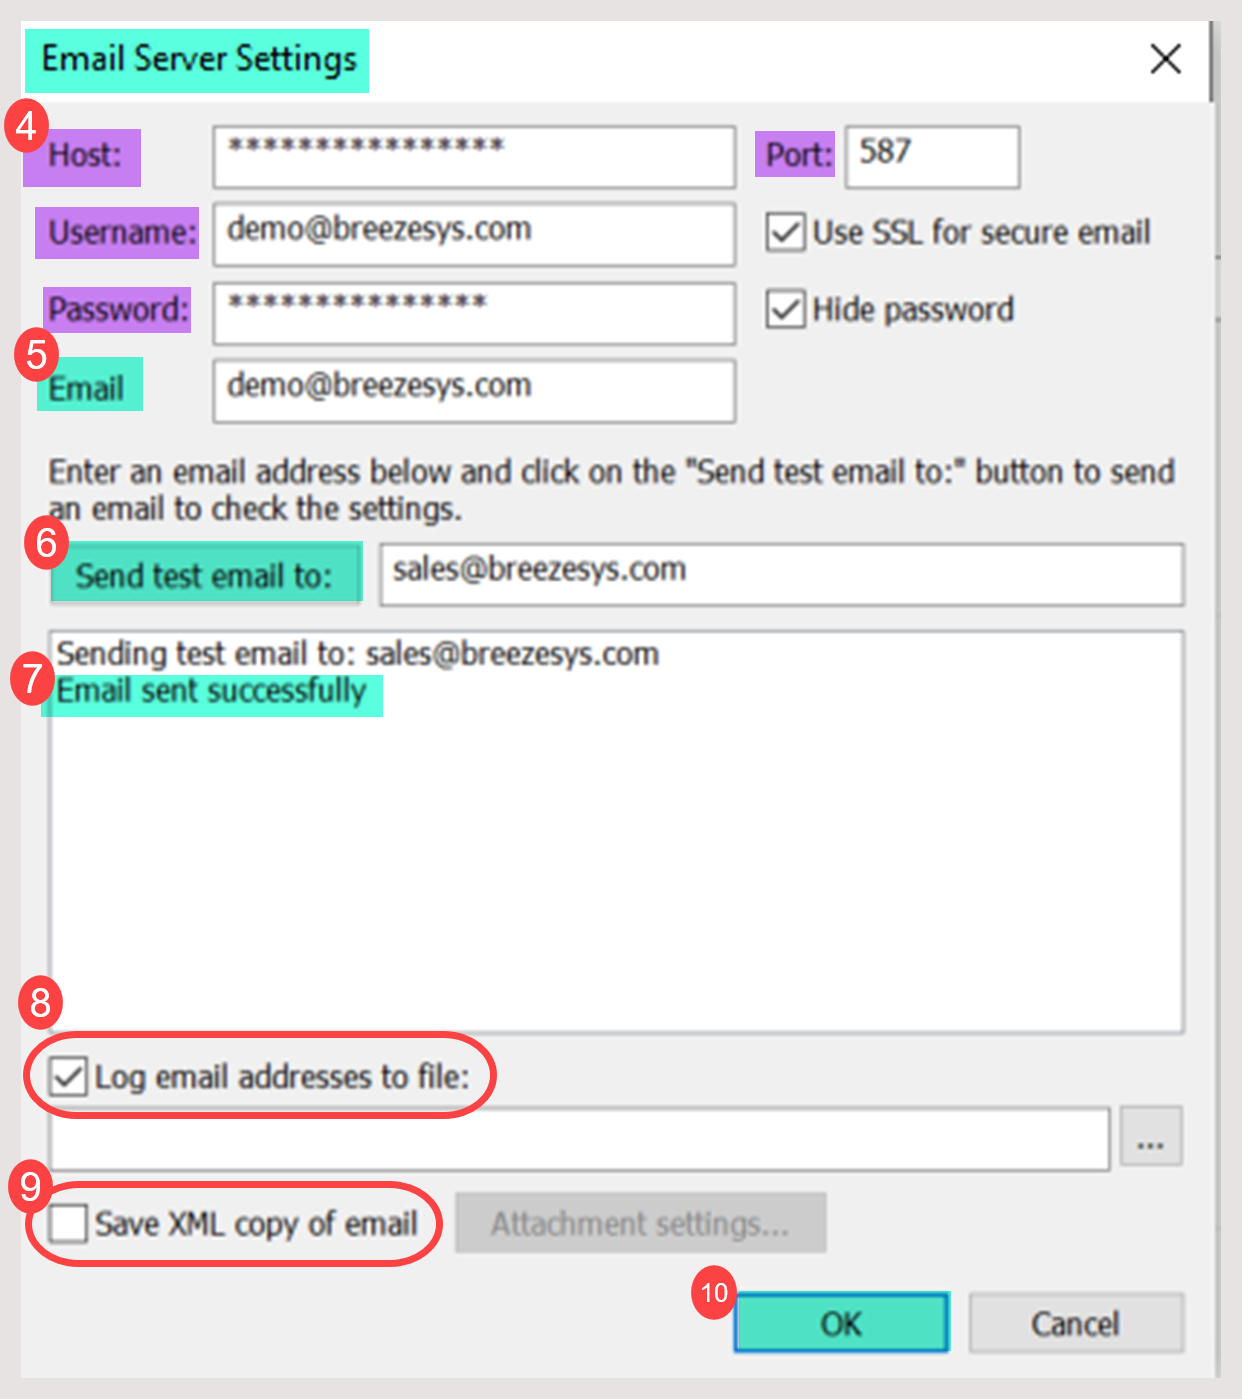
Entering account details into the Email Server Setting Screen
The values of Host, Username, Password, Email and Port (4) you enter on the Email Server Settings screen are specific to your email provider.
To send an email you have to enter the host name and port number of your email server. Most email servers also require a username and a password. We recommend checking Use SSL for secure email for additional security.
Be aware that
- The port number is usually 587 when using SSL secure email or 25 otherwise (but check the port numbers used by your ISP).
- Emails look more professional when sent from your own domain.
- Most free email services require the sender’s email address to the be the same as the email account specified by the username and password.
- Gmail users now need to ‘authenticate’ ie approve third party applications which send emails from their gmail accounts. More
- Transport Layer Security (TLS): A growing number of ISPs require TLS version 1.2, which is not supported in older versions of some Breeze apps. More
Email Server Settings Screen DSLR Remote Pro 3.15.4 & Kiosk 2.0
Including your name with the email address
(5) To include the name of the sender with the email address enter the name followed by the email address enclosed in angle brackets e.g. Sue’s Blog <demo@breezesys.com>.
Check everything works and save your settings
Before you move on, check everything works by sending a test email to your own email address (6). DSLR Remote Pro displays Email sent successfully (7) when this message has been sent. Check that you receive the test email.
Save your settings
- Remember to click OK to save your settings as you leave each screen.
- Close the program to ensure your settings are saved for future use.
Useful to know (Kiosk and older versions of DSLR Remote Pro)
DSLR Remote Pro 3.16 and later releases automatically send emails and texts in the background, log email addresses and cell phone number and provide sharing statistics. More
To collect guest email addresses in Kiosk and older versions of DLSR Remote Pro:
(8) To collect email addresses used by guests check Log email addresses to file
Send emails in the background to reduce waiting time
(9) You can use Breeze Hub* to share emails in the background, instead of directly from DSLR Remote Pro, Kiosk and Webcam Photobooth. Save XML copy of email must be checked for this to work. Check Offline email mode also or each email will be sent both from the photo booth app and Hub. Where the event internet is poor, Hub can send outstanding emails after the event More..
Remember to click OK (10) to save your settings as you leave this screen.
Kiosk, Webcam Photobooth and Hub
These screenshots have extra detail about adding your email account details to Kiosk, Webcam Photobooth and Hub
Kiosk
To get to the Email server settings screen in Kiosk, go to the General Settings tab
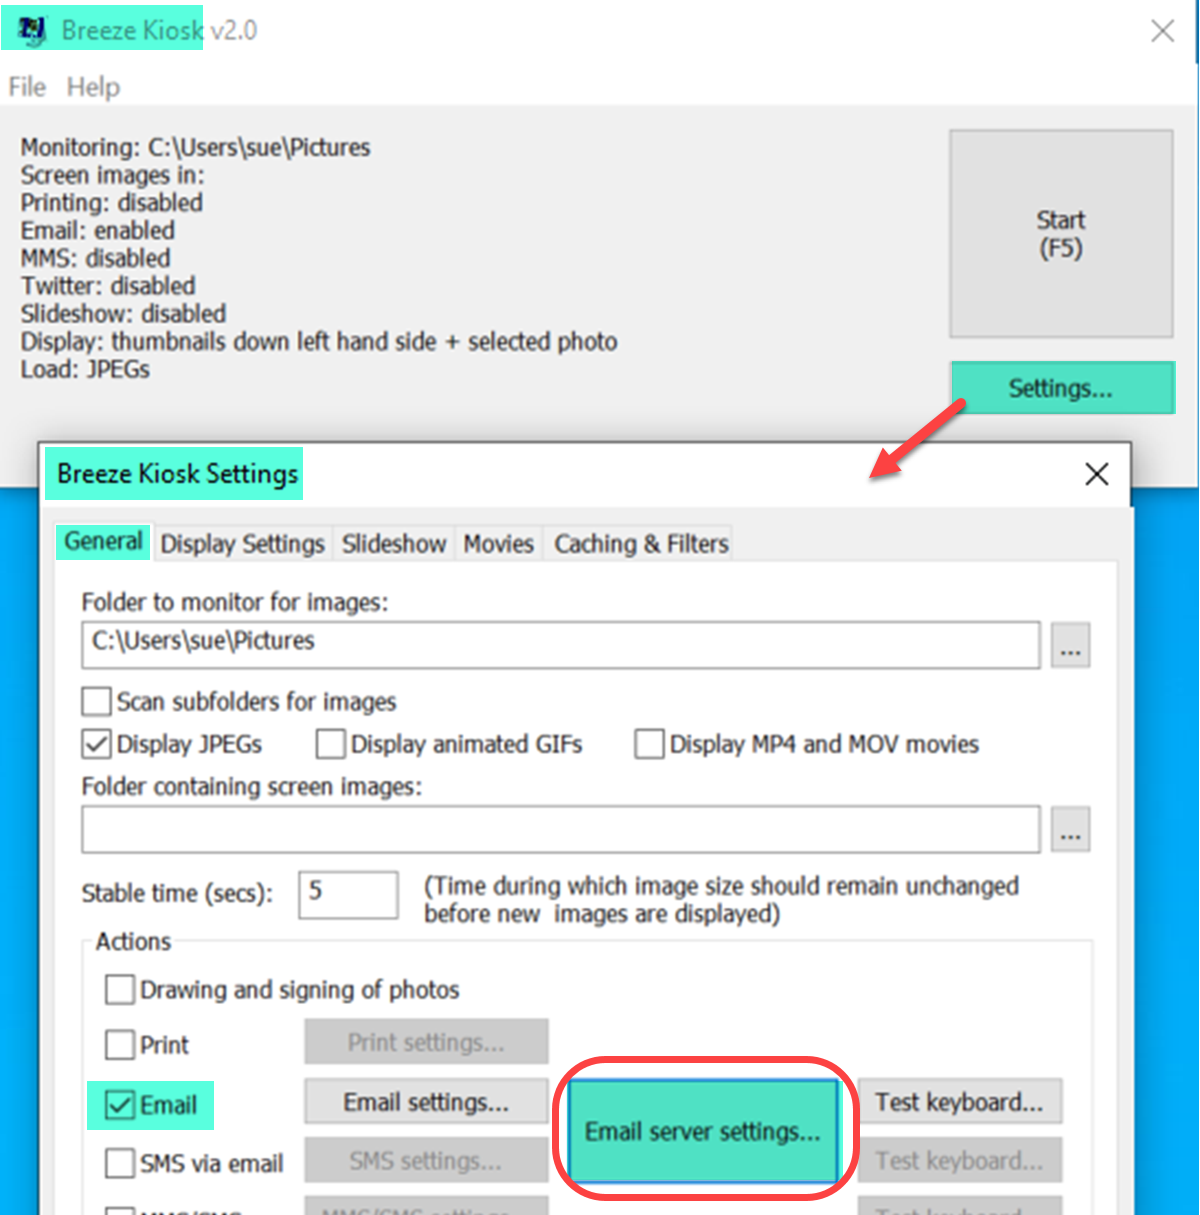
Breeze Kiosk Email Server Settings button (Kiosk 2.0)
Webcam Photobooth
In Webcam Photobooth the Email server settings screen is reached from the Output tab:
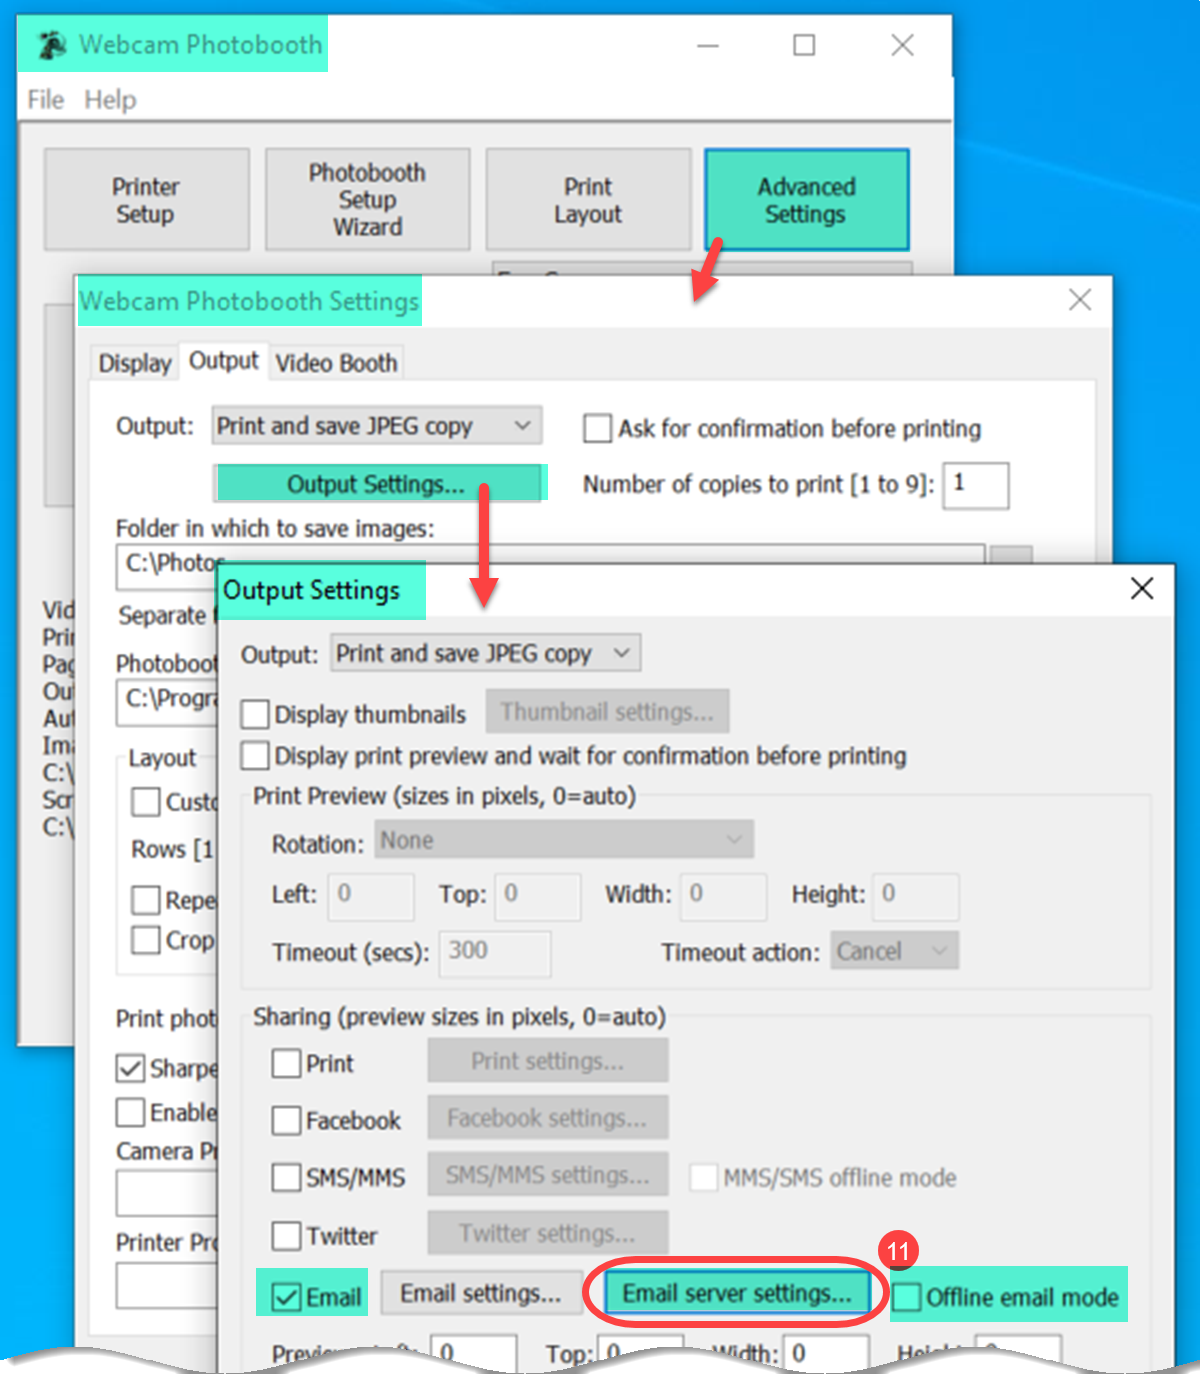
Breeze Webcam Photobooth Email Server Settings button (Webcam Photobooth 2.5.1)
If the Internet connection at an event is flaky or non-existent save the email details and send them later. Check (11) Offline email mode as well as Log email addresses to file (8) above.
*Hub
Hub can share emails and texts sent from Breeze Booth (DSLR+Windows) aka DSLR Remote Pro, Breeze Booth (iPad+ iPhone), Breeze Booth (Webcam +Windows) and Kiosk. Hub is free for all Breeze customers to use with our software. Emails shared by Hub use the email account details held in Hub (not those stored in the photo booth or Kiosk App).
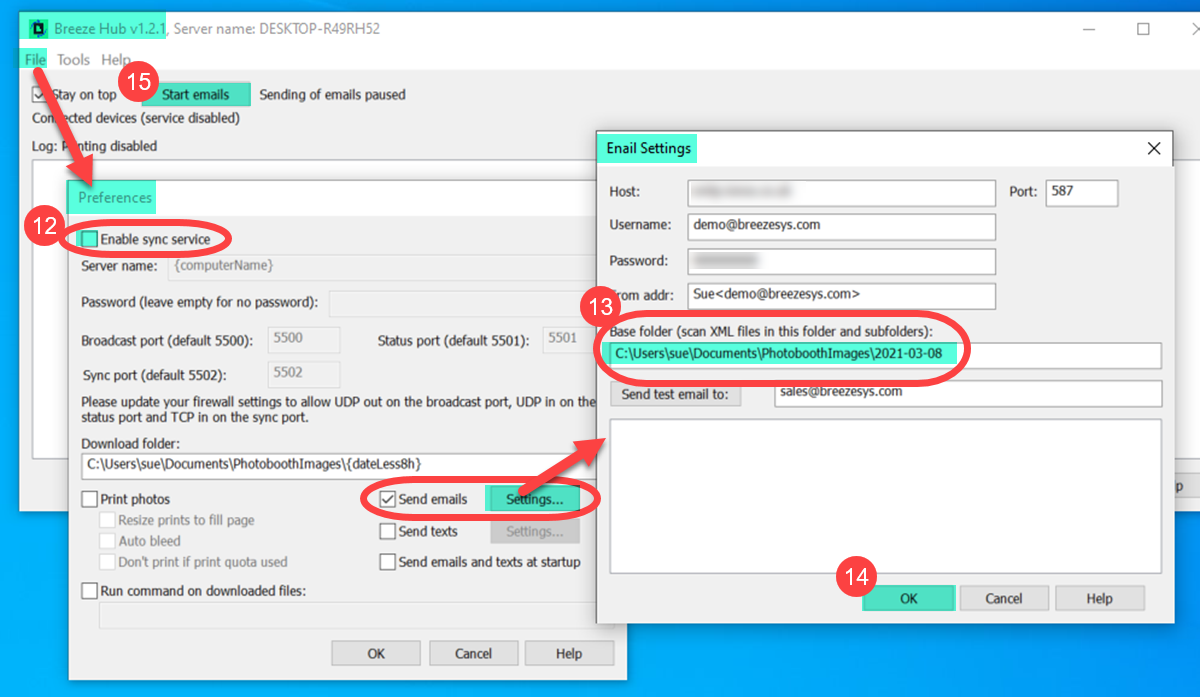
To add your email account details to Hub, select File then Preferences.
Setting up Breeze Hub to share emails in the background from Booth (DSLR + Windows) aka DSLR Remote Pro and Kiosk
Useful to know
- Enable sync service should remain unchecked (12) unless Hub is processing images from BreezeBooth for iPad
- Hub will search the Base folder (13) and its subfolders for the XML copies of emails sent by guests. (For DSLR Remote Pro users this is usually the folder where photos and movies are saved.)
- Remember to click OK (14) to save your settings as you leave this screen and the Preferences screen.
- Close Hub to ensure your settings are saved for future use. When you are ready to start sending emails, restart Hub and click on (15) Start emails.
Summary
Before sending emails from Breeze programs you need to set up the email server settings. I have shown how and where to add these to Breeze Booth (DSLR + Windows) aka DSLR Remote Pro, Webcam Photobooth and Hub.
© Breeze Systems 2022