Introduction to video booths
This tutorial Video Booth Basics is an introduction to running a video booth powered by DSLR Remote Pro, and covers
- Equipment
- Getting started
- Customizing your setup
- Video Booth Settings Window
- Camera settings
- Video guest books
- Hints and troubleshooting
- Live view
- Video playback screen
- Video duration and download time
- Sharing your videos
- Reliability issues and camera connection problems
- Software hangs when downloading to a PC
- Mirrors and shooting in portrait
- Video settings shortcut button
The second tutorial Post processing Videos covers
- Video processing screens
- Boomerangs, loops and playback speed
- Cropping to square and other formats
- Resizing for efficient sharing
- Branding & Presentation: Overlay, Intro, Outro, Sound track and Audio
- Video effects: Speed ramps, jump cuts, combining effects
- Slow motion
- Speeding up post processing time
- Hints and troubleshooting
- Cropped videos & live view
- Saving both original and final videos
- Screen names
- Error log
- Anti virus issues
Equipment
What do I need in addition to DSLR Remote Pro?
- Powerful Windows PC/laptop* , especially when post processing videos
- Camera: all except very old cameras supported by DSLR Remote Pro support video.
- Capturing sound: we recommend cameras which support an external microphone
- Slow motion: we recommend cameras which capture 180fps or 120fps video**
- 360 spinners: consider a small camera with wireless video capability*** so the PC does not need to be mounted on the spinner
- Continuous lighting
- External microphone if capturing sound
- Memory card with plenty of free space in camera
- Good quality USB cable and camera power supply.
* We recommend a fast, recent computer with a quad core, i5 or i7 processor and SSD to process videos quickly. The main factors are the speed of the processor, number of cores and the computer’s storage. Increasing the amount of RAM above 4 or 8GB will have little or no effect on the processing speed. More..
** Canon’s EOS R6 Mark II captures both 180fps and 120fps video. Other models which capture 120fps video include Canon EOS R100, R10, R7, R6, R5, M50 Mark II, M50, M6 Mark II, M200, Canon PowerShot G5X Mark II and G7 Mark III at the time of writing (June 2023)
*** Models with wireless video capability include Canon EOS R5, R6 Mark II, R6, R7, R10, R, RP, M50 Mark II, M50, M6 Mark II, 77D, 80D, 850D, 800D, 250D at the time of writing (February 2023). Older models and the Rebel T7/T6/T5/T3 aka EOS 2000D/1300D/1200D etc do not support wireless video capability.
Getting started
The simplest way to get started is to run the Photobooth Setup Wizard, choosing either Video only or Photos or video at Step 2.
You may want to tailor video related captions to your events.
Customizing your setup
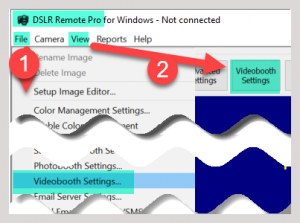
(1) Select File then Videobooth settings… or (2) add a Shortcut button to control video settings.
This takes you to the Video settings window, where you can customize videos and burst GIFs.
Video Settings Window
(1) Enable video in photobooth mode must be checked when capturing video. This is flag is set automatically when you choose video in the setup wizard.
Use this screen to adjust the (2) video duration, (3) countdown and screens related to video capture and playback.
You also get to (4) video post processing and (5) burst GIF settings from here.
There is a useful shortcut to the (6) Advanced Photobooth Settings window. Adjustments to the live view display are made here (see below). Photobooth Settings also displays the current Photobooth images folder. Profiles and Touchscreen settings are accessed from here for video and burst GIFS as well as still photos.
For a more detailed description of video settings see the online manual.
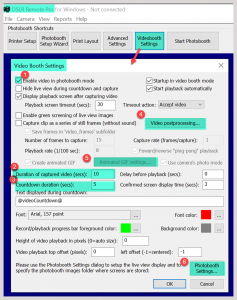
Video Booth Settings window (DSLR Remote Pro 3.17)
Camera settings
Videos use large quantity of data, which can be slow to transfer and process. Photo booths are designed to be fun and have a fast turnaround. You need to balance fast results with video quality.
First set the camera dial to video mode and choose the video size, frame rate and system in the camera’s video settings. Before starting the photo booth session, you must switch the camera to photo mode.
Setting video size, frame rate and system
Switch the camera dial to video mode
Video size/image quality
We suggest starting with Canon’s HD quality ie 720p.
Frame rate
- We suggest a frame rate of 30 or 60 fps ( frames per second), except when running slow motion
- For slow motion, we recommend capturing at High Frame Rate 180 fps or 120fps, which are both automatically played back in slow motion at 30fps. NB High frame rate shooting does not capture sound.
The lower frame rate of 30 fps produces smaller files, which are downloaded more quickly and faster to post process.
Video system
For slow motion choose NTSC (not PAL)
Setting the camera dial to photo mode
Now switch the camera dial to photo mode
- Cameras with movie mode on the exposure mode dial should be set to P, Tv, Av or M.
- Cameras that have a power switch with OFF, ON and MOVIE settings should be set to ON.
- Cameras with a photo/movie switch should be set to the photo setting.
Video guest books
When running a Video guest book, choose a fairly long video duration and add a stop action, so that guests can stop the recording when they finish. You may may also like to edit the on screen captions in the setup wizard as above.
For good quality audio, use an external microphone, and a camera which supports an external microphone. Set the camera to HD. (High frame rate shooting does not capture sound.)
Note: audio messages are only recorded and played back when the video is played forwards and playback speed is one.
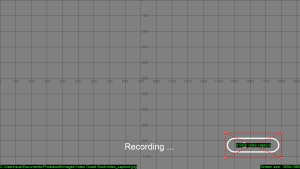
Adding a stop action Stop video capture to the video capture screen video_capture.jpg in DLSR Remote Pro. More details
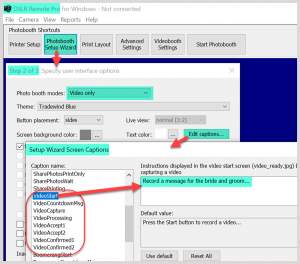
Editing captions in the Photobooth Setup Wizard DSLR Remote Pro 3.17
Post processing and slow motion
Videos can be post processed to boomerang forwards and backwards, speed up and slow down, introduce jump cuts and other creative effects. You can also add intro and outro videos, overlay and sound to videos. You can also resize videos to make them more manageable.
Post processing and slow motion videos are covered in the VideoBooth Post Processing tutorial.
Hints & troubleshooting
This section has more information about
- Live view
- Video playback screen
- Video duration and download time
- Sharing your videos
- Reliability issues and camera connection problems
- Software hangs when downloading to a PC
- Mirrors and shooting in portrait
- Video settings shortcut button
Live view
Live view is shared with stills photo booth mode. Sometimes the video live view set up by the wizard hides part of the caption or buttons.
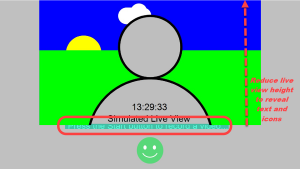
Live view partly covering video booth captions
Adjust the live view height to correct this.
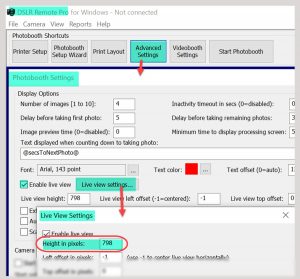
Adjusting the height of live view image (Breeze DSLR Remote Pro 3.17)
Save your settings and run the booth to check the captions and icons are clear.
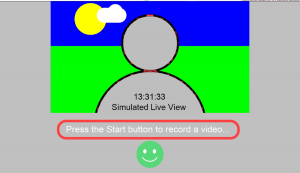
Here the height of the live view has been reduced, and captions can be seen clearly (DSLR Remote Pro 3.17)
Video playback size
The height of the video playback image may also need to be adjusted. Change this in the Video Booth Settings window.
When DSLR Remote Pro chooses the height of video played back to guests, Height of video playback… is set to zero. Override this by setting Height of video playback… to your chosen height in pixels.
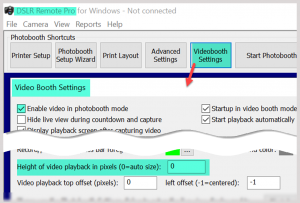
The program sets the size of the video displayed on screen when Height of video playback… is set to zero. To override this, enter your chosen video height in pixels.
Video duration and download time
- Long video clips take more time to download to the PC than shorter clips. Expect a 6 second capture from a Canon EOS R100 or EOS M50 camera set to 720p and HD (60fps) to take about 3 secs to download via USB cable. A 10 second capture might take 5 seconds to download etc
- Wired download via a USB cable is generally faster than wireless download.
- Download time is also affected by the frame rate and image quality.
Sharing your videos
Videos downloaded from your camera probably need to be resized (made smaller) before they are shared. This is done in video post processing by cropping the height and width of the video.
DSLR Remote Pro shares videos as attachments. You can include a preview of the video in the body of your email. More
Reliability issues and camera connection problems
Shooting video causes more stress to equipment than shooting still photos. High quality USB cables and power supplies are especially important to avoid reliability problems.
More on trouble shooting camera connection problems
Software hangs when downloading to a PC
If the camera’s memory card is full the software will attempt to capture the video but stall when it tries to download it to the PC. To avoid this problem please make sure there is plenty of free space on the memory card.
Mirrors and Shooting video in portrait
Videos shot in portrait may be captured in landscape. This can be fixed by rotating the video during post processing. More about shooting in portrait.
Adding a Video settings shortcut button
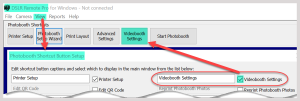
The videobooth settings shortcut button is useful when working on videos and burst GIFs (Breeze DSLR Remote Pro 3.17)
Online manual
You can also find detailed instructions in the online manual
Summary
This tutorial explained the basics of setting up a video booth in DSLR Remote Pro. We looked at equipment, using the wizard to build a working booth, camera settings, video guest books, plus hints and troubleshooting. Slow motion and post processing videos will be covered in a future tutorial.
© Breeze Systems 2023