Which Windows platforms do you support?
All our Windows apps are supported on Intel processors running running Windows 11 and Windows 10 (not Windows 11 S or 10 S). ARM/SQ1/SQ2 processors are not supported.
I just ordered an upgrade license. How soon will I get the new registration?
We have automated the process of issuing upgrade licenses – generally you should receive your new registration in minutes instead of hours, providing
-
existing name and code are entered correctly
-
same email address is used as the original license
-
comment field is empty
-
the existing license is still valid – ie has not already been upgraded, refunded, cancelled etc
There are a few exceptions & Multi-Camera orders are always processed manually.
Processed manually means we check the order before issuing the new registration. This is almost always done within 12 hours of your payment being accepted, but occasionally at weekends and UK Public Holidays it takes a little longer. Very occasionally at weekends and UK Public Holidays we take a break and orders are not processed until the next working day.
Can I use my license on more than one computer?
No. Each Breeze Windows software license is a single user non-transferable license which can be installed on one computer at a time.
The full End User License Agreement for using our software can be found here. The End User License Agreement is also displayed when installing the software, and you can find it in the installation folder for each application.
Fixed installations – whose name needs to be on the license and registration?
If you offer fixed installation booths with a copy of Breeze software decide who will own it before buying the license. If you are renting out a booth with Breeze software (and may take it back if the agreement ends) then buy the license in your own name. If you are selling the booth with software, the license must be purchased in the end customer’s name.
Buying a booth/other equipment with Breeze software installed (Windows based software)
Occasionally customers tell us they have been sold equipment with Breeze licenses issued in someone else’s name, usually the name of the person or business selling the equipment. Breeze licenses are only valid if they are issued in your name. If you use a license issued to someone else it may stop working without warning.
If your copy of Breeze software is obtained via a third party, please be aware that
- All Breeze software licenses are single user, non-transferable licenses
- Each license allows the license owner to install the program on one computer
- Licenses and registrations for valid copies of the software are issued in the End User’s name, not the name of the vendor
- Breeze have no special agreements allowing photo booth vendors to sell licenses in their own name
- Breeze have no special agreements allowing photo booth vendors to sell one license/registration to several people
A copy of the End User License Agreement for using our software can be found here. The End User License Agreement is also displayed when installing the software, and you can find it in the installation folder for each application.
If you buy equipment from a third party which includes Breeze software we suggest you check the registration details. If you are at all concerned that the license may not be valid for you to use, email sales@breezesys.com straight away. Include the registration name and code, and if possible a copy of your order/receipt. (Do not include any confidential information such as your credit card details.)
To check your registration start the program, click on “Help” then “Register”.
HEIC/HEIF images
BreezeBrowser Pro 1.12.1 introduced support for displaying HEIC/HEIF images from iPhones, iPads and other mobile devices
HDR PQ (HEIF) images
March 2021: We don’t have plans to support 10 bit HDR PQ (HEIF) images at present.
Program icon shows on toolbar but can’t see the program
You have opened a Breeze program and can see the icon in the toolbar across the bottom of your screen, but the program is nowhere to be found.
Hold down the SHIFT key and right click on the program icon. This should display a pop up menu. Select Move then move the Left or Right arrows until the program appears.
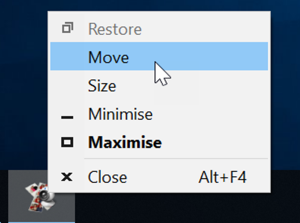
Note: This Windows glitch can happen if you attach an extra screen to the PC and then remove it.
 Windows Companion Apps